1. Produk Langkungview
The Salus 091FLRFv2 is a wireless digital thermostat designed for controlling heating and cooling systems. It features a weekly programming function, a clear LCD display, and a reliable 868 MHz radio frequency for communication between the thermostat unit and its receiver. This device is factory-paired for ease of installation.

Image 1.1: The Salus 091FLRFv2 Wireless Digital Thermostat (left) and its receiver (right).
2. Émbaran Kasalametan
- Baca sagala parentah taliti saméméh instalasi tur operasi.
- Pamasangan kedah dilakukeun ku tukang listrik atanapi insinyur pemanasan anu mumpuni.
- Ensure the main power supply to the heating system is disconnected before installing or servicing the receiver unit.
- Do not expose the thermostat or receiver to water or excessive humidity.
- Jauhkeun tina jangkauan barudak.
- Buang batré anu dipaké sacara tanggung jawab nurutkeun peraturan lokal.
3. Komponén Kaasup
pakét ngandung item handap:
- Salus 091FLRFv2 Wireless Digital Thermostat Unit
- Salus 091FLRFv2 Receiver Unit
- 2 x AA Alkaline Batteries (for Thermostat)
- Instruksi Manual
4. Spésifikasi Téknis
| Fitur | Spésifikasi |
|---|---|
| Catu Daya Termostat | 2 x Batré Alkali AA |
| Panarima Power Supply | 230 V AC 50 Hz |
| Beban Max | 16 (5) A |
| Sinyal Kaluaran | Voltage-free Relay NO/COM |
| Suhu Setting Range | 5 °C nepi ka 30 °C |
| Akurasi Suhu | 0.2 °C |
| Histeresis | ± 0.25 °C or ± 0.5 °C |
| Frékuénsi Radio | 868 MHz |
| Range nirkabel | Up to 60 m (open space) |
| Diménsi Termostat (P x L x T) | 154 x 80 x 30 mm |
| Ukuran panarima (L x W x H) | 96 x 96 x 27 mm |
| Tipe tampilan | LCD (Backlight) |
| Fitur husus | Weekly Program, Frost Protection |
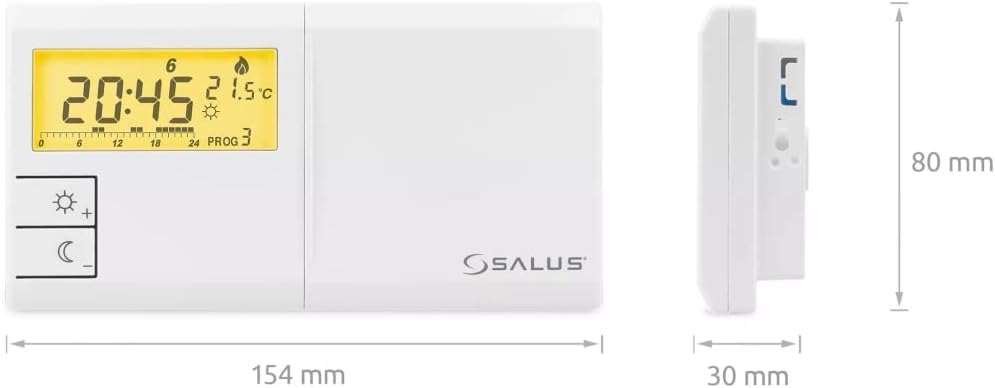
Image 4.1: Dimensions of the Salus 091FLRFv2 Thermostat unit.
5. Setup jeung Instalasi
5.1. Setup Unit Thermostat
- Pamasangan batré: Open the battery compartment on the back of the thermostat. Insert the two supplied AA alkaline batteries, ensuring correct polarity. Close the compartment.
- panempatan: Place the thermostat in a central location within the heated area, away from direct sunlight, drafts, or heat sources. The integrated stand allows for desktop placement, or it can be wall-mounted.
5.2. Receiver Unit Installation
The receiver unit controls your heating/cooling system. It requires a 230V AC 50Hz power supply and should be wired by a qualified professional.
- Pegatkeun daya: Before any wiring, ensure the main power supply to your heating/cooling system is completely disconnected.
- Pamasangan: Mount the receiver unit in a suitable location near your heating/cooling appliance. It is designed for ceiling mounting or wall mounting.
- Wiring: Connect the receiver to your heating/cooling system according to the wiring diagram provided in the full installation guide (not included here, refer to manufacturer's detailed manual). The output signal is a voltage-free relay (NO/COM).
- Sambungan Daya: Once wiring is complete and secure, restore the main power supply.
5.3. Factory Pairing
The thermostat and receiver units are factory-paired. No manual pairing is typically required for initial setup. If communication issues arise, refer to the troubleshooting section or the full manual for re-pairing instructions.
6. Parentah Operasi
6.1. Operasi dasar
- Hurungkeun/Pareuman: The thermostat powers on automatically once batteries are inserted. The receiver powers on when connected to mains electricity.
- Layar LCD: The backlit LCD displays current time, temperature, program status, and operating mode. The backlight duration is extended, returning to the main screen after up to 10 seconds of inactivity.
- Penyesuaian Suhu: Use the '+' and '-' buttons (often indicated by sun/moon icons for day/night modes) to manually adjust the desired temperature.
- Pilihan Mode: The thermostat supports both heating and cooling modes. Refer to the full manual for specific instructions on switching between modes.
6.2. Jadwal Mingguan Programming
The 091FLRFv2 offers 6 predefined programs and 3 user-definable programs. It features three temperature levels: Day, Night, and Anti-freeze.
- Accessing Program Menu: Press the 'PROG' button (or similar, refer to device specific button layout) to enter the programming mode.
- Nyetél Waktos sareng Dinten: Before setting programs, ensure the current time and day are correctly set. Use the appropriate buttons (e.g., 'SET', 'HOUR', 'MIN', 'DAY') to adjust.
- Pilihan Program: Navigate through the predefined programs or select a user-definable slot.
- Defining Temperature Levels: For each time segment of the day, set the desired temperature level (Day, Night, or Anti-freeze).
- Saving Programs: Turutan pitunjuk dina layar pikeun nyimpen jadwal anu tos diprogram.
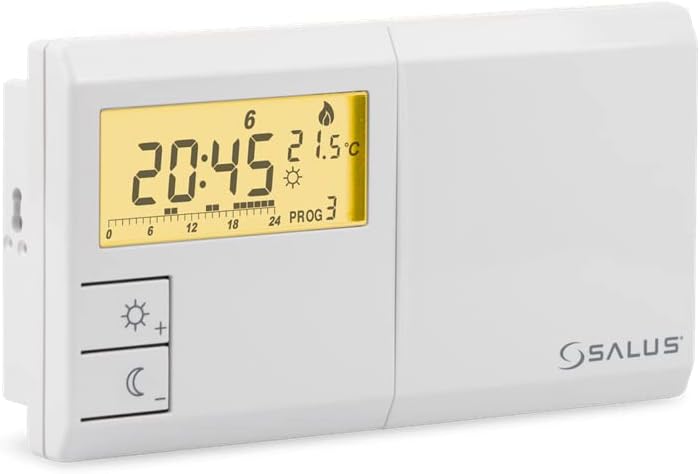
Gambar 6.1: Hareupeun view of the Salus 091FLRFv2 Thermostat, showing the LCD display and control buttons.
7. Pangropéa
7.1. Ngagantian batré
When the low battery indicator appears on the thermostat's display, replace the AA batteries promptly to ensure continuous operation. Use only alkaline batteries.
7.2. beberesih
Clean the thermostat and receiver units with a soft, dry cloth. Do not use abrasive cleaners, solvents, or chemical sprays, as these can damage the plastic casing sareng komponén éléktronik.
8. Cara ngungkulan
- Teu aya tampilan dina termostat: Check if batteries are correctly inserted and not depleted. Replace if necessary.
- No Communication with Receiver: Ensure the receiver is powered on. Verify that the thermostat and receiver are within the specified wireless range (up to 60m in open space). Obstacles like thick walls or metal objects can reduce range.
- Pemanasan/Pendinginan Teu Aktipkeun: Check the receiver's power supply. Ensure the thermostat is set to the correct mode (heating/cooling) and the desired temperature is above/below the ambient temperature.
- Changing Communication Code: The device allows changing the communication code without disassembling the units. Refer to the full manual for detailed instructions on this advanced feature if interference is suspected. The radio receiver supports up to 64,000 communication code combinations.
9. Garansi jeung Rojongan
For warranty information, please refer to the documentation provided with your purchase or contact your retailer. For technical support or further assistance, please contact Salus customer service through their official website or the contact details provided in the product packaging.