Bubuka
Thank you for choosing the Vector Optics Minotaur 12-60x60 Gen II Riflescope. This manual provides detailed instructions for the proper setup, operation, and maintenance of your new riflescope. Please read this manual thoroughly before use to ensure optimal performance and longevity of your device.
The Minotaur 12-60x60 Gen II is designed for precision shooting, featuring a wide magnification range, a 34mm main tube, and a red illuminated Second Focal Plane (SFP) reticle with 1/8 MOA adjustments. Its robust construction ensures reliability in various conditions.
Produk Leuwihview
Komponén konci
- Lensa Tujuan: The front lens of the riflescope, responsible for gathering light.
- Tabung Utama: The central body of the riflescope, 34mm in diameter for this model.
- Menara Elevasi: Nyaluyukeun titik tumbukan vertikal.
- Menara Windage: Nyaluyukeun titik dampak horizontal.
- Kenop Pangaluyuan Paralaks: Eliminates parallax error at various distances.
- Cingcin Pembesaran: Adjusts the magnification level from 12x to 60x.
- Kacamata: The rear section of the riflescope where the user looks through.
- Diopter adjustment ring: Adjusts the focus of the reticle to the user's eye.
- Kontrol katerangan: Adjusts the brightness of the illuminated reticle.
Fitur
- Magnification: 12-60x
- Diaméter Lénsa Tujuan: 60mm
- Tube Diameter: 34mm Monotube
- Reticle: Second Focal Plane (SFP) with Red Illumination
- Click Value: 1/8 MOA
- Eye Relief: Approximately 3.7 inches (94mm)
- Mounting Type: Compatible with Picatinny Mounts

Gambar 1: Hareupeun view of the Vector Optics Minotaur 12-60x60 Gen II Riflescope, showcasing the objective lens and main body.

Gambar 2: Tukangeun view of the riflescope, showing the eyepiece and magnification ring.

Gambar 3: Sisi view of the riflescope, highlighting the elevation, windage, and parallax adjustment turrets.
Disetél
1. Mounting the Riflescope
Proper mounting is crucial for accuracy and consistent performance. Use high-quality 34mm scope rings compatible with your rifle's Picatinny rail system.
- Pastikeun senjata api anjeun dibongkar sareng diarahkeun ka arah anu aman.
- Attach the scope rings to your rifle's Picatinny rail, ensuring they are spaced appropriately for the riflescope's length and your preferred eye relief.
- Place the riflescope into the lower halves of the rings.
- Adjust the riflescope forward or backward until you achieve optimal eye relief (approximately 3.7 inches from the eyepiece to your eye when in a natural shooting position).
- Rotate the riflescope until the vertical crosshair is perfectly plumb (vertical) with the rifle. A plumb bob or a scope leveling tool can assist with this.
- Place the upper halves of the rings over the riflescope and tighten the ring screws evenly and gradually, following the torque specifications provided by your ring manufacturer. Do not overtighten.
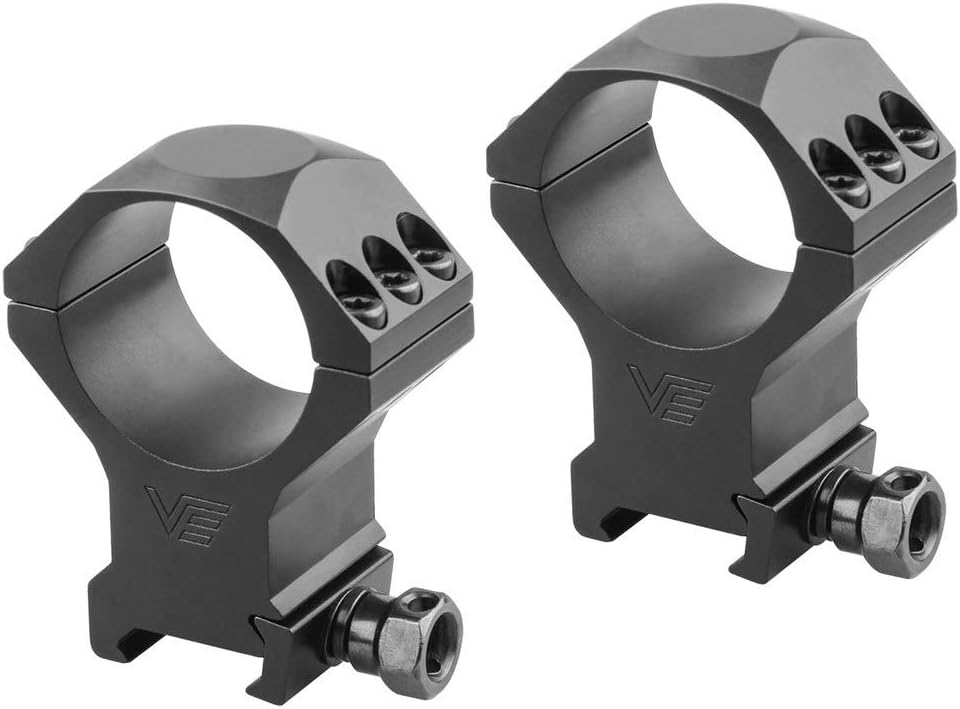
Gambar 4: Kelample of Picatinny scope mounting rings, essential for securing the riflescope to the firearm.
2. Diopter adjustment
The diopter adjustment focuses the reticle to your individual eye, ensuring a crisp and clear reticle image.
- Point the riflescope at a plain, bright background (e.g., a clear sky or a blank wall).
- Look through the riflescope and quickly glance at the reticle.
- Rotate the diopter adjustment ring (located at the rear of the eyepiece) until the reticle appears sharp and clear the instant you look at it. Avoid staring, as your eye may compensate for an out-of-focus reticle.
3. Zeroing the Riflescope
Zeroing aligns the point of impact with the point of aim at a specific distance.
- Begin at a close range, such as 25 yards, to get on paper.
- Fire a three-shot group.
- Perhatikeun titik tumbukan dibandingkeun jeung titik tujuan anjeun.
- Adjust the elevation and windage turrets. Each click of the turret moves the point of impact by 1/8 MOA at 100 yards. At 25 yards, 1/8 MOA is 1/32 inch. Consult a ballistic calculator or a zeroing chart for precise adjustments.
- Repeat firing and adjusting until your shots consistently hit the desired aim point.
- Once zeroed at the close range, move to your desired zeroing distance (e.g., 100 yards) and repeat the process for fine-tuning.

angka 5: Tutup-up view of the elevation and windage turrets, showing the 1/8 MOA click adjustments.
Ngoperasikeun Riflescope
Adjustment Magnification
Rotate the magnification ring (located just forward of the eyepiece) to change the magnification from 12x to 60x. Since this is a Second Focal Plane (SFP) reticle, the reticle size remains constant regardless of the magnification setting. Ballistic holdovers and ranging features of the reticle are accurate at a specific magnification, typically the highest setting (60x) or as indicated by the manufacturer.
Parallax adjustment
Parallax is the apparent movement of the reticle relative to the target when the shooter's eye moves. The parallax adjustment knob (typically on the left side of the main tube) allows you to eliminate this error.
- Aim the riflescope at your target.
- While looking through the scope, slowly rotate the parallax adjustment knob until the target and reticle appear to be in the same focal plane and there is no apparent movement between them when you slightly move your head.
- The numerical markings on the parallax knob are approximate; always fine-tune by observing the image.
Pencahayaan Reticle
The Minotaur 12-60x60 Gen II features a red illuminated reticle for enhanced visibility in low-light conditions or against dark targets. The illumination control is integrated with the parallax knob.
- Rotate the outer ring of the parallax knob to turn the illumination on and adjust its brightness.
- Start with the lowest setting and increase brightness as needed. Excessive brightness can cause glare and reduce target visibility.
- Turn off the illumination when not in use to conserve battery life.

Figure 6: Representation of the illuminated reticle, showing the central red dot for improved visibility.
Pangropéa
Ngabersihan Lensa
Always use proper lens cleaning techniques to avoid scratching the optical coatings.
- Brush off any loose dust or debris with a soft lens brush or blow it off with compressed air (specifically for optics).
- Apply a small amount of lens cleaning solution to a clean microfiber lens cloth.
- Gently wipe the lens surfaces in a circular motion, starting from the center and moving outwards.
- Do not use harsh chemicals, paper towels, or clothing, as these can damage the lens coatings.
Perawatan umum sareng Panyimpenan
- Keep the lens caps on when the riflescope is not in use to protect the lenses.
- Simpen riflescope di tempat anu tiis sareng garing, jauh tina sinar panonpoé langsung sareng suhu anu ekstrim.
- Avoid dropping or subjecting the riflescope to severe impacts.
- Periodically check the mounting screws for tightness, especially after initial use and before each shooting session.
Pamérésan masalah
| Masalah | Mungkin Cukang lantaranana | Solusi |
|---|---|---|
| Blurred image / Reticle out of focus | Improper diopter adjustment; Parallax error | Adjust diopter ring; Adjust parallax knob to match target distance. |
| Point of impact shifts / Inconsistent accuracy | Loose mounting rings; Improper zeroing; Damaged scope | Check and tighten mounting screws; Re-zero the riflescope; Contact Vector Optics support if damage is suspected. |
| Reticle illumination not working | Dead battery; Loose battery cap; Faulty illumination module | Replace battery (CR2032, typically); Ensure battery cap is tight; Contact Vector Optics support. |
| Kasusah nyaluyukeun turret | Turret caps too tight (if applicable); Debris in mechanism | Ensure caps are removed or loosened if they are tactical/capped turrets; Gently clean around turrets; Do not force adjustments. |
spésifikasi
| Fitur | Rincian |
|---|---|
| Magnification | 12-60x |
| Diaméter lénsa obyektif | 60 mm |
| Diaméter tabung | 34 mm |
| Tipe Reticle | Second Focal Plane (SFP) |
| Pencahayaan Reticle | Beureum |
| Pencét Nilai | 1/8 MOA |
| Panon lega | Kira-kira. 3.7 inci (94 mm) |
| Beurat | Kira-kira 959g (33.9 ons) |
| Alat nu cocog | bedil |
| Tipe Pamasangan | Picatinny Mount (rings not included) |
| Wengi Visi Cocog | No |
Garansi sareng Rojongan
Vector Optics provides a limited lifetime warranty on their riflescopes, covering defects in materials and workmanship. For specific warranty terms, service, or technical support, please contact Vector Optics directly through their official website or authorized distributors. Keep your proof of purchase for warranty claims.
For further assistance, visit the official Vector Optics websitus: www.vectoroptics.com


