1. Bubuka
This manual provides comprehensive instructions for the installation, operation, and maintenance of your Anlapus H.265+ 8-Channel 1080P DVR Surveillance System. This system is designed to offer reliable 24/7 video recording with four high-definition IP66 weatherproof outdoor cameras, ensuring detailed monitoring of your property.
Key features include crystal-clear 1080p video resolution, advanced H.265+ video compression for efficient storage, robust night vision capabilities, and remote access via the Anlapus mobile application for live viewing sareng panggeuing.
2. Émbaran Kasalametan
- Sasayogian tanaga: Use only the specified power adapters. Incorrect voltage tiasa ngaruksak alat sareng nyababkeun résiko kaamanan.
- Lingkungan Instalasi: Ensure the DVR is placed in a well-ventilated area, away from direct sunlight, heat sources, and moisture. Cameras are IP66 rated for outdoor use but should not be submerged in water.
- Manajemén Kabel: Route cables carefully to prevent tripping hazards and damage. Avoid placing heavy objects on cables.
- beberesih: Pegatkeun sambungan kakuatan saméméh beberesih. Paké lawon lemes, garing. Entong nganggo pembersih cair atanapi aerosol.
- Palayanan: Ulah nyobian ngalereskeun produk ieu nyalira. Serahkan sadaya perawatan ka tanaga anu mumpuni.
3. Eusi Paket
Pastikeun yén sadaya item anu didaptarkeun di handap kalebet kana pakét anjeun. Lamun aya item nu leungit atawa ruksak, mangga ngahubungan rojongan customer.

Image: Anlapus DVR and a single camera unit.

Image: Diagram showing all components included in the Anlapus security system package.
- 1 x 8-Channel 1080P DVR
- 4 x 1080P IP66 Outdoor Cameras
- 4 x 60ft BNC Video Cables
- 2 x 12V 2A Power Adapters
- 1 x 1-to-4 Power Splitter Cable
- 1 x Mouse USB
- 1 x Instruction Manual (Quick Start Guide)
- 4 x Kantong Sekrup Pemasangan
- 4 x Stiker Peringatan
4. Produk Langkungview
4.1 DVR (Digital Video Recorder)
The DVR is the central unit of your surveillance system, responsible for recording, storing, and managing video footage from all connected cameras. It supports up to 8 channels, allowing for future expansion with additional cameras.

Image: Detailed diagram illustrating the ports on the Anlapus DVR and the features of the camera.
DVR Rear Panel Ports:
- Video Input (BNC): Connects to surveillance cameras.
- Input Audio (RCA): Connects to external microphones (if applicable).
- Kaluaran Audio (RCA): Nyambung ka spiker.
- Monitor (VGA): Nyambung ka monitor VGA.
- Monitor (HDMI): Connects to an HDMI monitor or TV.
- Jaringan (RJ45): Nyambung ka router anjeun pikeun aksés internét sareng jarak jauh viewing.
- Port USB: For connecting the USB mouse and for USB backup.
- Input Daya (DC 12V): Nyambung ka adaptor kakuatan.
4.2 Surveillance Cameras
The included cameras are 1080P HD, providing clear and detailed images. They are designed for both indoor and outdoor use with an IP66 weatherproof rating.
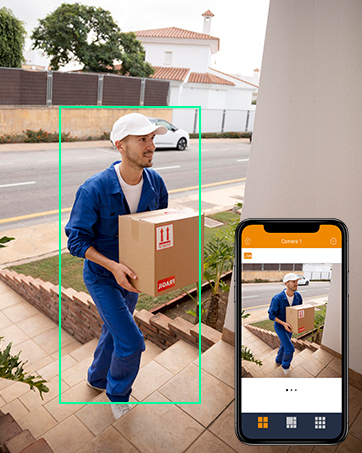
Image: An Anlapus camera shown with rain, highlighting its IP66 weatherproof rating.
Fitur kaméra:
- Resolusi: 1920 x 1080p (2.0MP) for high-definition video.
- Visi Peuting: Equipped with 24 IR-LEDs, providing up to 20 meters (65.62 feet) of clear night vision.
- Lensa: 3.6mm HD lens with a 90-degree wider viewsudut ing.
- Tahan cuaca: IP66 rated, ensuring protection against dust and water for reliable outdoor performance.
- Panutup kaca: Designed to prevent fogging and maintain clear vision in various weather conditions.
5. Setélan
5.1 Sambungan Awal
Follow these steps to connect your DVR and cameras for initial setup.

Image: Diagram illustrating the simple connection process for the Anlapus DVR and cameras.
- Sambungkeun kaméra: Connect each camera to a BNC video input port on the DVR using the provided 60ft BNC cables.
- Kaméra Daya: Use the 1-to-4 power splitter cable and one 12V 2A power adapter to power the cameras.
- Sambungkeun Monitor: Connect a monitor (TV or PC display) to the DVR using either an HDMI or VGA cable.
- Sambungkeun Mouse: Plug the USB mouse into one of the DVR's USB ports.
- Connect Network (Optional but Recommended): Sambungkeun DVR ka router anjeun nganggo kabel Ethernet pikeun aksés jarak jauh sareng fitur online.
- Power DVR: Connect the second 12V 2A power adapter to the DVR's power input. The system will power on automatically.
5.2 First-Time Configuration
Upon first boot, the system will guide you through initial setup steps, including language selection, password creation, and network settings. Follow the on-screen prompts.
5.3 Mobile App Setup (Anlapus App)
Pikeun jauh viewing and alerts, download and configure the Anlapus mobile application.

Image: Screenshot of the Anlapus mobile application interface showing live camera feeds.
- Unduh App: Milarian pikeun "Anlapus" in the App Store (iOS) or Google Play Store (Android) and install the application.
- Ngadaptar Akun: Open the app and register a new user account.
- Tambahkeun Alat: Follow the in-app instructions to add your DVR by scanning the QR code displayed on the DVR's monitor or by manually entering its device ID.
- Konfigurasikeun Bewara: Enable motion detection alerts and email notifications within the app settings to receive real-time updates.
6. Operasi Sistim nu
6.1 Hirup View
Sakali disambungkeun, anjeun tiasa view hirup footage from your cameras on a connected monitor or via the Anlapus mobile app.

Image: People viewing live surveillance footage on smartphones, tablets, and laptops.
6.2 Modeu ngarékam
The DVR supports several recording options:
- Rekaman Kontinyu (24/7): Records constantly, overwriting older footage lamun gudang pinuh.
- Ngarekam Deteksi Gerak: Records only when motion is detected, saving storage space. You can configure motion detection zones and sensitivity.
- Rekaman Dijadwalkeun: Catetan dina waktos-waktos khusus dina sadinten atanapi saminggu.
- Ngarekam Manual: Start and stop recording manually as needed.

Image: A person and child playing in a yard, with green boxes indicating motion detection zones.
6.3 Playback
Review dirékam footage directly from the DVR or through the mobile app.

Image: Screenshots showing video playback on a monitor and a mobile phone app.
Komprési Pidéo 6.4 H.265+
The system utilizes H.265+ video compression technology, which significantly reduces file sizes compared to H.264, allowing for up to four times longer recording times and faster remote viewing without compromising video quality.

Image: A comparison showing H.265+ requiring 50% less storage than H.264 for the same video content.
6.5 Visi Peuting
The cameras automatically switch to infrared night vision in low-light conditions, providing clear black and white images up to 20 meters (65.62 feet).
Image: A split image showing a scene in full color during the day and in black and white with infrared illumination at night.
7. Pangropéa
- Beberesih Kaméra: Périodik ngabersihan lénsa kaméra ku lemes, damp lawon pikeun mastikeun kualitas gambar jelas. Ngahindarkeun cleaners abrasive.
- DVR Ventilation: Ensure the DVR's ventilation openings are clear of dust and obstructions to prevent overheating.
- Pembaruan firmware: Check the Anlapus official website or app for available firmware updates to ensure optimal performance and security. Follow update instructions carefully.
- Cadangan Data: Rutin nyadangkeun video foo pentingtage to an external USB drive to prevent data loss.
8. Cara ngungkulan
| Masalah | Mungkin Cukang lantaranana | Solusi |
|---|---|---|
| Taya gambar dina monitor | Sambungan kabel leupas, sumber input salah, masalah kakuatan. | Pariksa sambungan kabel HDMI/VGA. Pastikeun monitor aya dina input anu leres. Pariksa kakuatan DVR. |
| Kaméra teu némbongkeun vidéo | Camera power issue, BNC cable issue, camera fault. | Check camera power connections and power adapter. Inspect BNC cables for damage. Test camera on a different channel if possible. |
| Teu aya aksés jarak jauh via aplikasi | DVR not connected to network, incorrect network settings, app configuration issue. | Ensure DVR is connected to router via Ethernet. Check DVR network settings. Verify app device ID and network permissions. Restart DVR and router. |
| Deteksi gerak teu jalan | Motion detection not enabled, sensitivity too low, detection zone not set. | Enable motion detection in DVR settings. Adjust sensitivity. Define detection zones. |
| Miskin visi wengi | IR LEDs obstructed, camera lens dirty, insufficient power. | Clear any obstructions from IR LEDs. Clean camera lens. Ensure camera is receiving adequate power. |
9. Spésifikasi
| Fitur | Spésifikasi |
|---|---|
| Nomer modél | AJ-AM8A4B-4B40E-202S |
| Komprési Video | H.265 + |
| Saluran DVR | 8 Saluran |
| Resolusi kaméra | 1080p (1920 x 1080) |
| Kuantitas kaméra | 4 |
| Wengi Sawangan Sawangan | Nepi ka 20 méter (65.62 suku) |
| Rating Kaméra Tahan Cuaca | IP66 |
| Kaméra Viewdina Angle | 90 darajat |
| Laju pigura | 30 fps or more |
| Kakuatan Voltage | 12 volt |
| Téhnologi konektipitas | Wired, Wireless (for remote access) |
| Tipe Pamasangan | Tembok Gunung |
| Ukuran produk (L x W x H) | 20.09 x 30.61 x 44.4 cm; 4.53 kg |
10. Émbaran jaminan
Anlapus products are covered by a limited warranty from the date of purchase. This warranty typically covers defects in materials and workmanship under normal use. Please refer to the warranty card included with your product or visit the official Anlapus website for specific terms and conditions, including warranty duration and claim procedures.
Simpen resi pameseran anjeun salaku bukti pameseran pikeun klaim garansi.
11. Rojongan Palanggan
If you encounter any issues or have questions regarding your Anlapus surveillance system, please contact our customer support team. Our dedicated support staff can assist you with technical queries, troubleshooting, and warranty services.

Image: A customer support representative wearing a headset, ready to assist.
For the most up-to-date contact information, including email, phone, and online chat options, please visit the official Anlapus websitus atanapi tingal wincik kontak disadiakeun dina bungkusan produk Anjeun.
Sumberdaya Online:
- Anlapus Official Websitus: www.anlapus.com (Kelample URL, please refer to actual product documentation)
- Anlapus App Support Section


