1. Bubuka
Thank you for choosing the Anlapus 1080p DVR 8 Channel CCTV Camera System. This Digital Video Recorder (DVR) is designed to provide reliable 24/7 surveillance recording for your home or business. It supports various camera types including analog, HD-TVI, CVI, and AHD, offering flexibility for your security needs. This manual provides detailed instructions for setup, operation, and maintenance of your DVR system.
Please read this manual thoroughly before installation and operation to ensure proper use and to maximize the performance and longevity of your device.

Image: The Anlapus 1080p DVR unit, shown with a 1TB hard drive for storage.
2. Naon dina Box
Upon opening the package, please verify that all components listed below are present and in good condition. If any items are missing or damaged, contact Anlapus customer support immediately.
- Anlapus 8 Channel DVR Unit
- Adaptor kakuatan
- Mouse USB
- Manual pangguna (dokumén ieu)
- (Optional) 1TB Security Grade Hard Drive (if purchased with HDD)

Image: The package contents including the DVR, USB mouse, power adapter, 1TB hard drive, and user manual.
3. Fitur Produk
The Anlapus DVR system is equipped with advanced features to enhance your surveillance experience:
- DVR Hibrida 4-in-1: Supports analog, HD-TVI, CVI, and AHD cameras, allowing connection of up to 8 cameras (720P, 1080P, 3MP, 4MP, 5MP).
- Format Pidéo H.265+ Canggih: Doubles data compression ratio while maintaining high video quality, maximizing storage space and enabling ultra-long recording times.
- Deteksi Gerakan anu Tiasa Disaluyukeun: Set specific motion zones and receive instant app pushes and email alerts with snapshots when motion events occur.
- Multiple Record Modes: Choose from continuous, scheduled, motion-activated, or recycle recording modes for each camera.
- Nyadangkeun USB: Easily transfer video files to a memory stick or external hard drive via USB.
- Jauh Viewing: Aksés langsung view and playback from anywhere using the associated mobile application on your phone, tablet, or computer.
- Énkripsi Data: Utilizes high-level encryptions and private protocols for secure remote access, ensuring your privacy.

Gambar: Leuwihview of Anlapus 5MP LITE DVR features including channels, FHD, H.265+, HDMI, Remote Connectivity, Recording, and 4-in-1 compatibility.

Image: Diagram illustrating data encryption features, including high-level encryptions, private protocols, activation password, and verification code.
4. Setup Guide
Follow these steps to set up your Anlapus DVR system:
4.1. Nyambungkeun DVR
- Sambungkeun kaméra: Connect your CCTV cameras to the BNC video input ports on the back of the DVR. The DVR supports up to 8 cameras.
- Sambungkeun Monitor: Connect a monitor (TV or PC monitor) to the DVR using either the HDMI or VGA port. HDMI is recommended for best video quality.
- Sambungkeun Mouse: Plug the included USB mouse into one of the USB ports on the DVR (front or back).
- Connect Network (Optional but Recommended): Pikeun jauh viewing and updates, connect an Ethernet cable from your router to the LAN port on the DVR.
- Sambungkeun Kakuatan: Plug the power adapter into the DVR's power input, then plug the adapter into a power outlet. The DVR will power on automatically.

Image: Detailed diagram of the Anlapus DVR's back panel, showing ports for video input, audio in/out, VGA, HDMI, LAN, USB, and power.

Image: Visual guide for easy installation, showing simple connection, downloading the free app, and viewing cameras.
4.2. Mimiti Setup Wizard
Upon first boot, the DVR may guide you through an initial setup wizard. Follow the on-screen prompts to:
- Setel basa sareng wilayah.
- Jieun kecap akses anu kuat pikeun akun administrator.
- Konpigurasikeun setélan jaringan (DHCP biasana cekap pikeun kaseueuran jaringan bumi).
- Saluyukeun setelan tanggal sareng waktos.
- Format the hard drive (if a new one is installed).
5. Parentah Operasi
5.1. Hirup View
Once the DVR is set up, you can view live feeds from your cameras on the connected monitor. Use the USB mouse to navigate the on-screen interface. Double-click a camera view to enlarge it, and double-click again to return to multi-camera view.
5.2. Modeu Rekaman
The DVR offers flexible recording options:
- Rékam Kontinyu: Rékaman 24/7.
- Rekaman Dijadwalkeun: Rékaman ngan ukur salami période waktu anu ditangtukeun.
- Ngarekam Deteksi Gerak: Records only when motion is detected in designated areas.
- Ngadaur mulang Rekaman: Otomatis nimpa foo pangkolotnatage nalika hard drive pinuh.
To configure recording modes, access the DVR's main menu, navigate to "Record" or "Schedule" settings, and adjust preferences for each camera channel.

Image: Illustration of customized motion detection zones and alerts, showing a child and dog in a yard.
5.3. Puterkeun deui
Pikeun ulangview dirékam footage:
- Tina ménu utama, pilih "Playback".
- Choose the camera channel and date/time range you wish to review.
- Anggo kadali playback (ulin, reureuhan, maju gancang, mundur) pikeun nganapigasi ngaliwatan footage.
5.4. Jauh Viewing (Mobile App)
The Anlapus DVR supports remote viewing via a dedicated mobile application. Follow these steps:
- Unduh Aplikasi: Milarian pikeun the "Anlapus" app (or specified app name in the DVR interface) on the Google Play Store or Apple App Store.
- Ngadaptar Akun: Create a new user account within the app.
- Tambahkeun Alat: Scan the QR code displayed on your DVR's monitor (usually found in Network settings or P2P Cloud settings) or manually enter the device ID to add your DVR to the app.
- View Live/Playback: Sakali ditambahkeun, anjeun tiasa view live feeds, play back recorded footage, and receive alerts directly on your smartphone or tablet.

Image: Depiction of live view functionality accessible from various devices including phone, tablet, laptop, and PC.
6. Pangropéa
Regular maintenance ensures optimal performance and longevity of your DVR system:
- Tetep Bersih: Gently wipe the DVR unit with a soft, dry cloth. Avoid using liquid cleaners or aerosols.
- Ventilasi: Pastikeun DVR disimpen di tempat anu ventilasina saé pikeun nyegah panas teuing. Ulah ngahalangan liang ventilasi.
- Pembaruan firmware: Periodically check the Anlapus official website or app for firmware updates. Keeping the firmware updated can improve performance and security.
- Kaamanan kecap akses: Robah kecap akses DVR sareng aplikasi anjeun sacara rutin kana kombinasi anu kuat sareng unik.
- Cadangan Data: Pikeun kadaharan kritistage, regularly back up data to an external USB drive.
7. Cara ngungkulan
If you encounter issues with your Anlapus DVR, refer to the following common problems and solutions:
| Masalah | Mungkin Cukang lantaranana / Solusi |
|---|---|
| Taya Kaluaran Video dina Monitor |
|
| "Video Loss" Message |
|
| Cannot Access DVR Remotely |
|
| No Recording / Hard Drive Not Detected |
|
If the problem persists after trying these solutions, please contact Anlapus customer support for further assistance.
8. Spésifikasi
| Fitur | Rincian |
|---|---|
| Nomer modél | A1R-M8A4-B1K or M1H08T4 |
| Input Video | 8 Channels (BNC), supports Analog/HD-TVI/CVI/AHD |
| Komprési Video | H.265 + |
| Kaluaran Video | HDMI, VGA |
| Input / Kaluaran Audio | Sumuhun (RCA) |
| Résolusi ngarékam | Up to 5MP (12.5fps), 4MP (12.5fps), 3MP (12.5fps), 1080p, 720p |
| Kapasitas Panyimpenan | Supports 1TB HDD (pre-installed or user-installed) |
| Panganteur Jaringan | RJ45 10M / 100M Ethernet |
| Panganteur USB | 2 x USB 2.0 |
| Ukuran (L x W x H) | 23 x 23 x 4.3 cm |
| Beurat | 1.77 kg |
| Sasayogian tanaga | DC 12V |
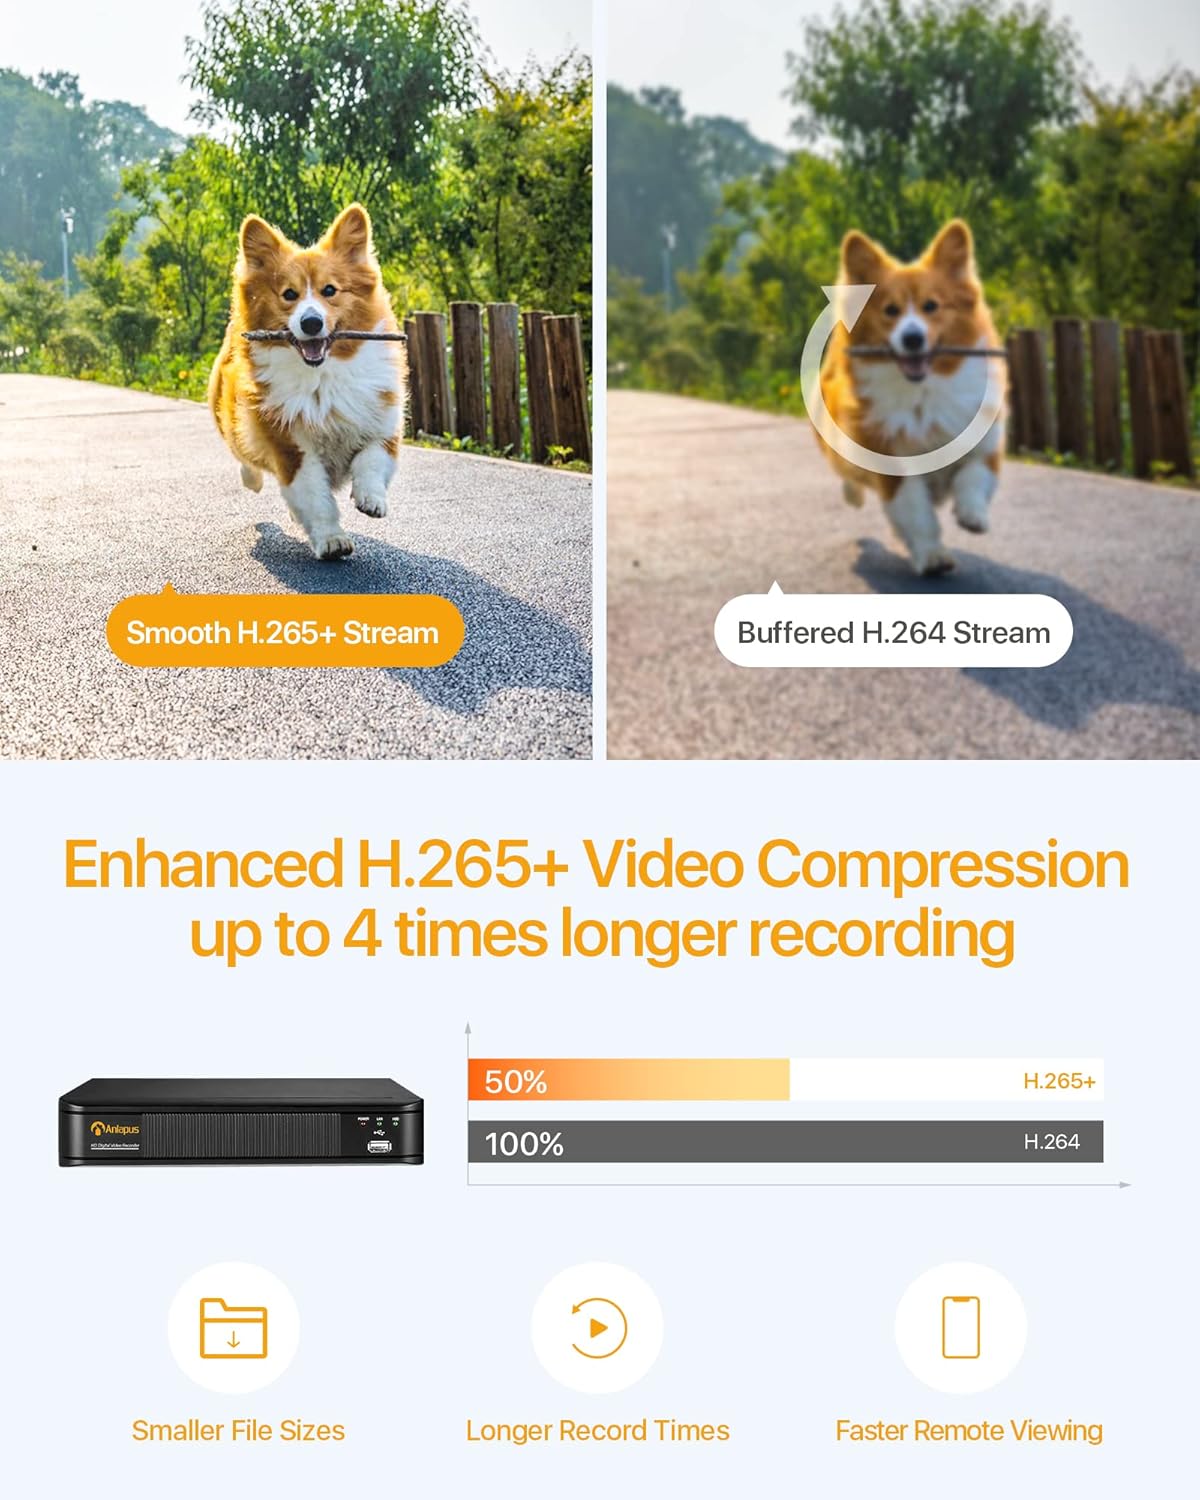
Image: Comparison illustrating the efficiency of H.265+ video compression, offering smaller file sizes and longer record times compared to H.264.
9. Garansi jeung Rojongan
Anlapus provides comprehensive support for its products. For warranty information, technical assistance, or customer service, please refer to the contact details provided with your product packaging or visit the official Anlapus websitus.
Produk kaasup Free Lifetime Support.

Image: Icons representing 24/7 Secure Recording, Scheduled Recording, Customizable Individual Cameras, and Free Lifetime Support.


