Bubuka
This manual provides detailed instructions for the setup, operation, maintenance, and troubleshooting of your Amcrest 5Series 4K NVR 16-Channel NV5216 Network Video Recorder. Please read this manual thoroughly before using the device to ensure proper functionality and safety.

Image: Amcrest 5Series 4K NVR NV5216, showcasing its 4K UHD resolution, 16 channels, H.265 compression, 20TB HDD capacity, two-way talk, 320Mbps bandwidth, HDMI output, and plug-and-play installation.
1. Setélan
1.1 Eusi pakét
Pastikeun yén sadaya komponén aya dina bungkusan:
- Amcrest 5Series 4K NVR (NV5216)
- Adaptor kakuatan
- Mouse USB
- Kabel Jaringan
- Gancang Mimitian Guide
- Mounting Screws for Hard Drive (Hard Drive Not Included)
1.2 Hardware Leuwihview
Familiarize yourself with the ports and indicators on the NVR.
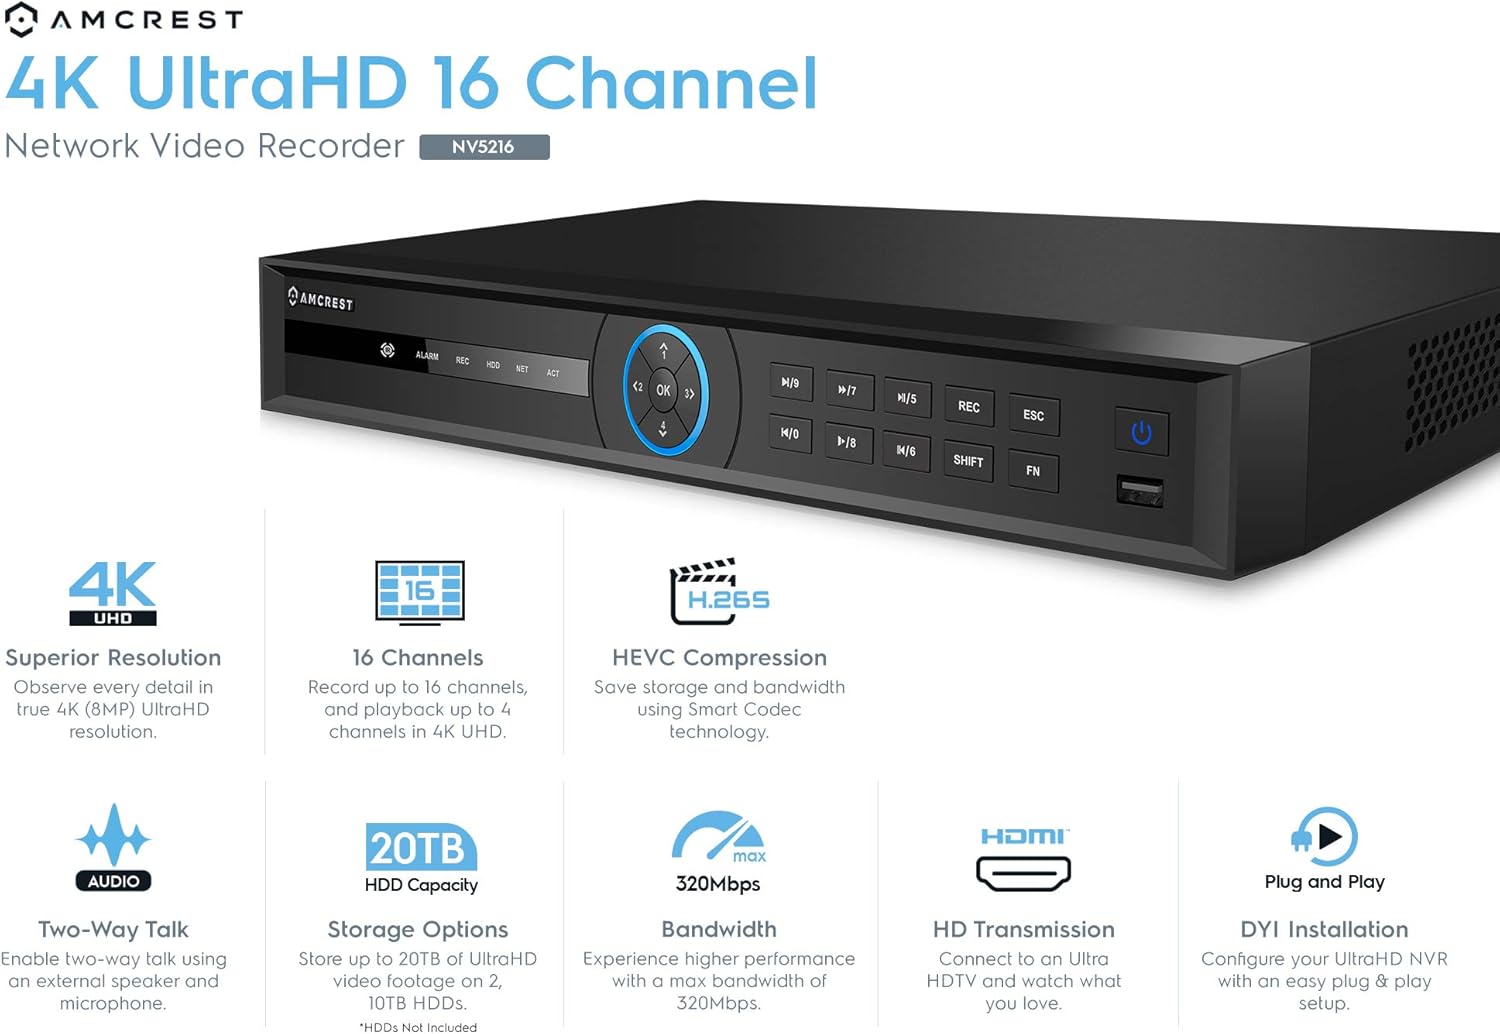
Image: Front panel of the Amcrest NV5216 NVR, showing the LED indicator, control panel buttons (OK, navigation, M/7, M/8, REC, ESC, SHIFT, FN), USB 3.0 port, and On/Off power button.
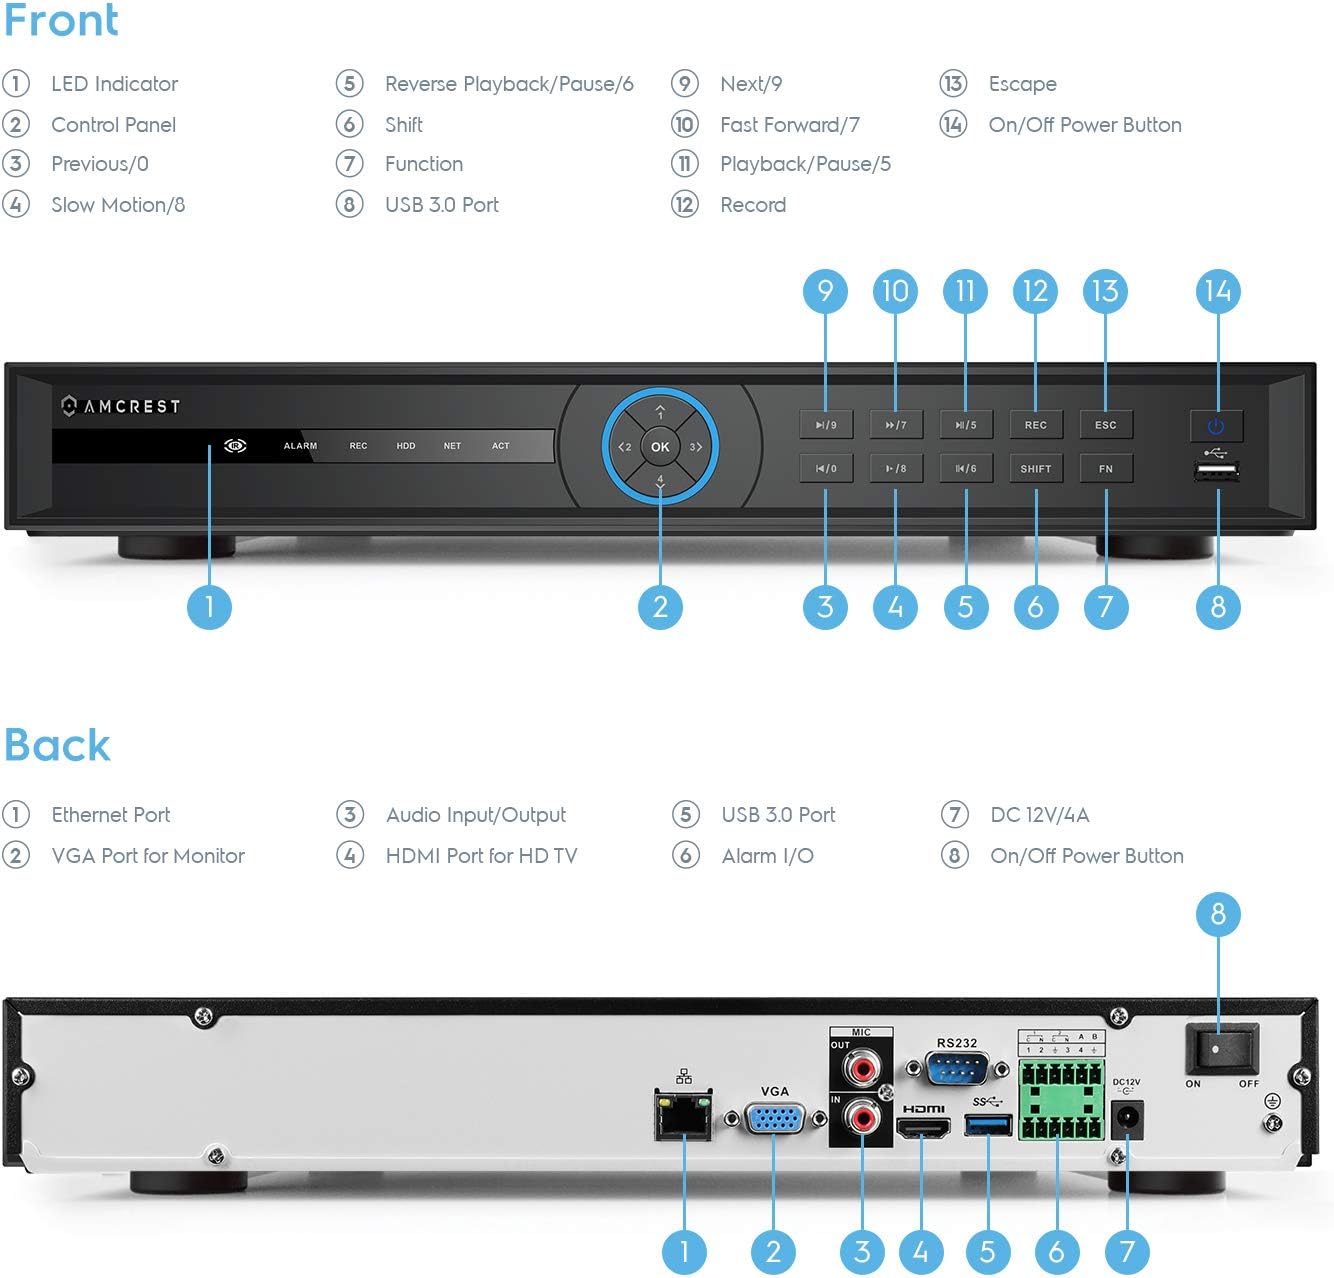
Image: Back panel of the Amcrest NV5216 NVR, illustrating the Ethernet port, VGA port for monitor, Audio Input/Output, HDMI port for HD TV, USB 3.0 port, Alarm I/O, DC 12V/4A power input, and On/Off power button.
1.3 Pamasangan Hard Drive
The NVR supports up to two 10TB hard drives (not included). Follow these steps to install a hard drive:
- Cabut sareng cabut panutup luhur NVR.
- Sambungkeun kabel data sareng daya SATA tina NVR ka hard drive.
- Pasangkeun hard drive kana rangka NVR nganggo sekrup anu disayogikeun.
- Ganti panutup luhur sareng amankeun ku sekrup.
1.4 Sambungan Awal
Connect the NVR to your network and display:
- Connect the NVR to your router using the provided Ethernet cable. This NVR requires a hard-wired connection directly to your router to operate.
- Sambungkeun monitor ka port HDMI atanapi VGA NVR.
- Sambungkeun beurit USB ka port USB dina NVR.
- Connect the power adapter to the NVR and a power outlet.
- Press the power button to turn on the NVR.
1.5 Wizard Setup Awal
Upon first boot, the NVR will guide you through an initial setup wizard to configure basic settings such as language, date/time, network, and password. Follow the on-screen prompts.
1.6 Manajemén kaméra
The NV5216 supports Amcrest WiFi and Wired IP cameras, as well as limited compatibility with third-party IP cameras. To add cameras:
- Ensure your IP cameras are powered on and connected to the same network as the NVR.
- Access the NVR's camera management interface (usually found in the main menu under "Camera" or "Device Search").
- The NVR will scan for available cameras. Select the cameras you wish to add and follow the prompts to configure them.
2. Parentah Operasi
2.1 Hirup View
After setup, the NVR will display the live feed from connected cameras. You can view up to 4 channels at 4K resolution simultaneously. The NVR will adjust the resolution of remaining channels to 1080P at 30fps if more than 4 channels are viewed sakaligus.
2.2 Konfigurasi rékaman
NVR ngadukung rupa-rupa modeu rékaman:
- Ngarekam Manual: Mimitian sareng eureunkeun ngarékam sacara manual.
- Rekaman Dijadwalkeun: Atur waktos khusus pikeun ngarékam kontinyu.
- Ngarekam Deteksi Gerak: Record only when motion is detected by the camera. Configure motion detection zones and sensitivity in the camera settings.
The NVR utilizes H.265 compression technology, which optimizes storage space without compromising video quality, allowing for longer recording times.
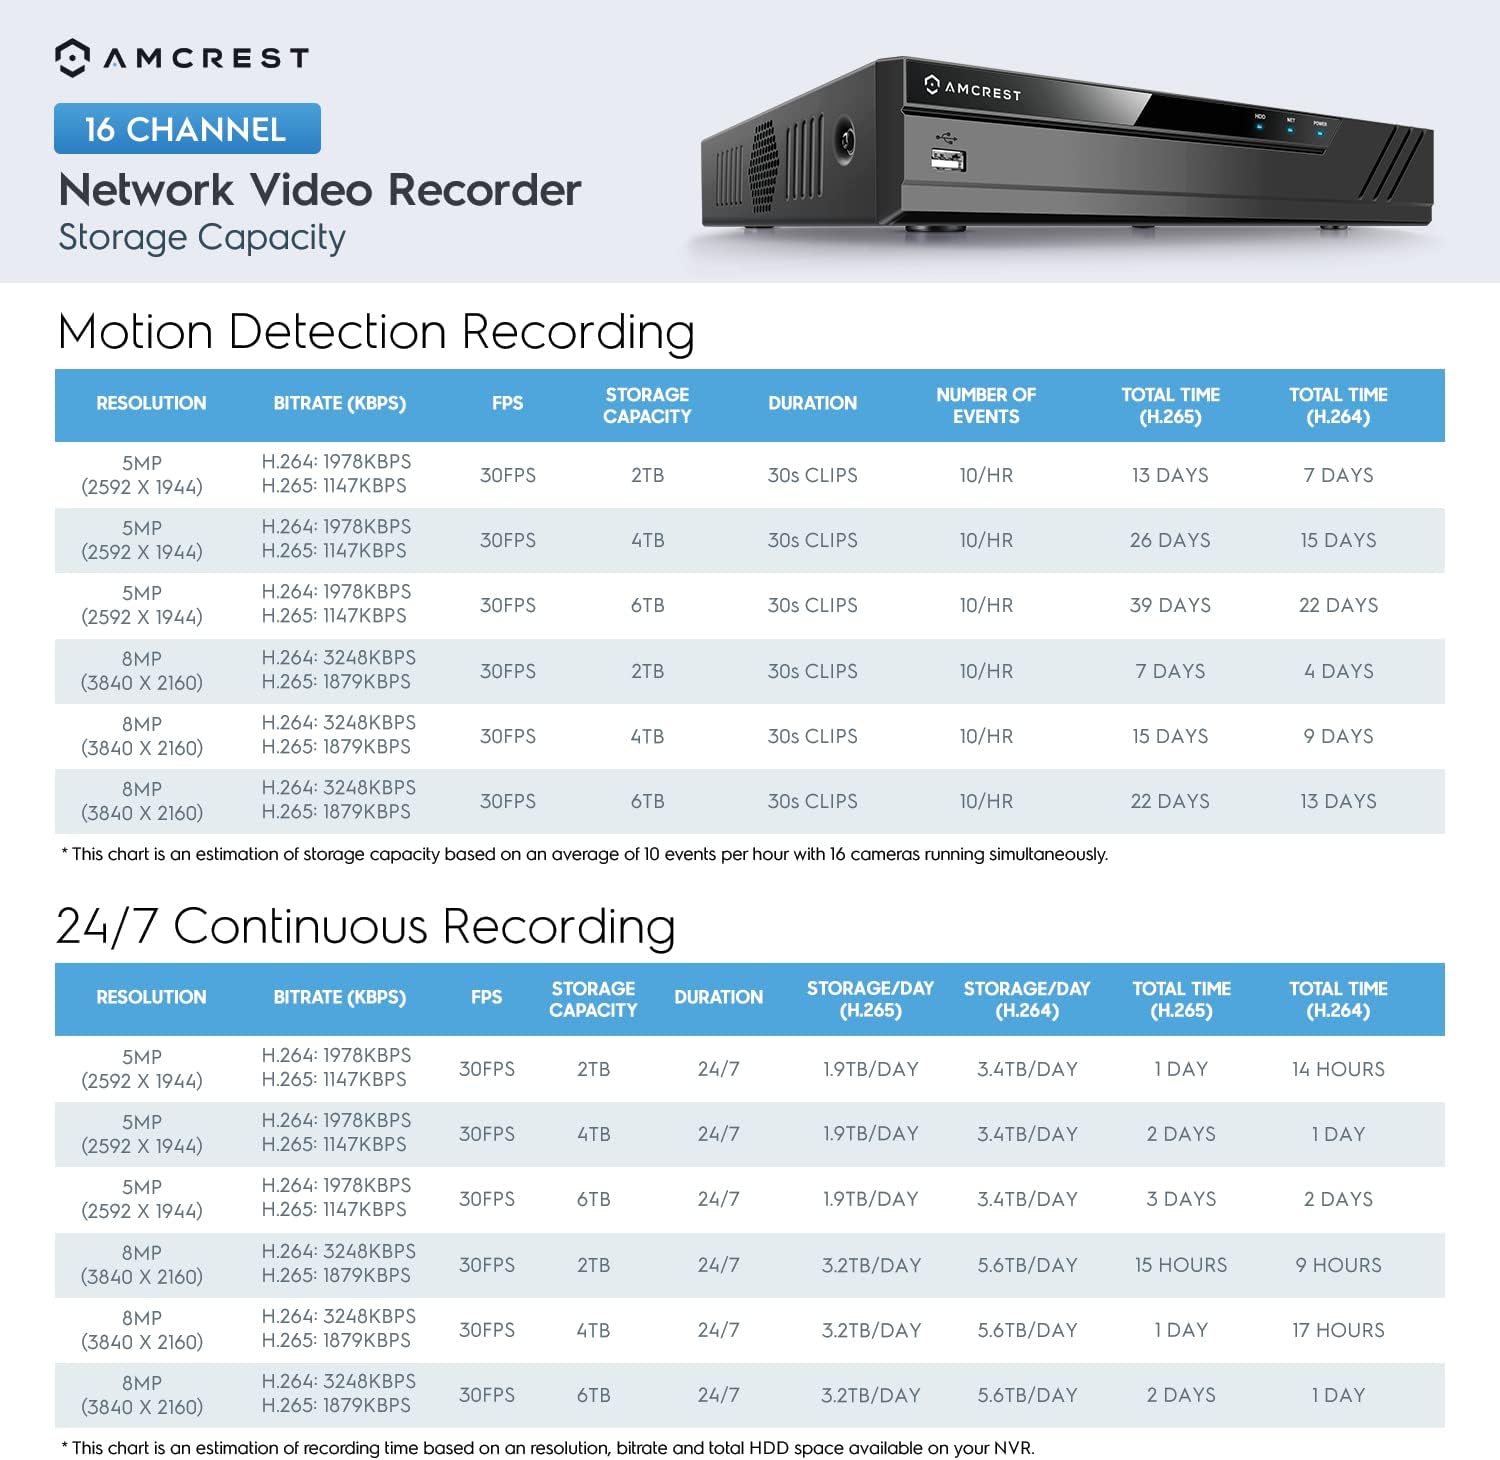
Image: A chart detailing estimated storage capacity for the Amcrest NV5216 NVR under various resolutions (5MP, 8MP) and recording types (Motion Detection, 24/7 Continuous) using H.264 and H.265 compression.
2.3 Playback
Pikeun ulangview dirékam footage:
- Access the "Playback" function from the NVR's main menu.
- Pilih tanggal, waktos, sareng saluran kaméra anu dipikahoyong.
- Anggo kadali playback (ulin, reureuhan, maju gancang, mundur) pikeun nganapigasi ngaliwatan footage.
2.4 Remote Access (Amcrest View aplikasi)
Access your NVR remotely using the Amcrest View app on your smartphone or tablet:
- Unduh "Amcrest" View" app from your device's app store (available for iPhone, iPad, and Android).
- Open the app and register an account if you don't have one.
- Scan the QR code displayed on the NVR's monitor (found in the network settings or device info) to add the NVR to your app.
- Sakali ditambahkeun, anjeun tiasa view siaran langsung, muterkeun rekaman, sareng ngatur setélan ti mana waé anu aya sambungan internét.
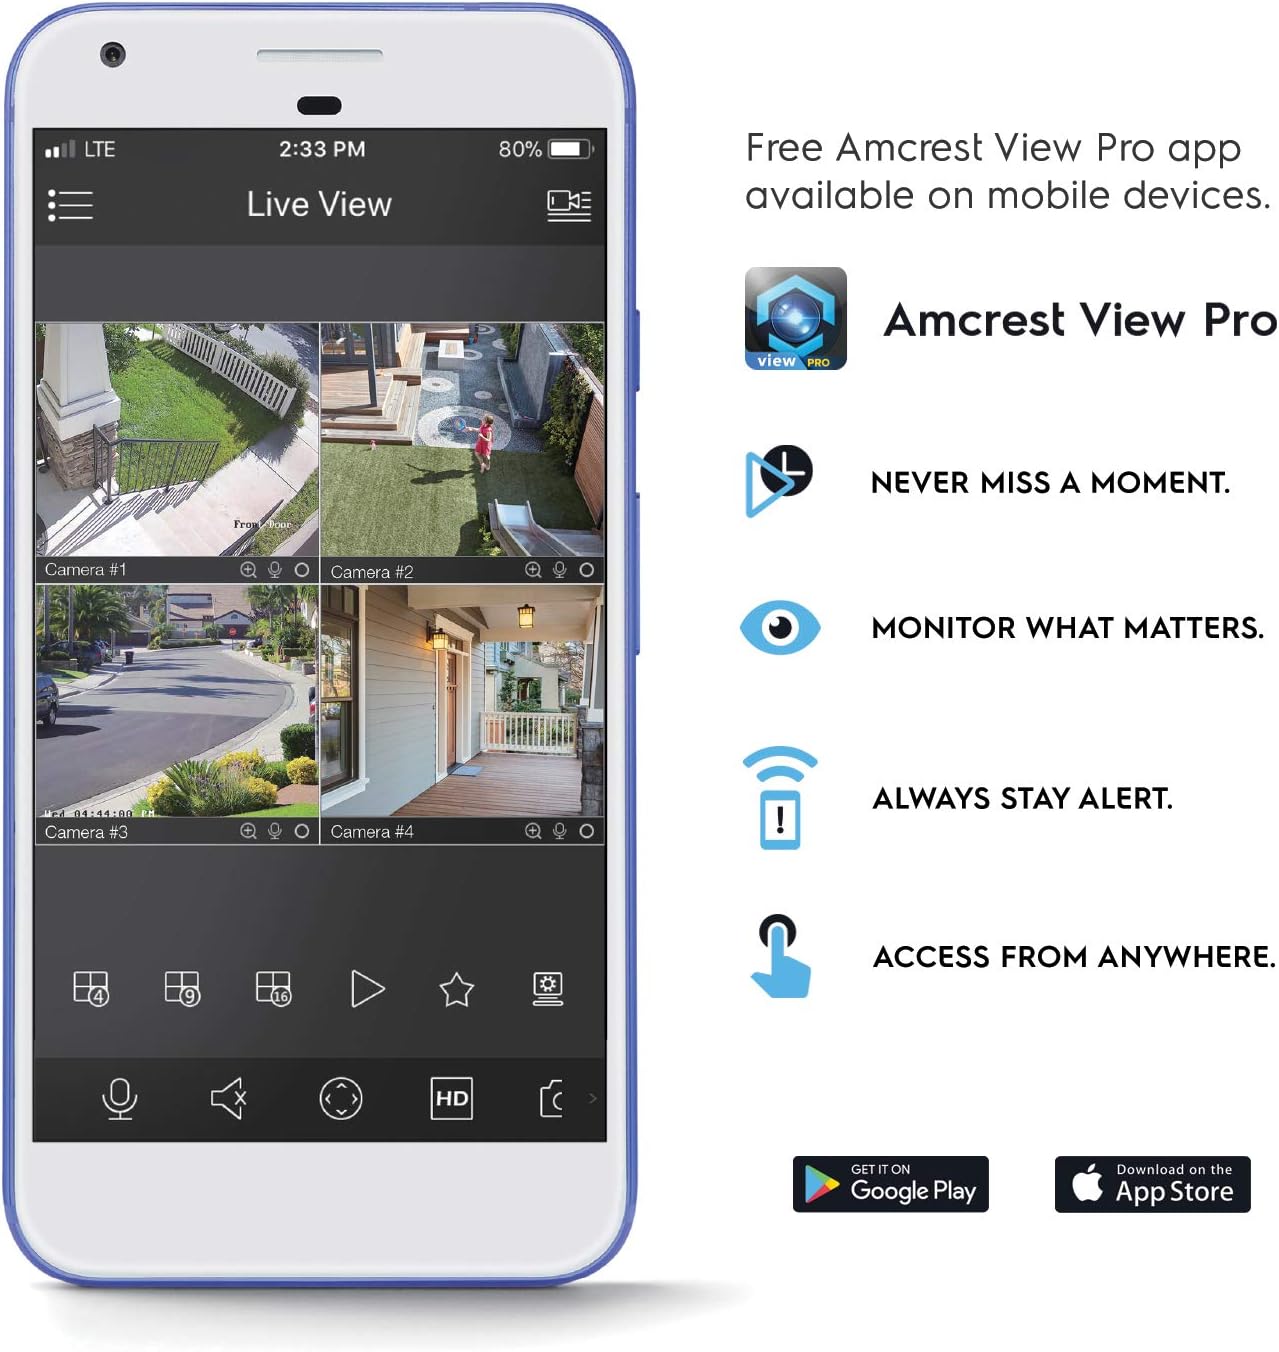
Image: A smartphone screen displaying the Amcrest View Pro app, showing a multi-camera live view interface. The app allows users to monitor, access, and stay alert from anywhere.
Video: An Amcrest overview video titled "Simple. Reliable. Secure." This video provides a general introduction to Amcrest security solutions and their benefits, including remote monitoring of loved ones and property.
3. Pangropéa
3.1 Manajemén hard drive
Regularly check the status of your hard drives through the NVR's storage settings. Ensure sufficient space is available for continuous recording. You can configure the NVR to overwrite older footage automatically when the hard drive is full.
3.2 Apdet firmware
Pariksa Amcrest sacara berkala websitus pikeun apdet firmware. Ngajaga firmware NVR anjeun tetep mutahir mastikeun kinerja, kaamanan, sareng aksés kana fitur-fitur anyar anu optimal. Turutan pitunjuk anu disayogikeun sareng pakét apdet firmware kalayan saksama.
3.3 beberesih
To maintain the NVR's longevity, keep it in a clean, dust-free environment. Use a soft, dry cloth to clean the exterior. Do not use liquid cleaners or aerosols.
4. Cara ngungkulan
4.1 Taya Kaluaran Video
- Check all video cable connections (HDMI/VGA) to the monitor and NVR.
- Pastikeun monitor dihurungkeun tur disetel ka sumber input nu bener.
- Verify the NVR is powered on and its power indicator light is active.
4.2 Kaméra Teu Ditampilkeun
- Confirm cameras are powered on and connected to the network.
- Ensure the NVR and cameras are on the same local network.
- Check camera IP addresses and network settings within the NVR's camera management interface.
- Verify camera compatibility with the NV5216.
4.3 Masalah Aksés Jarak Jauh
- Pastikeun NVR gaduh sambungan internét anu aktip.
- Verify that the Amcrest View aplikasi parantos diénggalan kana vérsi pangénggalna.
- Check network firewall settings on your router; port forwarding may be required for direct access, though the app often uses P2P for easier setup.
4.4 Masalah Ngarékam
- Check if a hard drive is installed and properly initialized in the NVR's storage settings.
- Verify that recording schedules or motion detection settings are correctly configured.
- Pastikeun hard drive gaduh rohangan kosong anu cekap.
5. Spésifikasi
| Nomer modél | NV5216 |
| Saluran | 16-Kanal |
| Résolusi ngarékam | 1080p/3MP/4MP/5MP/6MP/8MP (4K)/12MP |
| Hirup View/ Playback | Up to 4CH @ 4K @ 30fps simultaneously (remaining channels 1080P @ 30fps) |
| Dukungan Hard Drive | Up to 2 x 10TB (20TB total) (Hard Drives Not Included) |
| Komprési Video | H.265 |
| Konektipitas | Ethernet (hard-wired connection required), USB 3.0 (rear), USB 2.0 (front) |
| Kaluaran Video | HDMI, VGA |
| Kaayaan Operasi | +14°F ~ +131°F (-10°C ~ +55°C) |
| Diménsi | 17.09 x 14.53 x 5.55 inci |
| Item Beurat | 6.41 pon |

Image: A visual comparison demonstrating the clarity and detail difference between various video resolutions, including HD (1080p), 2K (3MP), 4MP, 5MP, and 4K (8MP).
6. Garansi jeung Rojongan
6.1 Garansi Produk
The Amcrest NV5216 NVR is guaranteed for a full year from the date of purchase. This warranty is offered with US Support and US Warranty exclusively by Amcrest.
6.2 Rojongan Téknis
For technical assistance, troubleshooting, or warranty claims, please contact Amcrest Support. Refer to the official Amcrest websitus pikeun inpormasi kontak sareng sumber pangrojong pang anyarna.