1. Produk Langkungview
The AJA Ki Pro GO is a portable multi-channel H.264 recorder and player designed for professional video workflows. It enables simultaneous recording of up to four channels of HD and SD video directly to readily available USB drives, offering redundant recording capabilities for enhanced reliability.
Equipped with 4 x 3G-SDI and 4 x HDMI digital video inputs, the Ki Pro GO provides flexible channel assignments, allowing connection to a wide range of modern video sources, including various cameras. Its Genlock-free recording feature simplifies integration by permitting the mixing and matching of incoming video sources without requiring external synchronization.
For audio, the unit supports high-quality 2-channel embedded audio or balanced XLR analog audio, which can be assigned to any recording channel. A multi-channel matrix monitoring function allows for the display of multiple video channels on a single HDMI monitor, streamlining monitoring tasks.
With a compact 2RU design, the Ki Pro GO is both portable and rack-mountable, making it suitable for diverse production environments.
Fitur konci:
- Multi-channel H.264 recording and playback.
- Five USB recording media slots, compatible with commercially available USB 3.0 media.
- Redundant recording capability.
- Genlock-free input for flexible source integration.
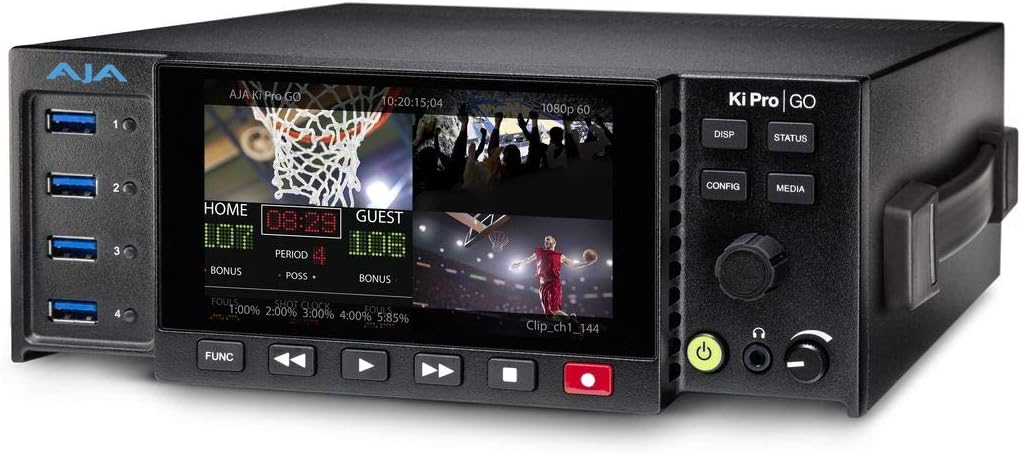
Gambar 1: Hareupeun view of the AJA Ki Pro GO, showing the display with a multi-view layout, USB ports on the left, and control buttons on the right.
2. Setup Guide
2.1 Ngabongkar sareng Inspeksi
- Carefully remove the Ki Pro GO unit and all accessories from its packaging.
- Pariksa unitna pikeun tanda-tanda karusakan fisik. Upami kapendak karusakan, langsung hubungi dealer anjeun.
- Pastikeun yén sadaya komponén anu didaptarkeun dina daptar bungkusan aya.
2.2 Sambungan Daya
- Connect the provided power supply to the 12V-18V DC input on the rear of the Ki Pro GO.
- Plug the power supply into a suitable AC outlet.
- The unit will power on automatically or can be powered on using the front panel power button.
2.3 Sambungan Input Video
The Ki Pro GO supports both 3G-SDI and HDMI video inputs.
- Connect your video sources (e.g., cameras, switchers) to the SDI IN 1-4 or HDMI IN 1-4 ports on the rear panel.
- Pastikeun kabel disambungkeun aman.
2.4 Sambungan Input Audio
Audio can be input via embedded SDI/HDMI or balanced XLR analog inputs.
- For analog audio, connect XLR cables from your audio source to the ANALOG AUDIO IN (CH 1/L, CH 2/R) ports.
- Adjust the +48V MIC/LINE switch as appropriate for your microphone or line-level source.
2.5 USB Media Installation
The Ki Pro GO records to standard USB 3.0 drives.
- Insert up to five formatted USB 3.0 drives into the USB ports on the front panel.
- Ensure drives are properly seated. The unit will detect and prepare them for recording.
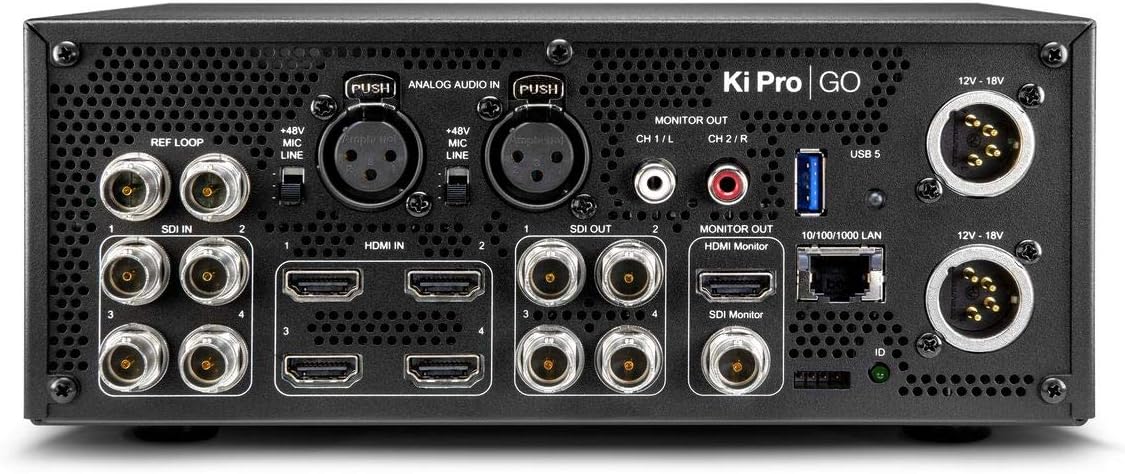
Gambar 2: Tukangeun view of the AJA Ki Pro GO, showing various input/output ports including SDI, HDMI, XLR audio, LAN, and power inputs.
3. Parentah Operasi
3.1 Daya Awal Hurung sareng Konfigurasi
- After connecting power, the unit will boot up. The front display will show the current status.
- Pencét éta KONFIG tombol pikeun ngakses ménu utama.
- Use the rotary knob to navigate through menu options and press to select.
- Configure video input settings, audio routing, and recording parameters as needed.
3.2 Ngarékam
- Ensure USB drives are inserted and recognized by the unit.
- Verify input signals are present and correctly configured on the multi-view tampilan.
- Pencét éta RECORD button (red button) on the front panel to begin recording. The button will illuminate red.
- Pikeun ngeureunkeun rékaman, pencét éta EUREUN kancing.
- For redundant recording, ensure multiple USB drives are inserted; the unit will automatically record to all available drives.
3.3 Playback
- Pencét éta MEDIA button to access recorded clips.
- Use the rotary knob to select the desired clip from the list.
- Pencét éta ulin button (triangle icon) to start playback.
- Ngagunakeun éta MAJU CEPAT jeung NGUNDUH BALIK tombol pikeun navigasi.
- Pencét EUREUN pikeun ngeureunkeun playback.
3.4 Ngawaskeun
The Ki Pro GO offers multi-channel matrix monitoring via its HDMI monitor output.
- Connect an HDMI display to the HDMI MONITOR OUT port on the rear panel.
- Ngagunakeun éta DISP button on the front panel to cycle through display modes, including multi-view and single-channel views.

Figure 3: Closer front view of the AJA Ki Pro GO, highlighting the display and front panel controls for operation.
4. Pangropéa
4.1 beberesih
Pikeun ngajaga kinerja optimal sareng penampilan:
- Ensure the unit is powered off and disconnected from power before cleaning.
- Paké lawon lemes, garing, lint bébas ngusap surfaces exterior.
- Pikeun tanda nekad, a rada damp cloth with a mild, non-abrasive cleaner can be used, followed by a dry cloth.
- Avoid using harsh chemicals, solvents, or abrasive materials, as these can damage the finish.
- Jaga liang ventilasi tetep bersih tina lebu sareng runtah.
4.2 Apdet firmware
AJA periodically releases firmware updates to improve performance, add features, or address issues. It is recommended to keep your Ki Pro GO firmware up to date.
- Visit the official AJA websitus (www.aja.com) to check for the latest firmware for the Ki Pro GO.
- Follow the instructions provided with the firmware download for the update procedure. Typically, this involves loading the firmware onto a USB drive and updating via the unit's menu.
5. Cara ngungkulan
5.1 Taya Daya
- Pariksa sambungan kakuatan: Ensure the power supply is securely connected to both the Ki Pro GO and a working AC outlet.
- Pariksa Power Supply: Confirm the power supply is the correct one for the unit and is functioning.
5.2 No Video Input Detected
- Cék kabel: Ensure all SDI or HDMI cables are correctly connected and not damaged.
- Kaluaran Sumber: Verify that the video source is powered on and outputting a signal.
- Format Input: Check that the input video format is supported by the Ki Pro GO.
- Konfigurasi: Review the input settings in the Ki Pro GO's configuration menu.
5.3 Ngarekam Masalah
- USB Drive Status: Ensure USB drives are inserted, properly formatted, and have sufficient free space. Check the drive status on the unit's display.
- Kasaluyuan drive: Use recommended USB 3.0 drives for optimal performance.
- Sinyal Input: Confirm that a valid video input signal is present and stable.
5.4 Taya Audio
- Sumber Audio: Verify the audio source is active and connected correctly.
- XLR Settings: If using XLR, check the +48V MIC/LINE switch setting.
- Routing Audio: Confirm audio routing settings in the Ki Pro GO's menu are correct for your inputs and outputs.
6. Spésifikasi
| Fitur | Spésifikasi |
|---|---|
| merek | AJA |
| Nomer modél | KI-PRO-GO-R0 |
| palabuhan USB | 5 |
| Saluran | 4 (Multi-channel recording) |
| Input Video | 4 x 3G-SDI, 4 x HDMI |
| Input audio | Embedded SDI/HDMI, Balanced XLR Analog |
| Format Rékam | H.264 |
| Média Rékam | USB 3.0 Drives |
| Dimensi produk | 34.04 x 24.38 x 16 cm |
| Beurat produk | 3.59 kg |
| Batré Kaasup | No |
| Batré Diperlukeun | No |
7. Garansi jeung Rojongan
For detailed warranty information, please refer to the warranty card included with your product or visit the official AJA website. AJA provides technical support and resources for its products.
7.1 Rojongan Téknis
If you encounter issues not covered in this manual or require further assistance, please contact AJA Technical Support through their official websitus:
- AJA Websitus: www.aja.com/support
The website offers FAQs, knowledge base articles, and contact information for direct support.