1. Bubuka
This manual provides detailed instructions for the installation, configuration, and operation of the ASRock Z370 TAICHI motherboard. This motherboard is designed to support 8th Generation Intel Core Processors (Socket 1151) and DDR4 memory, offering a robust platform for personal computing.
2. Pedoman Kasalametan
Observe the following safety precautions during installation and operation to prevent damage to the motherboard or injury:
- Always disconnect the power cord from the wall outlet before handling any components.
- Wear an anti-static wrist strap or frequently touch a grounded object to discharge static electricity.
- Nanganan motherboard dina edges na ulah noél komponén sénsitip.
- Pastikeun ventilasi anu cekap dina jero casing komputer pikeun nyegah panas teuing.
- Tetep motherboard jauh ti Uap jeung hawa ekstrim.
3. Eusi Paket
Pastikeun yén sadaya item aya dina bungkusan:
- ASRock Z370 TAICHI Motherboard
- SLI Bridge
- Kabel SATA (jumlahna tiasa bénten-bénten)
- Instruksi Manual
- Support DVD Disk
- Wi-Fi Antenna (for integrated Intel 802.11ac WiFi)
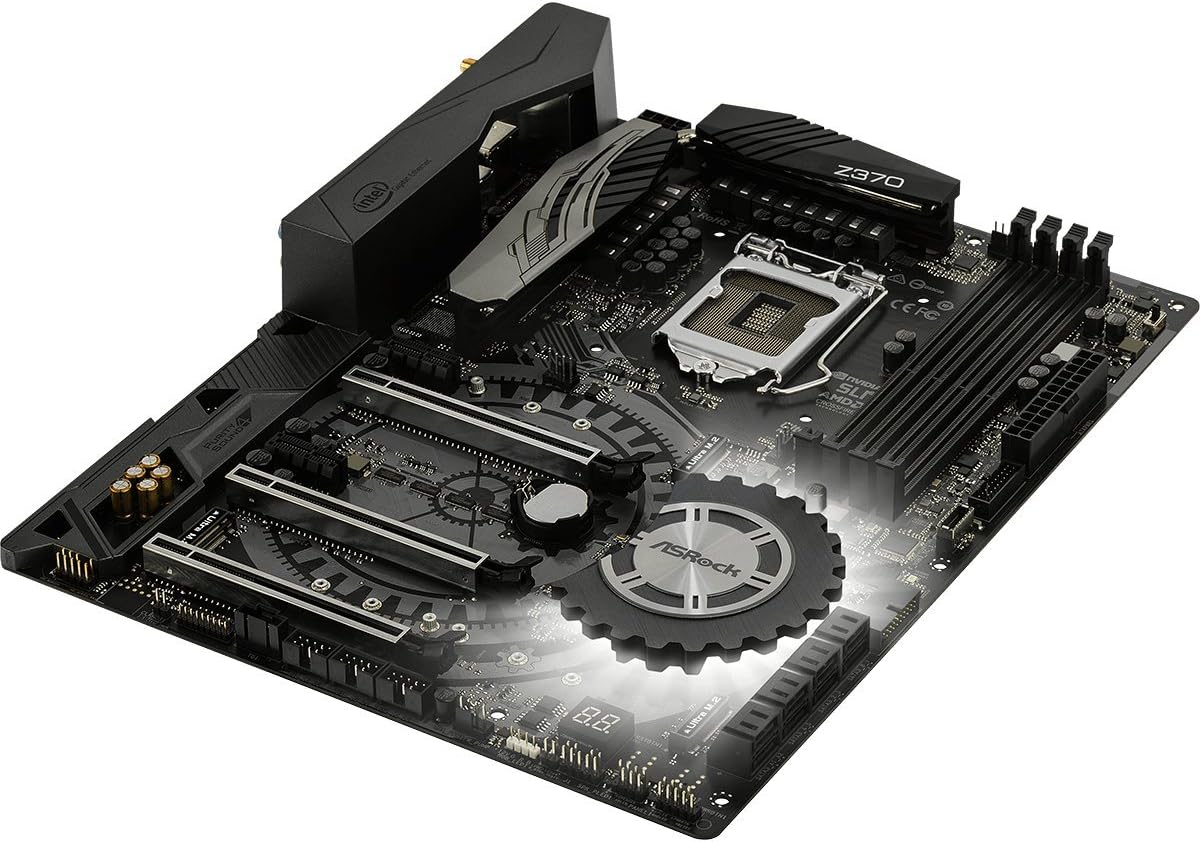
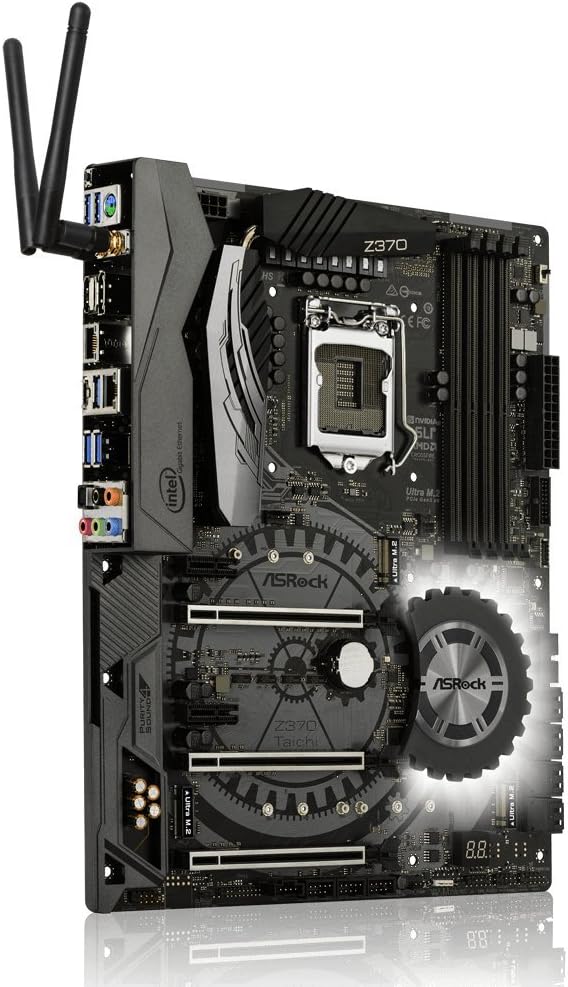
4. Layout motherboard
Familiarize diri jeung komponén konci na panyambungna dina motherboard saméméh instalasi.


5. Pitunjuk Instalasi
Follow these steps for proper installation of components onto the motherboard.
5.1. Pamasangan CPU
- Locate the LGA 1151 CPU socket.
- Buka uas stop kontak CPU jeung angkat plat beban.
- Taliti align CPU jeung stop kontak, mastikeun segitiga emas dina CPU cocog segitiga dina stop kontak nu.
- Gently nempatkeun CPU kana stop kontak tanpa maksa eta.
- Tutup pelat beban sareng amankeun ku uas.
- Pasang cooler CPU nurutkeun parentah produsén na.
5.2. RAM (DDR4) pamasangan
- Identify the DDR4 DIMM slots. For dual-channel operation, refer to the motherboard manual for recommended slot pairing.
- Buka klip dina kadua tungtung slot DIMM.
- Align the notch on the DDR4 module with the key in the DIMM slot.
- Pencét pageuh dina kadua tungtung modul mémori dugi ka jepitan dipasang dina tempatna.
5.3. Pamasangan Alat Panyimpenan (SATA & M.2)
5.3.1. Drive SATA
- Connect SATA data cables to the SATA3 ports on the motherboard and to your SATA hard drives or SSDs.
- Sambungkeun kabel kakuatan SATA tina catu daya anjeun ka drive.
5.3.2. Ultra M.2 SSDs
- Locate the Ultra M.2 slots on the motherboard. The Z370 TAICHI features three Ultra M.2 slots (PCIe Gen3 x4 & SATA3).
- Leupaskeun screw standoff M.2.
- Selapkeun M.2 SSD kana slot dina sudut 30-gelar.
- Gently push the M.2 SSD down and secure it with the standoff screw.
5.4. Pamasangan Kartu PCIe
- Identify the PCIe 3.0 x16 and x1 slots.
- Leupaskeun panutup slot ékspansi saluyu tina kotak komputer Anjeun.
- Align the PCIe card with the slot and press down firmly until it is seated correctly.
- Ngamankeun kartu ku screw kana kasus nu.
5.5. Sambungan Kakuatan
- Sambungkeun konektor kakuatan ATX 24-pin tina catu daya anjeun ka motherboard nu.
- Connect the 8-pin (or 4+4-pin) ATX 12V power connector to the motherboard.
5.6. Panel hareup jeung Rear I / O Sambungan
- Connect the front panel headers (power switch, reset switch, HDD LED, power LED) to the corresponding pins on the motherboard. Refer to the motherboard manual for pin assignments.
- Connect USB 2.0, USB 3.1 Gen1, and USB 3.1 Gen2 Type-C front panel connectors if your case supports them.
- Connect audio cables from the front panel to the motherboard's audio header.
- Install the Wi-Fi antennas to the rear I/O panel connectors for Intel 802.11ac WiFi functionality.
- Connect peripherals (monitor, keyboard, mouse, network cable) to the rear I/O ports.
6. BIOS Setup and Software
After hardware installation, configure the system through the BIOS/UEFI and install necessary software.
6.1. Accessing the BIOS/UEFI
- Daya dina komputer Anjeun.
- Salila prosés boot, pencét sababaraha kali Del or F2 konci pikeun ngasupkeun BIOS / UEFI utilitas setelan.
6.2. Initial BIOS Configuration
- Setel tanggal sareng waktos sistem anu leres.
- Konpigurasikeun urutan boot pikeun ngutamakeun média pamasangan sistem operasi anjeun (drive USB atanapi DVD).
- Review and adjust SATA mode (AHCI is generally recommended for SSDs).
- Simpen parobahan sareng kaluar BIOS.
6.3. Pamasangan supir sareng parangkat lunak
- After installing your operating system, install the necessary drivers from the provided support DVD or download the latest versions from the ASRock website. Key drivers include chipset, audio, LAN, Wi-Fi, and graphics drivers.
- Install ASRock utility software for features like RGB LED control and system monitoring.
6.4. BIOS Apdet
Regularly check the ASRock website for BIOS updates. BIOS updates can improve system stability, compatibility, and performance. Refer to the ASRock website for specific instructions on how to update the BIOS, typically involving a utility or flashing from within the BIOS itself.
7. Cara ngungkulan
Bagian ieu ngabahas masalah umum anu anjeun tingali.
7.1. Taya Daya / Henteu Boot
- Ensure all power cables (24-pin ATX, 8-pin ATX 12V) are securely connected to the motherboard and power supply.
- Verify the power supply switch is in the "ON" position.
- Pariksa sambungan saklar daya panel hareup kana motherboard.
- Coba booting kalawan komponén minimal (CPU, hiji RAM iteuk, kartu grafik lamun euweuh grafik terpadu) pikeun ngasingkeun masalah.
7.2. Taya Kaluaran Témbongkeun
- Confirm the monitor is connected to the correct graphics output (either dedicated GPU or motherboard's integrated graphics port).
- Reseat the graphics card and ensure its power connectors are attached.
- Uji nganggo monitor atanapi kabel tampilan anu béda.
7.3. Instabilitas Sistim / kacilakaan
- Check CPU and RAM temperatures. Ensure CPU cooler is properly installed.
- Verify RAM modules are correctly seated and compatible. Run a memory diagnostic tool.
- If overclocking, revert to default BIOS settings to check for stability.
- Pastikeun yén sadaya supir parantos diropéa.
7.4. Periferal Teu Dideteksi
- Coba sambungkeun periferal ka port anu béda.
- Pariksa manajer alat dina sistem operasi anjeun pikeun masalah supir.
- Ensure the peripheral is powered on and functioning correctly.
8. Spésifikasi
Detailed technical specifications for the ASRock Z370 TAICHI motherboard.
| Fitur | Rincian |
|---|---|
| merek | ASRock |
| Ngaran modél | TAICHI |
| CPU Socket | LGA 1151 |
| Prosesor cocog | Prosesor Intel Core Generasi ka-8 |
| Tipe Chipset | Intel Z370 |
| Téhnologi Mémori RAM | DDR4 |
| Laju mémori | 2400 MHz (Supports DDR4 4333+(OC)) |
| Max Kamampuh Mémori | 64 GB |
| PCIe liang | 3 PCIe 3.0 x16, 2 PCIe 3.0 x1 |
| Rojongan Multi-GPU | NVIDIA Quad SLI, AMD 3-Way CrossFireX |
| Pilihan Kaluaran Grafik | HDMI, DisplayPort |
| Audio | 7.1 CH HD Audio (Realtek ALC1220 Audio Codec), Purity Sound 4 & DTS Connect |
| palabuhan SATA | 8 SATA3 |
| M.2 liang | 3 Ultra M.2 (PCIe Gen3 x4 & SATA3) |
| USB 3.1 Gen2 | 3 (1 Front Type-C, 1 Rear Type-C, 1 Rear Type-A) |
| USB 3.1 Gen1 | 8 (4 Hareup, 4 Tukang) |
| USB 2.0 palabuhan | 3 |
| LAN | Dual Intel Gigabit LAN |
| Konéktipitas Wireless | Intel 802.11ac WiFi + BT 4.2 |
| Fitur husus | ASRock RGB LED, Hyper BCLK Engine II, Intel Optane Memory Ready |
| Ukuran (L x W x H) | 12.2 x 13.7 x 3.6 inci |
| Item Beurat | 3.3 pon |
| Tanggal Sadia munggaran | 7 Oktober 2017 |
9. Émbaran jaminan
ASRock provides a limited warranty for its motherboards. The specific terms and duration of the warranty may vary by region and retailer. Please retain your proof of purchase for warranty claims. For detailed warranty information, refer to the official ASRock websitus atanapi ngahubungan pangecér lokal Anjeun.
10. Rojongan Téknis
For further assistance, driver downloads, BIOS updates, or troubleshooting not covered in this manual, please visit the official ASRock support websitus:
You can also find additional resources and FAQs on the ASRock product page for the Z370 TAICHI model.


