1. Produk Langkungview
The Synology DiskStation DS218+ is a 2-bay Network Attached Storage (NAS) device designed for efficient data management, file sharing, and multimedia streaming. It features a dual-core processor with AES-NI encryption acceleration and a transcoding engine, supporting real-time 4K video transcoding.

Gambar 1.1: Hareupeun view of the Synology DS218+ NAS, showing the power button, USB port, and status indicator lights.
Eusi pakét
- DS218+ main unit x 1
- Pituduh Instalasi Gancang x 1
- Pakét asesoris x 1
- Adaptor kakuatan AC x 1
- Kabel LAN RJ-45 x 1
2. Setup Hardware
2.1 Masang Hard Drives
The DS218+ features a tool-free design for easy hard drive installation. It supports 2.5-inch and 3.5-inch drives.

Gambar 2.1: Hareupeun view of the DS218+ with the front panel removed, revealing the two drive bays.
- Gently pull the front cover to remove it, exposing the drive bays.
- Slide out an empty drive tray from the bay.
- For 3.5-inch drives: Secure the drive to the tray using the provided screws from the accessory pack.
- For 2.5-inch drives: Place the drive into the tray and secure it with screws.
- Slide the loaded drive tray back into the drive bay until it clicks into place.
- Repeat for the second drive if applicable.
- Ganti panutup hareup.
Pidéo 2.1: Pratinjau pondokview demonstrating the tool-free hard drive installation process for a Synology NAS. This video shows how to open the drive bay, insert a hard drive into a tray, and slide it back into the unit.
2.2 Nyambungkeun ka Jaringan sareng Daya
After installing the hard drives, connect the NAS to your network and power source.

Gambar 2.2: Tukangeun view of the Synology DS218+, highlighting the LAN ports, USB 3.0 ports, eSATA port, and power input.
- Connect one end of the RJ-45 LAN cable to the NAS's LAN port and the other end to your router or switch.
- Connect the AC power adapter to the power port on the NAS and then plug it into a power outlet.
- Press the power button on the front panel to turn on the NAS.
3. Initial Software Setup (DiskStation Manager - DSM)
Once the hardware is set up and powered on, you will need to install and configure Synology's DiskStation Manager (DSM) operating system.
- Buka a web browser on a computer connected to the same network as your NAS.
- Pindah ka find.synology.com or enter the NAS's IP address followed by `:5000` (e.g., `http://synologynas:5000`).
- Follow the on-screen instructions to install DSM. You can choose to automatically download the latest DSM version.
- During installation, you will be prompted to create an administrator account and set up storage pools and volumes.
- Select the desired RAID type (e.g., Synology Hybrid RAID (SHR) for beginners) and create shared folders for your data.
Video 3.1: An official Synology video showcasing the Active Backup Suite, demonstrating centralized data protection features within DSM. This video highlights the software capabilities for managing and securing data on the NAS.
4. Operating Your DS218+
4.1 Accessing and Managing Files
DSM provides a user-friendly interface to access and manage your files from various devices.
- File Stasion: Ngagunakeun éta File Station application within DSM to browse, upload, download, and manage files directly through your web browser.
- SMB/AFP: Connect to your shared folders from Windows (SMB) or Mac (AFP) computers as network drives.
- QuickConnect: Enable QuickConnect for easy access to your NAS from anywhere with an internet connection, without complex router settings.
4.2 System pangimeutan
Monitor the health and performance of your NAS using the Resource Monitor and Storage Manager applications in DSM.
- Resource Monitor: View real-time CPU, RAM, network, and disk usage.
- Manajer Panyimpenan: Check drive status, temperature, and volume usage.
5. Pangropéa sareng Perlindungan Data
5.1 Data Backup Strategies
Regular backups are crucial for data protection. The DS218+ offers several options:
- External USB Drive: Use the front USB 3.0 port for quick backups to an external USB drive. Configure backup tasks via DSM.
- Nyadangkeun awan: Utilize Synology's Cloud Sync or Hyper Backup to back up your data to various public cloud services.
- Potret: The advanced Btrfs file system offers 65,000 system-wide snapshots and 1,024 snapshots per shared folder for point-in-time data recovery.
5.2 Hard Drive Health
Monitor your hard drives' health through Storage Manager. Features like S.M.A.R.T. (Self-Monitoring, Analysis and Reporting Technology) and Dynamic Bad Sector Mapping help maintain drive integrity.
Video 5.1: An official Synology video discussing the choice of HDDs and SSDs for Synology NAS devices, emphasizing compatibility and performance considerations.
6. Cara ngungkulan
If you encounter issues with your DS218+, consider the following:
- Lampu Status: Check the LED indicators on the front panel for status, LAN, and disk activity. Refer to the Quick Installation Guide for LED behavior explanations.
- Konektipitas Jaringan: Ensure the RJ-45 LAN cable is securely connected to both the NAS and your router/switch. Verify your network settings in DSM.
- Hard Drive Issues: If a disk indicator light is abnormal, check the drive status in Storage Manager. The tool-free design allows for easy replacement of faulty drives.
- DSM Access: If you cannot access DSM, try using find.synology.com or ensure your computer is on the same network segment.
7. Spésifikasi
| Fitur | Rincian |
|---|---|
| Ram | 2 GB DDR3L (expandable up to 6GB) |
| Kapasitas Hard Drive | Up to 20 TB (Diskless unit) |
| Prosesor | Dual-core with AES-NI encryption engine |
| Ukuran (L x W x H) | 9.14 x 4.25 x 6.5 inci |
| Item Beurat | 2.87 pon |
| Protokol Jaringan | CalDAV, iSCSI, Telnet, SSH, SNMP, VPN (PPTP, OpenVPN, L2TP) |
| Klién dirojong | Windows 7 and 10, Mac OS X 10.11 onward |
| Encryption Performance | Over 113 MB/s reading and 112 MB/s writing |
| 4K Video Transcoding | Live transcoding of up to two concurrent H.265/H.264 4K video streams |
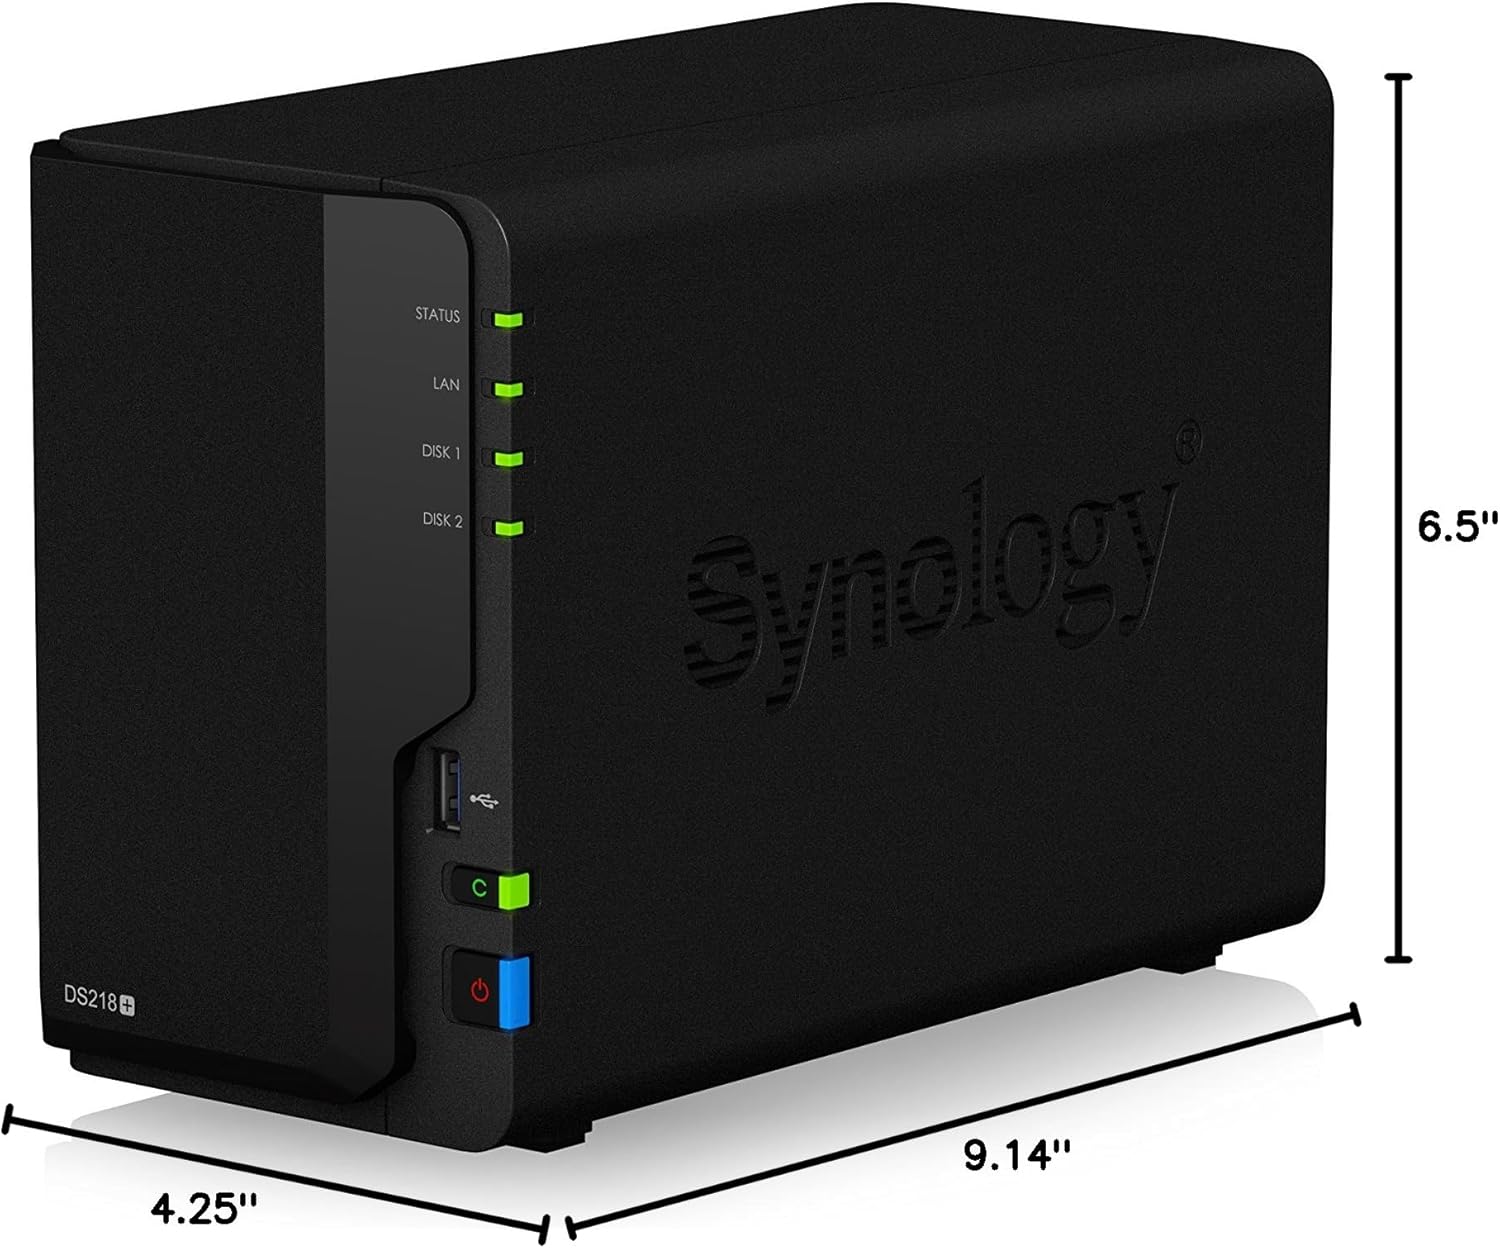
Figure 7.1: Diagram illustrating the physical dimensions of the Synology DS218+.
8. Garansi jeung Rojongan
8.1 Garansi Produk
The Synology DS218+ is backed by a 2-year limited warranty. Please retain your proof of purchase for warranty claims.
8.2 Rojongan Téknis
For technical assistance, visit the official Synology support website or consult the online DSM Help documentation available directly from your NAS interface.


