1. Bubuka
This manual provides detailed instructions for the installation, operation, and maintenance of your Hiseeu A1004NS-US and A1008NS-US 5-in-1 Digital Video Recorders (DVRs). These DVRs are designed for comprehensive security surveillance systems, supporting multiple video input formats including TVI, CVI, AHD, Analog, and IP cameras. Please read this manual thoroughly before using the product to ensure proper setup and functionality.
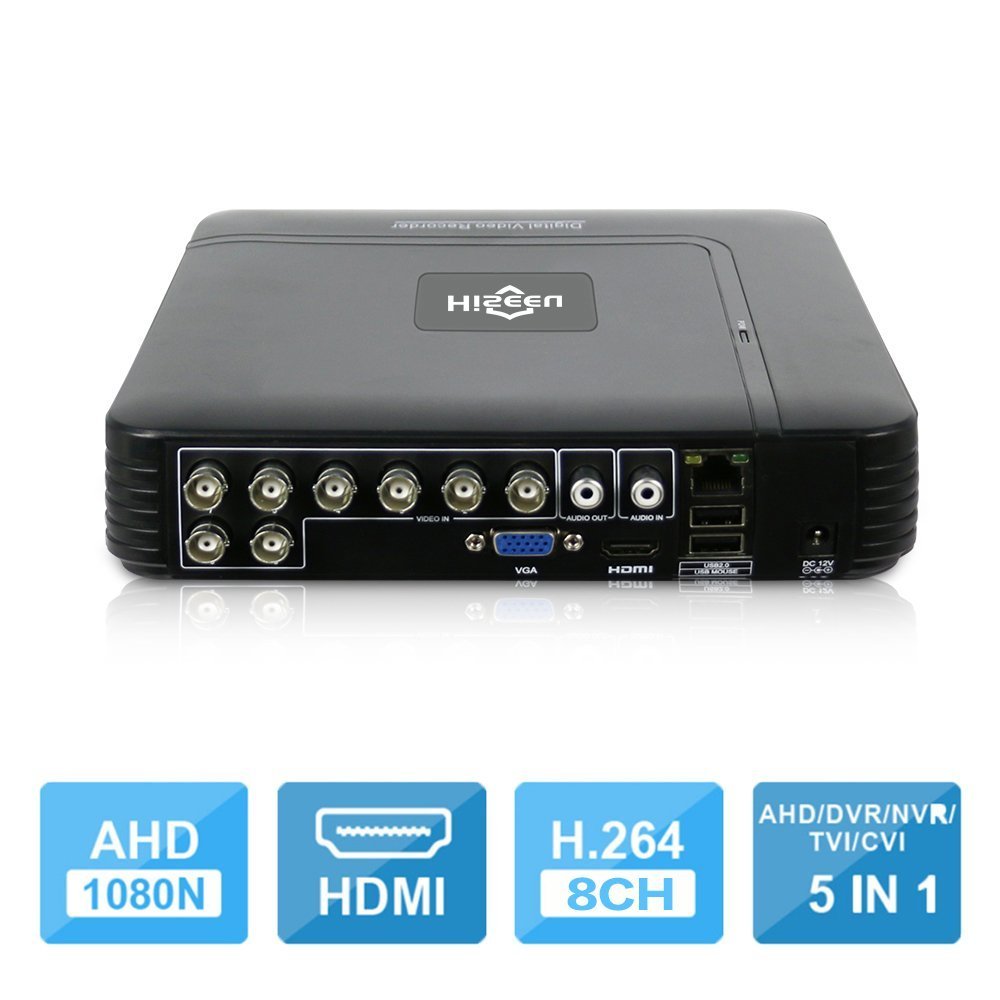
Image 1.1: The Hiseeu 5-in-1 DVR unit, showcasing its compact design and connectivity ports.
2. Émbaran Kasalametan
To prevent injury to yourself or others, and to avoid damage to your device, read all safety information before using the product. Keep this manual for future reference.
- Sumber Daya: Use only the provided power adapter. Using unauthorized adapters may cause fire, electric shock, or damage to the device.
- Ventilasi: Ensure the DVR is placed in a well-ventilated area. Do not block ventilation openings.
- Uap: Do not expose the device to rain, moisture, or any liquids.
- Suhu: Operate the device within the specified temperature range. Avoid extreme heat or cold.
- beberesih: Pegatkeun sambungan listrik saméméh beberesih. Paké kaen garing, lemes. Entong nganggo pembersih cair atanapi aerosol.
- Palayanan: Entong nyobian ngalayanan produk ieu nyalira. Rujuk sadayana ngalayanan ka tanaga jasa anu mumpuni.
3. Eusi Paket
Pariksa yén sadaya barang aya dina pakét anjeun. Upami aya barang anu leungit atanapi ruksak, hubungi padagang anjeun.
- 1 x Mini 4-channel or 8-channel DVR (Model A1004NS-US or A1008NS-US)
- 1 x Mouse USB
- 1 x DC12V Power Adapter
- 1 x Manual Pamaké (dokumén ieu)

Image 3.1: Included accessories: USB mouse and DC12V power adapter.
4. Setélan
Follow these steps to set up your Hiseeu DVR system.
4.1 Pamasangan Hard Drive (henteu kalebet HDD)
The DVR requires a 3.5-inch SATA hard drive for video recording. A hard drive is not included in the package. Please select an appropriate HDD (up to 6TB) based on your camera count and desired recording duration.
- Unscrew the top cover of the DVR.
- Sambungkeun kabel data SATA sareng kabel kakuatan tina DVR ka HDD.
- Ngamankeun HDD ka chassis DVR ngagunakeun screws disadiakeun.
- Ganti panutup luhur sareng amankeun ku sekrup.

Image 4.1: Illustration of connecting the SATA data and power cables to the hard drive.
4.2 Nyambungkeun kaméra
Connect your security cameras to the BNC video input ports on the back of the DVR. This DVR supports 5-in-1 camera types: TVI, CVI, AHD, Analog, and IP cameras. For IP cameras, ensure they support ONVIF 2.0 for compatibility.
4.3 Connecting a Monitor
Connect a monitor to the DVR using either the HDMI or VGA port. The DVR supports 1080P resolution output.
4.4 Sambungan Jaringan
Connect an Ethernet cable from the DVR's LAN port to your router or network switch for remote access and online features.
4.5 Kakuatan Hurung
Connect the DC12V power adapter to the DVR's power input and then plug it into a power outlet. The DVR will power on automatically.
5. Parentah Operasi
This section covers the basic operation of your Hiseeu DVR.
5.1 Initial Setup and Main Menu
Upon first power-on, the DVR will guide you through an initial setup wizard. Use the connected USB mouse to navigate the on-screen menus. The main menu provides access to live view, playback, recording settings, network configuration, and system settings.
5.2 Remote Monitoring (P2P Cloud)
The DVR supports P2P (Cloud) functionality, eliminating the need for port forwarding for remote access. You can monitor your system remotely using a smartphone or PC.
- Aplikasi smartphone: Download the "XMEye" app from your device's app store.
- Tambahkeun Alat: Open the app, register an account, and add your DVR by scanning the QR code displayed on the DVR's monitor (usually found in the network settings) or by manually entering the device ID.
- Hirup View: Sakali ditambahkeun, anjeun tiasa view live feeds from your cameras and access recorded footage.

Gambar 5.1: Example screenshot of the XMEye mobile application for remote viewing.
5.3 Motion Detection and Email Alerts
Configure motion detection settings for each camera to trigger recording and send email notifications or mobile push alerts when motion is detected.
- Arahkeun ka Main Menu > Alarm > Motion Detect.
- Enable motion detection for desired channels.
- Adjust sensitivity and detection areas.
- Configure email settings under Main Menu > Network > Email to receive alerts.
5.4 Puterkeun Pidéo
The DVR supports synchronous 8-channel playback. You can review dirékam footage ti sababaraha kaméra sakaligus.
- Ti live view,-klik katuhu jeung pilih Playback.
- Select the date and time range for the footage anjeun hoyong deuiview.
- Choose the cameras for playback.
- Use the playback controls (play, pause, fast forward, rewind) to navigate through the recording.
5.5 Audio Dua Arah
If your cameras and audio setup support it, the DVR allows for two-way audio communication. Connect a microphone to the audio input and a speaker to the audio output port on the DVR.
6. Pangropéa
Pangropéa rutin ngajamin umur panjang sareng kinerja optimal sistem DVR anjeun.
- beberesih: Periodically clean the DVR's exterior with a soft, dry cloth. Ensure ventilation openings are free from dust and debris.
- Pembaruan firmware: Check the Hiseeu official website for any available firmware updates. Updating firmware can improve performance and add new features. Follow the instructions provided with the update carefully.
- Cadangan Data: Rutin nyadangkeun video foo pentingtage to an external USB drive. This can be done via the DVR's menu system.
- Kaséhatan Hard Drive: Monitor the health of your hard drive through the DVR's system information. Replace the HDD if any errors or warnings are reported.
7. Cara ngungkulan
Bagian ieu alamat masalah umum Anjeun bisa sapatemon jeung DVR Anjeun.
- Henteu aya Kaluaran Pidéo dina Monitor:
- Pariksa sambungan kabel HDMI/VGA.
- Pastikeun monitor dihurungkeun tur disetel ka sumber input nu bener.
- Coba monitor atanapi kabel anu béda.
- Henteu aya gambar kaméra:
- Verify camera power supply and video cable connections.
- For IP cameras, ensure they support ONVIF 2.0 and are correctly configured on the network.
- Check camera settings within the DVR interface.
- Henteu aya rékaman:
- Ensure a hard drive is installed and properly formatted. (Note: Hard drive unit is not included.)
- Check recording schedules and motion detection settings.
- Verify the hard drive status in system settings.
- Aksés Jauh Teu Gawé:
- Pastikeun DVR nyambung ka internét.
- Verify the P2P status in network settings.
- Pariksa sambungan internét smartphone anjeun.
- Ensure the correct device ID or QR code was used to add the DVR to the XMEye app.
8. Spésifikasi
| Fitur | Katerangan |
|---|---|
| Produsén | HisEEu |
| Nomer modél | DVR17823 |
| Diménsi | 28.6 x 25.6 x 7.9 cm; 767 g |
| Téhnologi konektipitas | HDMI, VGA, BNC, Ethernet, USB |
| Alat nu cocog | Desktop Computer, Smartphone, CCTV Cameras (TVI/CVI/AHD/Analog/IP ONVIF) |
| Jumlah Saluran | 4 or 8 (depending on model) |
| Komprési Video | H.264, H.265 |
| Video Input Modes | 5-in-1 (AHD, TVI, CVI, Analog, IP) |
| Kaluaran Video | HDMI, VGA (1080P) |
| Input / Kaluaran Audio | 1 CH Audio In / 1 CH Audio Out |
| Panyimpenan | 1 SATA Port (Max 6TB HDD, HDD not included) |
| Aplikasi Aksés Jarak Jauh | XMEyee |
9. Garansi jeung Rojongan
Your Hiseeu DVR comes with a standard manufacturer's warranty. Please refer to the warranty card included in your package or visit the official Hiseeu websitus pikeun istilah jeung kaayaan jaminan lengkep.
For technical support, troubleshooting assistance, or warranty claims, please contact Hiseeu customer service through their official website or the contact information provided with your purchase. When contacting support, please have your model number (DVR17823) and purchase details ready.


