1. Langkungview
Papan Ékspansi AD/DA Presisi Tinggi Waveshare dirancang pikeun nambihan kamampuan konvérsi analog-ka-digital (AD) sareng digital-ka-analog (DA) anu canggih kana Raspberry Pi anjeun. Papan ieu ngahijikeun ADS1256, ADC presisi tinggi 24-bit 8-kanal, sareng DAC8552, DAC presisi tinggi 16-bit 2-kanal. Éta cocog sareng Raspberry Pi sareng nyayogikeun solusi anu kuat pikeun aplikasi anu meryogikeun pamrosésan sinyal analog anu tepat.
Gambar 1: Leuwihview tina Papan AD/DA Presisi Tinggi Waveshare anu disambungkeun ka Raspberry Pi.
2. Fitur
- Lulugu éksténsi GPIO Raspberry Pi 40PIN standar pikeun sambungan langsung.
- ADS1256 onboard, ADC presisi tinggi 8-kanal 24-bit (input diferensial 4-kanal) kalayan 30ksps samplaju ling.
- DAC8552 onboard, DAC presisi tinggi 16-bit 2-kanal.
- Antarmuka input via pinheaders pikeun nyambungkeun sinyal analog.
- Cocog sareng standar antarmuka sénsor Waveshare pikeun sambungan anu gampang ka rupa-rupa modul sénsor analog.
- Antarbeungeut input/output onboard via terminal sekrup pikeun nyambungkeun sinyal analog/digital.
- Dilengkepan sirkuit deteksi AD/DA pikeun démo sinyal.
3. Tata Letak Papan sareng Définisi Antarmuka
Bagian ieu ngajelaskeun tata letak fisik sareng definisi pin tina Papan Ékspansi AD/DA.

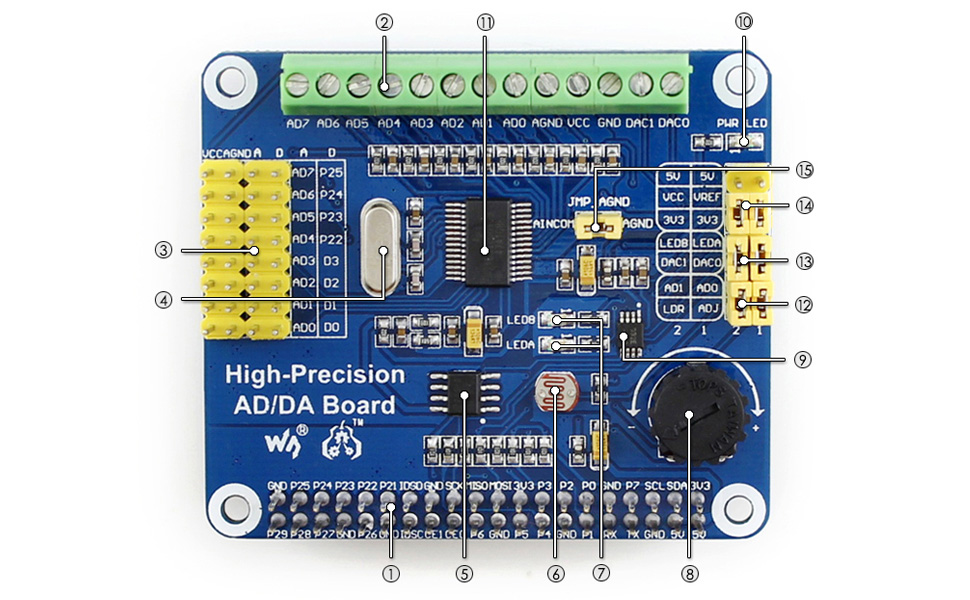
Gambar 2: Komponen anu dilabélan tina Papan AD/DA Presisi Tinggi Waveshare.
- Antarbeungeut GPIO Raspberry Pi: Pikeun nyambungkeun sareng Pi.
- Input/output AD/DA: Terminal sekrup pikeun sambungan sinyal.
- Input AD: Pinheaders, cocog sareng standar antarmuka sénsor Waveshare.
- Kristal 7.68M: Nyayogikeun timing pikeun papan.
- LM285-2.5: Nyayogikeun volum rujukantage pikeun chip ADC.
- Resistor poto: Hiji example sénsor pikeun démo.
- Indikator kaluaran LED: Eupan balik visual pikeun kaluaran.
- Potensiometer 10K: Hiji exampmasukan pikeun demonstrasi.
- DAC8552: DAC presisi tinggi 16-bit, 2 saluran.
- Indikator daya: LED pikeun némbongkeun status daya.
- ADS1256: ADC presisi tinggi 24-bit, 8 saluran (4 input diferensial).
- Jumper uji ADC: Pikeun ngonpigurasikeun modeu uji ADC.
- Jumper uji DAC: Pikeun ngonpigurasikeun modeu uji DAC.
- Jumper pilihan daya: Pikeun milih sumber daya.
- Konfigurasi taneuh rujukan ADC: Nalika AD tunggal diasupkeun, AINCOM mangrupikeun terminal rujukan, tiasa disambungkeun ka GND atanapi voltase rujukan éksternal.tage.
Gambar 3: Définisi pin pikeun Papan AD/DA Presisi Tinggi Waveshare.
| PIN | LAMBANG | PEDARAN |
|---|---|---|
| 1, 17 | 3.3V | Catu daya (3.3V) |
| 2, 4 | 5V | Catu daya (5V) |
| 3, 5, 7, 8, 10, 18, 22, 24, 26, 27, 28, 29, 32, 36, 38, 40 | NC | Teu Nyambung |
| 6, 9, 14, 20, 25, 30, 34, 39 | GND | taneuh |
| 11 | GASIH | Kaluaran data ADS1256 siap, aktif rendah |
| 12 | RESET | Input reset ADS1256 |
| 13 | PDWN | Input sinkronisasi/pareum ADS1256, aktif rendah |
| 15 | CS0 | Pilihan chip ADS1256, aktif rendah |
| 16 | CS1 | Pilihan chip DAC8552, aktip rendah |
| 19 | DIN | Input data SPI |
| 21 | DOUT | kaluaran data SPI |
| 23 | Scuk | jam SPI |
| 31, 33, 35, 37 | GPIO | Manjangkeun ka antarmuka sénsor |
4. Parentah Setup
Turutan léngkah-léngkah ieu pikeun nyetél Papan Ékspansi AD/DA Presisi Tinggi Waveshare anjeun nganggo Raspberry Pi:
- Sambungan fisik: Sacara saksama sejajarkeun header GPIO 40-pin dina papan AD/DA sareng pin anu saluyu dina Raspberry Pi anjeun. Pencét ka handap lalaunan pikeun mastikeun sambungan anu aman.
- Sasayogian tanaga: Pastikeun Raspberry Pi anjeun dipareuman sateuacan nyambungkeun papan AD/DA. Saatos disambungkeun, hurungkeun Raspberry Pi. LED indikator daya dina papan AD/DA kedah hurung.
- Pamasangan parangkat lunak:
- Aksés Wiki Waveshare resmi pikeun "Dewan AD/DA Presisi Tinggi" pikeun mendakan driver sareng ex panganyarnaample kode.
- Unduh sareng pasang pustaka sareng ex anu diperyogikeunampprogram le pikeun ADS1256 ADC sareng DAC8552 DAC. Ieu biasana ngalibatkeun kloning repositori Git sareng kompilasi kode C atanapi Python.
- Pastikeun pustaka Broadcom GPIO dipasang sareng dikonfigurasi kalayan leres pikeun sistem operasi Raspberry Pi anjeun (contona, Raspbian).
- Uji Awal: Ngajalankeun ex disadiakeunampkode pikeun mastikeun fungsi dasar ADC sareng DAC. Ieu bakal ngabantosan mastikeun sambungan hardware sareng setelan software anu leres.
Catetan: Mangga tingal Wiki Waveshare kanggo pituduh pamasangan parangkat lunak anu lengkep sareng mutahir, ogé paréntah khusus pikeun modél sareng sistem operasi Raspberry Pi anjeun.
5. Parentah Operasi
Ngoperasikeun Papan AD/DA Presisi Tinggi ngalibatkeun ngonpigurasikeun chip ADC sareng DAC ngalangkungan komunikasi SPI ti Raspberry Pi.
5.1 Konvérsi Analog-ka-Digital (ADC) nganggo ADS1256
- Sambungan Input: Sambungkeun sinyal analog kana pinheader input AD atanapi terminal sekrup (AD0-AD7). ADS1256 ngadukung 8 saluran tungtung tunggal atanapi 4 saluran diferensial.
- Konfigurasi: Anggo pustaka perangkat lunak anu disayogikeun pikeun ngonpigurasikeun ADS1256. Parameter konci kalebet:
- Pilihan Saluran: Pilih saluran input anu dipikahoyong.
- Setélan gain: Atur gain anu tiasa diprogram amplifier (PGA) pikeun rentang sinyal anu optimal.
- Laju Data: Nyetél samplaju ling (dugi ka 30ksps). Catet yén s anu langkung luhurampTarif le tiasa nyababkeun langkung seueur bising.
- Rujukan Voltage: Konpigurasikeun volum rujukan internal atanapi éksternaltage.
- Pangumpulan Data: Mimitian konvérsi sareng baca data digital 24-bit tina ADS1256 via SPI. Pin DRDY nunjukkeun iraha data énggal sayogi.
5.2 Konvérsi Digital-ka-Analog (DAC) nganggo DAC8552
- Sambungan Kaluaran: Sambungkeun alat kaluaran anjeun kana pin DAC0 sareng DAC1 dina terminal sekrup.
- Kaluaran Data: Kirimkeun nilai digital 16-bit ka DAC8552 via SPI. DAC bakal ngarobah nilai-nilai ieu kana voltase analog anu saluyu.tages.
- Generasi Gelombang: Ku cara terus-terusan ngapdet DAC nganggo runtuyan nilai digital, anjeun tiasa ngahasilkeun rupa-rupa bentuk gelombang analog.
Rujuk ka mantanampkodeu sareng lembar data ADS1256/DAC8552 pikeun inpormasi pamrograman anu lengkep sareng konfigurasi canggih.
6. Pangropéa
Pangropéa anu leres mastikeun umur panjang sareng operasi anu tiasa dipercaya tina Papan Ékspansi AD / DA anjeun:
- Penanganan: Salawasna cekel papan ku sisi-sisina supados henteu nyabak komponén, khususna IC anu sénsitip. Listrik statis tiasa ngaruksak komponén éléktronik.
- beberesih: Upami diperlukeun, gently ngabersihan dewan ku lemes, sikat garing atawa hawa dikomprés pikeun miceun lebu. Hindarkeun ngagunakeun cairan atanapi bahan abrasive.
- Panyimpenan: Simpen papan dina kantong anti-statik di lingkungan anu garing sareng tiis nalika henteu dianggo.
- Sambungan: Pariksa sadaya sambungan (GPIO, terminal sekrup) sacara berkala pikeun mastikeun éta aman sareng bébas tina korosi.
- Apdet Firmware/Software: Pariksa Wiki Waveshare sacara rutin pikeun milarian driver, pustaka, atanapi firmware anu diénggalan anu tiasa ningkatkeun kinerja atanapi ngalereskeun masalah.
7. Cara ngungkulan
Upami anjeun ngalaman masalah sareng Papan Ékspansi AD/DA anjeun, pertimbangkeun léngkah-léngkah ngungkulan masalah ieu:
- Papan Teu Kadétéksi:
- Pastikeun papan dipasang kalayan leres dina header GPIO Raspberry Pi.
- Pariksa yén Raspberry Pi hurung sareng LED daya papan AD/DA hurung.
- Pariksa pangaktipkeun antarmuka SPI dina Raspberry Pi anjeun (contona, via
raspi-config).
- Bacaan/Kaluaran Anu Salah:
- Pariksa deui kabel anjeun pikeun input/output analog.
- Review konfigurasi parangkat lunak anjeun pikeun ADS1256 (gain, laju data, pilihan saluran) sareng DAC8552.
- Pastikeun volume rujukantage setélan bener.
- Tés kalawan vol anu dipikanyahotagsumber pikeun ADC sareng ukur kaluaran DAC nganggo multimeter.
- Noise dina suhu anu langkung luhurampLaju le pikeun ADC dipiharep; pertimbangkeun laju anu langkung handap pikeun presisi anu langkung luhur.
- Masalah Parangkat Lunak/Supir:
- Pastikeun yén anjeun nganggo pustaka parangkat lunak anu leres sareng pangénggalna tina Waveshare Wiki.
- Pariksa yén sadaya dependensi (contona, perpustakaan Broadcom GPIO) parantos dipasang sareng dikonfigurasi kalayan leres.
- Pariksa kasalahan kompilasi upami ngawangun tina sumberna.
- Konsultasi ka forum komunitas atanapi halaman dukungan Waveshare pikeun masalah sareng solusi anu dipikanyaho.
- Papan Henteu Berfungsi:
- Pegatkeun sambungan sareng sambungkeun deui papan.
- Cobi Raspberry Pi anu béda upami sayogi pikeun nyingkirkeun masalah khusus Pi.
- Pariksa papanna pikeun ningali karusakan anu katingali atanapi pin anu bengkok.
8. Spésifikasi
| Fitur | Rincian |
|---|---|
| Ngaran produk | Papan AD/DA Presisi Tinggi |
| merek | Waveshare |
| Chip ADC | ADS1256 (input 24-bit, 8-kanal, 4-diferensial) |
| ADC Sampling Laju | Nepi ka 30ksps |
| Chip DAC | DAC8552 (16-bit, 2-kanal) |
| Panganteur | SPI (Serial Peripheral Interface) |
| Kasaluyuan | Raspberry Pi (40PIN GPIO) |
| Sistem operasi | Linux |
| Téhnologi konektipitas | GPIO |
| Dimensi produk | 7.09 x 3.94 x 3.54 inci (kira-kira 180 x 100 x 90 mm) |
| Item Beurat | 0.353 ons (kira-kira 10 gram) |
| Komponén Kaasup | Papan AD/DA Presisi Tinggi, pak sekrup RPi (2pcs) |

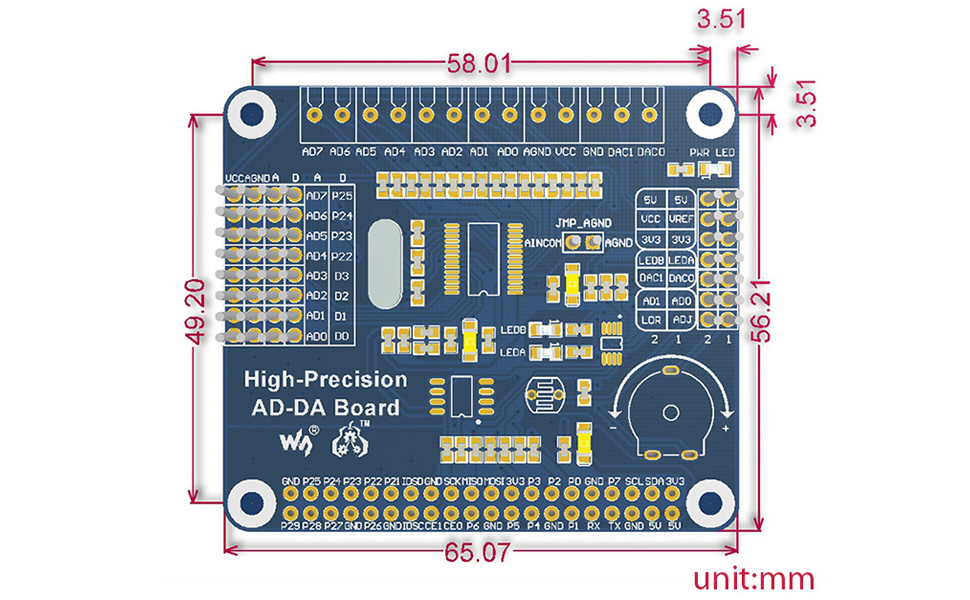
Gambar 4: Diménsi fisik Papan AD/DA Presisi Tinggi Waveshare dina milimeter.
9. Garansi jeung Rojongan
Kanggo inpormasi garansi, dukungan téknis, sareng sumber daya tambahan, mangga buka situs wéb resmi Waveshare. websitus atanapi halaman Wiki produkna. Wiki sering ngandung dokuméntasi lengkep, skéma, sareng contoampkode anu tiasa janten barang anu teu ternilai pikeun pangguna tingkat lanjut sareng ngungkulan masalah.
Resmi Waveshare Websitus: www.waveshare.com
Wiki Produk: Milarian pikeun "Papan AD/DA Presisi Tinggi" dina Wiki Waveshare pikeun dokuméntasi khusus.


