1. Bubuka
The DigiTech JamMan Stereo Looper Delay Pedal (Model JML2) is an advanced looping and phrase sampling device designed for musicians. It allows users to record, play back, and overdub multiple layers of audio in stereo, offering extensive memory capacity and versatile connectivity options. This manual provides detailed instructions for setting up, operating, and maintaining your JamMan Stereo Looper.
2. Fitur konci
- Stereo Looping: Record and play back audio in true stereo.
- Mémori anu lega: Store over 35 minutes of CD-quality loops in 99 internal memories.
- Ékspansi Kartu SD: Utilize an optional SDHC memory card for over 16 hours of additional storage across 99 more slots.
- Konektipitas USB: Connect to a computer for loop organization and archiving using the JamManager software.
- Reverse Playback: Play loops in reverse for creative effects.
- Input mikropon: Balanced XLR mic input with dedicated gain control for dynamic and self-powered microphones.
- Input bantu: Import music from external devices like CD or MP3 players.
- Métronome: Built-in metronome with multiple rhythm sounds and time signatures.
- Saklar suku: Four heavy-duty footswitches for intuitive looping control and loop selection.
- Modeu eureun: Three distinct stop modes: Stop, Finish, and Fade.
- Rhythm Output: Dedicated output for sending a click track to keep other musicians in sync.
- Konstruksi kasar: Durable metal chassis designed for reliability.
3. Setélan
Before operating your JamMan Stereo Looper, ensure all connections are made correctly. Refer to the rear panel diagram for input and output locations.
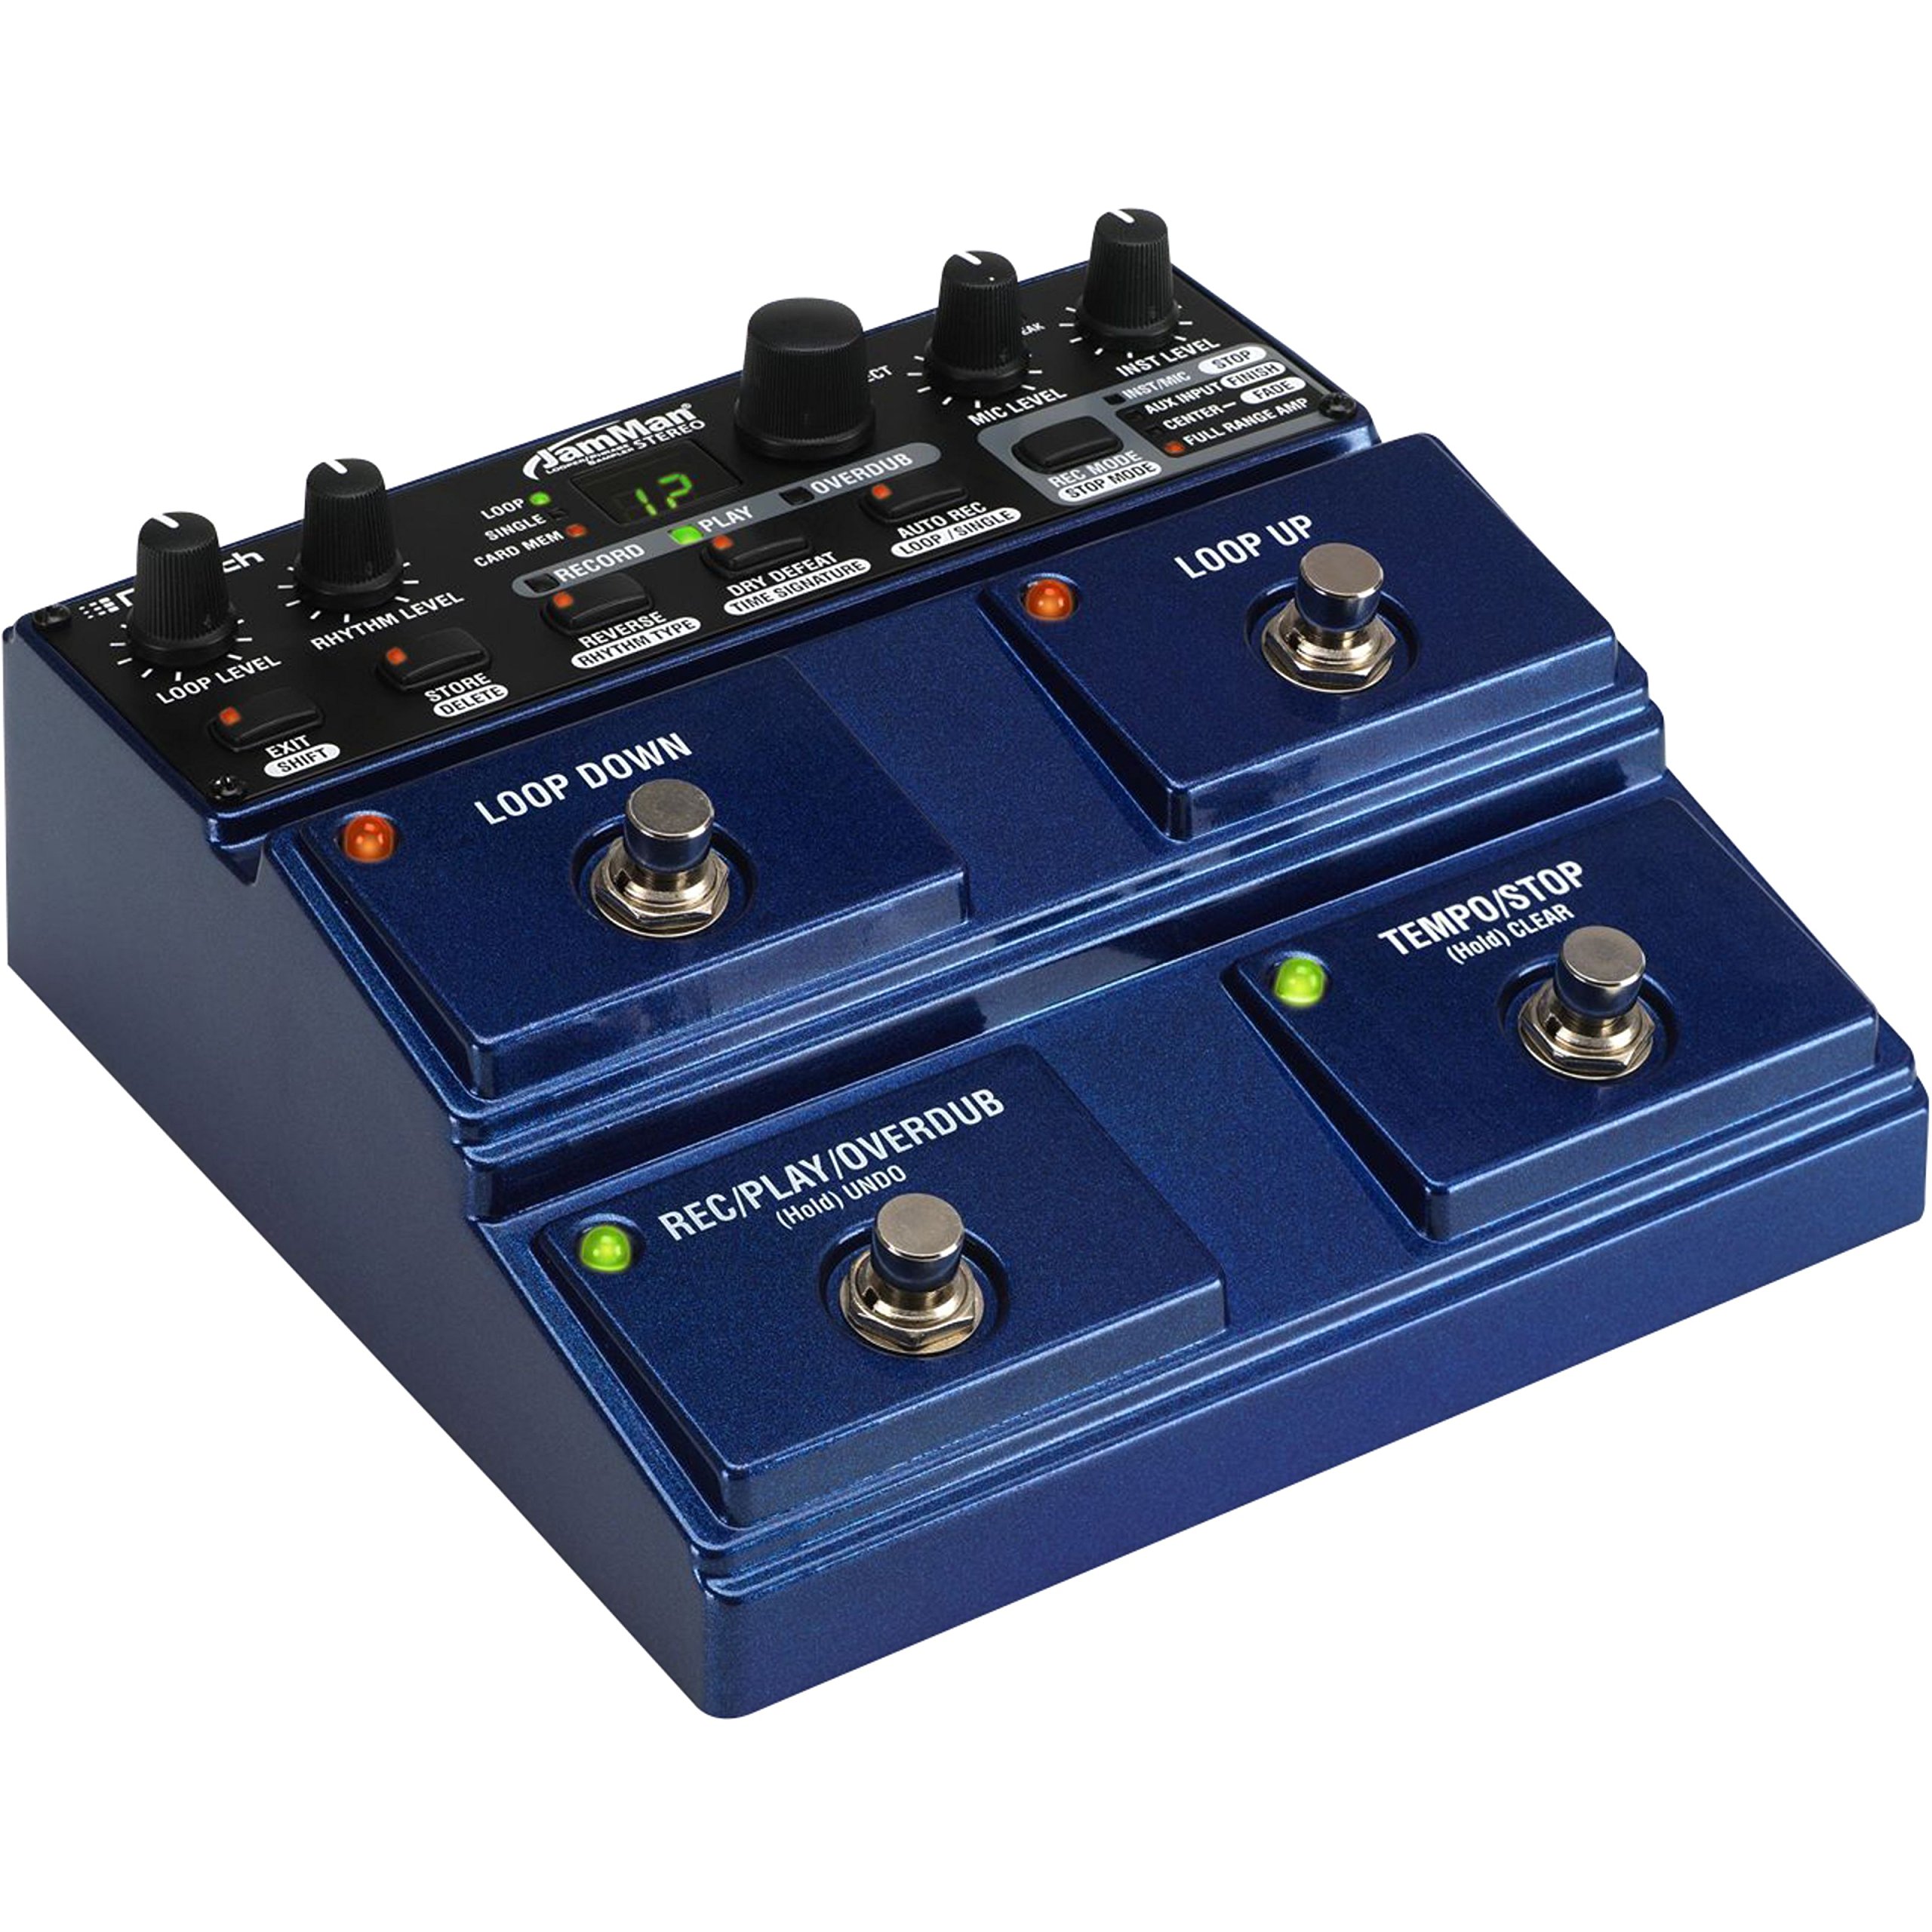
Figure 3.1: Rear Panel Connections. This image displays the rear panel of the JamMan Stereo Looper, highlighting the MIC INPUT (XLR), LEFT (Mono) OUT, RIGHT OUT, RHYTHM OUT, HEADPHONE jack, LEFT (Mono) IN, RIGHT IN, AUX INPUT, FOOTSWITCH input, MEMORY CARD slot, USB port, and 9VAC power input.
3.1 Sambungan Daya
Connect the included 9VAC, 1300mA power supply to the 9VAC input jack on the rear panel. Plug the power supply into a suitable AC outlet.
3.2 Panyambung Audio
- Input Instrumen: Connect your instrument (e.g., guitar, keyboard) to the LEFT (Mono) IN jack. For stereo instruments, connect the second output to the RIGHT IN jack.
- Input mikropon: For microphone use, connect an XLR cable from your microphone to the MIC INPUT. Saluyukeun TINGKAT MIC kenop dina panel luhur.
- Input bantu: To import audio from an external device (e.g., MP3 player), connect it to the AUX INPUT jack.
- Kaluaran Audio: Nyambungkeun LEFT (Mono) OUT ka anjeun amplifier or mixer. For stereo output, also connect the LUAR.
- Headphone: For monitoring, connect headphones to the dedicated headphone jack.
- Rhythm Output: If using an external device for rhythm synchronization, connect it to the RHYTHM OUT.
3.3 Pamasangan Kartu Mémori
The JamMan Stereo Looper supports SDHC memory cards for expanded storage. Insert an SDHC card into the Kartu KENING slot on the rear panel until it clicks into place. To eject, push the card in again.
3.4 Sambungan USB
Connect the JamMan Stereo Looper to your computer using a USB cable for use with the JamManager software. This allows for loop management and archiving.
4. Parentah Operasi
The JamMan Stereo Looper features intuitive controls for recording, playback, and loop management. Familiarize yourself with the top panel controls and footswitches.

Figure 4.1: Top Panel Controls. This image shows the top control panel of the JamMan Stereo Looper, including knobs for LOOP LEVEL, RHYTHM LEVEL, MIC LEVEL, INST LEVEL, and SELECT. It also displays the RECORD, PLAY, OVERDUB buttons, the LOOP/SINGLE/CARD MEM display, and various function buttons like STORE/DELETE, REVERSE/RHYTHM TYPE, DRY DEFEAT/TIME SIGNATURE, AUTO REC/LOOP/SINGLE, REC MODE/STOP MODE, and the four large footswitches: LOOP DOWN, LOOP UP, REC/PLAY/OVERDUB (Hold UNDO), and TEMPO/STOP (Hold CLEAR).
4.1 Basic Looping Functions
- Recording a Loop:
- Pencét éta REC/PLAY/OVERDUB footswitch once to start recording. The RECORD LED will illuminate.
- Play your desired phrase.
- Pencét éta REC/PLAY/OVERDUB footswitch again to stop recording and immediately begin playback. The PLAY LED will illuminate.
- Overdubbing:
- While a loop is playing, press the REC/PLAY/OVERDUB footswitch once to enter overdub mode. The OVERDUB LED will illuminate.
- Play additional layers over your existing loop.
- Pencét éta REC/PLAY/OVERDUB footswitch again to exit overdub mode and continue playback.
- Ngeureunkeun Playback:
- Pencét éta TEMPO/STOP footswitch once to stop the current loop.
- The stop mode can be configured using the REC MODE/STOP MODE button (Stop, Finish, Fade).
- Balikkeun/Balikkeun:
- To undo the last overdub, hold the REC/PLAY/OVERDUB footswitch for approximately 2 seconds.
- To redo the undone overdub, hold the REC/PLAY/OVERDUB footswitch again for 2 seconds.
- Clearing a Loop:
- To clear the current loop, hold the TEMPO/STOP footswitch for approximately 2 seconds.
4.2 Loop Selection and Storage
- Navigating Loops: Ngagunakeun éta LOOP UP jeung LOOP DOWN footswitches to select different loop memories. The display will show the current loop number.
- Saving Loops: After creating a loop, press the STORE/DELETE kancing. Ngagunakeun éta PILIH knob to choose a memory location, then press STORE/DELETE deui pikeun mastikeun.
- Deleting Loops: To delete a loop, select the desired loop, then hold the STORE/DELETE button for approximately 2 seconds. Confirm deletion if prompted.
- Card Memory: To access loops stored on an SDHC card, ensure the card is inserted and select "CARD MEM" using the appropriate button or menu option.
4.3 Fungsi Maju
- Reverse Playback: Pencét éta REVERSE/RHYTHM TYPE button to toggle reverse playback for the current loop.
- Metronome/Rhythm: Pencét éta REVERSE/RHYTHM TYPE button (when not in reverse mode) to cycle through rhythm types. Adjust rhythm level with the TINGKAT RHYTHM kenop.
- Kontrol Tempo: Ketok dina TEMPO/STOP footswitch multiple times to set the tempo for the metronome or for tempo-synced effects.
- JamManager Software: For advanced loop management, connect the JamMan Stereo Looper to your computer via USB and use the DigiTech JamManager software. This software allows you to organize, archive, and transfer loops between the pedal and your computer.
5. Pangropéa
Proper maintenance ensures the longevity and optimal performance of your DigiTech JamMan Stereo Looper.
- beberesih: Anggo kaén anu garing sareng lemes pikeun ngabersihan bagian luar unit. Hindarkeun pembersih abrasive atanapi pangleyur.
- Panyimpenan: Upami teu dianggo, simpen pedal di tempat anu tiis sareng garing, jauh tina sinar panonpoé langsung sareng suhu anu ekstrim.
- Sasayogian tanaga: Always use the original DigiTech power supply or a compatible replacement with the correct voltage and current ratings (9VAC, 1300mA).
- Saklar suku: The heavy-duty footswitches are designed for durability, but avoid excessive force.
- Pembaruan firmware: Check the DigiTech website periodically for any available firmware updates for your JamMan Stereo Looper.
6. Cara ngungkulan
If you encounter issues with your JamMan Stereo Looper, refer to the following common solutions:
| Masalah | Mungkin Cukang lantaranana | Solusi |
|---|---|---|
| Taya kaluaran sora. | Incorrect cable connections, low volume levels, incorrect input/output selection. |
|
| Poor sound quality or noise. | Gain anu teu pantestaging, faulty cables, interference, low-quality power supply. |
|
| Loops not saving or loading. | Memory full, faulty SD card, incorrect save procedure. |
|
| JamManager software not recognizing the device. | USB cable issue, driver problem, software version. |
|
7. Spésifikasi
| Fitur | Rincian |
|---|---|
| Nomer modél | JML2 |
| Item Beurat | 2.22 pon (1.01 kg) |
| Dimensi produk | 6.84 x 6.7 x 2.89 inci (17.37 x 17.02 x 7.34 cm) |
| Mémori internal | 35 minutes of CD-quality audio, 99 loops |
| Mémori éksternal | SDHC card slot (up to 16+ hours, 99 additional loops) |
| Sumber Daya | Corded Electric, 9VAC, 1300mA |
| Panganteur Hardware | USB |
| Format Sinyal | Analog |
| Warna | Biru |
8. Garansi jeung Rojongan
Kanggo inpormasi garansi sareng dukungan téknis, mangga tingal DigiTech resmi websitus atanapi ngahubungan layanan palanggan maranéhanana langsung. Simpen bukti pameseran anjeun pikeun klaim garansi.
Resmi DigiTech Websitus: digital.com


