1. Bubuka
The Velleman DVM810 is a compact and economical 3 1/2 digit digital multimeter designed for measuring DC and AC voltages, DC currents, resistance, and for performing diode and transistor (hFE) tests. It features overload protection and automatic polarity indication, making it suitable for hobbyists, field use, and workshops. This manual provides essential information for the safe and effective operation of your DVM810 multimeter.
2. Fitur Produk
- Automatic polarity indication
- Voltage measurements: AC 500V and DC 500V maximum
- Current measurements: DC 10A maximum (0.2A fused, 10A unfused)
- Resistance measurements: Up to 2MΩ
- Diode and transistor (hFE) test functions
- panyalindungan overload
- Compact design with 3 1/2 digit LCD display
3. Eusi Paket
Mangga parios eusi pakét pikeun mastikeun yén sadaya barang aya:
- Velleman DVM810 Digital Multimeter
- Kabel Tés (hiji beureum, hiji hideung)
- Instruksi Manual
4. Émbaran Kasalametan penting
Read all safety warnings and instructions carefully before using this product. Failure to follow these instructions may result in electric shock, fire, or serious injury.
- Always ensure the multimeter is set to the correct function and range before making any measurements.
- Never exceed the maximum input limits for any range. The maximum voltage for AC/DC is 500V.
- Do not attempt to measure current on circuits with voltages ngaleuwihan 250V.
- Inspect test leads for damaged insulation or exposed metal before each use. Replace damaged leads immediately.
- Entong nganggo multimeter upami katingalina ruksak atanapi upami wadahna dibuka.
- Exercise extreme caution when working with live circuits. Use appropriate personal protective equipment.
- Salawasna pegatkeun daya ka sirkuit sareng kaluarkeun daya voltase luhurtage capacitors before measuring resistance or performing diode/transistor tests.
- Replace the battery when the low battery indicator appears on the display to ensure accurate readings.
5. Produk Langkungview
Familiarize yourself with the components of your Velleman DVM810 multimeter:
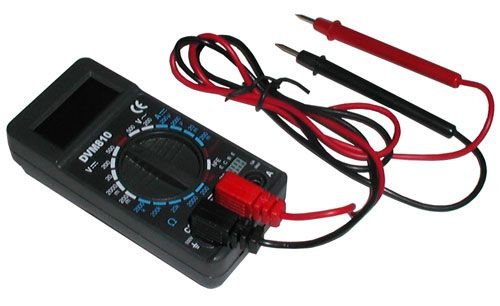
Figure 1: Velleman DVM810 Digital Multimeter. This image displays the front view of the compact multimeter, highlighting its liquid crystal display (LCD), the central rotary function switch, and the input jacks for test leads at the bottom.
- Layar LCD: Shows measurement readings, units, and polarity.
- Saklar Rotary: Dipaké pikeun milih pungsi pangukuran anu dipikahoyong sareng rentang.
- Input Jacks:
- COM Jack: Common (negative) input for all measurements. Connect the black test lead here.
- Jack VΩmA: Input positif pikeun voltage, resistance, and current measurements up to 200mA. Connect the red test lead here.
- Soket 10A: Positive input for high current measurements (up to 10A). Connect the red test lead here for 10A measurements.
- Uji Lead: Red and black leads used to connect the multimeter to the circuit under test.
6. Setélan
6.1 Pamasangan batré
The DVM810 multimeter requires a 9V battery (not always included). To install or replace the battery:
- Ensure the multimeter is turned OFF (rotary switch set to OFF).
- Teangan tempat panutup kompartemen batré dina tonggong unit.
- Remove the screw(s) securing the cover and carefully lift it off.
- Sambungkeun batré 9V anyar kana klip batréna, bari tetep niténan polaritasna anu bener.
- Lebetkeun batréna kana kompartemen teras pasang deui panutupna, pageuhkeun nganggo sekrup.
6.2 Nyambungkeun Test Leads
Sambungkeun kabel tés kalayan leres pikeun pangukuran anu akurat sareng aman:
- Selapkeun lead test hideung kana COM (common) jack.
- Kanggo sabagéan ageung pangukuran (voltage, resistance, diode, hFE, and current up to 200mA), insert the red test lead into the VΩmA jack.
- Pikeun pangukuran arus tinggi (nepi ka 10A), selapkeun lead test beureum kana 10A jack.
7. Parentah Operasi
Before making any measurement, ensure the test leads are correctly connected and the rotary switch is set to the appropriate function and range.
7.1 Ngukur DC Voltage (V=)
- Selapkeun kalungguhan beureum kana VΩmA jack and the black lead into the COM jack.
- Setel saklar puteran kana Voltase DC anu dipikahoyongtage (V=) range. Start with the highest range if the voltage teu kanyahoan.
- Connect the test leads across the component or circuit to be measured (in parallel).
- Baca voltage value on the LCD display. The display will show the correct polarity.
7.2 Ngukur AC Voltage (V~)
- Selapkeun kalungguhan beureum kana VΩmA jack and the black lead into the COM jack.
- Setel saklar puteran kana Voltase AC anu dipikahoyongtage (V~) range. Start with the highest range if the voltage teu kanyahoan.
- Connect the test leads across the component or circuit to be measured (in parallel).
- Baca voltage nilai dina tampilan LCD.
7.3 Measuring DC Current (A=)
Caution: Never connect the multimeter in parallel with a voltage sumber nalika ngukur arus, sakumaha ieu bisa niup sekering atawa ngaruksak méter.
- Determine the expected current. For currents up to 200mA, insert the red lead into the VΩmA jack. For currents up to 10A, insert the red lead into the 10A jack. Always insert the black lead into the COM jack.
- Set the rotary switch to the appropriate DC Current (A=) range. Start with the highest range if the current is unknown.
- Turn off power to the circuit. Open the circuit where the current is to be measured.
- Sambungkeun multimeter dina runtuyan jeung sirkuit.
- Restore power to the circuit and read the current value on the LCD display.
7.4 Ngukur Résistansi (Ω)
Caution: Ensure the circuit is completely de-energized and all capacitors are discharged before measuring resistance.
- Selapkeun kalungguhan beureum kana VΩmA jack and the black lead into the COM jack.
- Set the rotary switch to the desired Resistance (Ω) range. Start with a higher range if the resistance is unknown.
- Sambungkeun lead test kana komponén anu bakal diukur.
- Baca nilai lalawanan dina tampilan LCD.
7.5 Tés Dioda
Caution: Ensure the diode is disconnected from the circuit or the circuit is de-energized before testing.
- Selapkeun kalungguhan beureum kana VΩmA jack and the black lead into the COM jack.
- Set the rotary switch to the Diode symbol (→|).
- Sambungkeun kabel beureum ka anoda sareng kabel hideung ka katoda dioda. Layar bakal nunjukkeun voltase majutage drop (typically 0.5V to 0.8V for silicon diodes).
- Reverse the leads. The display should show 'OL' (Overload) for a good diode. If it shows a reading in both directions or 'OL' in both directions, the diode may be faulty.
7.6 Transistor (hFE) Test
Caution: Ensure the transistor is disconnected from the circuit before testing.
- Selapkeun kalungguhan beureum kana VΩmA jack and the black lead into the COM jack.
- Atur switch Rotary ka posisi hFE.
- Identify if the transistor is NPN or PNP. Insert the transistor's emitter, base, and collector leads into the corresponding holes in the hFE socket on the multimeter.
- Read the hFE (DC current gain) value on the LCD display.
8. Spésifikasi
| Parameter | Nilai |
|---|---|
| merek | Véleman |
| Nomer modél | DVM810 |
| Tipe Pangukuran | Multimeter |
| DC Voltage Rentang | Nepi ka 500V |
| AC Voltage Rentang | Nepi ka 500V |
| DC Range Ayeuna | Up to 10A (0.2A fused, 10A unfused) |
| Rentang lalawanan | Nepi ka 2MΩ |
| Diode Tés | Sumuhun |
| Uji Transistor (hFE). | Sumuhun |
| tampilan | 3 1/2 Digit LCD |
| Sumber Daya | Batré 9V (teu kalebet) |
| Diménsi | Kira-kira 3.70" x 1.81" x 1.03" |
| Item Beurat | Kira-kira 3.2 ons (0.2 lbs) |
| UPC | 836479002272 |
9. Pangropéa
9.1 Ngagantian batré
When the low battery indicator appears on the LCD, replace the 9V battery as described in Section 6.1. A weak battery can lead to inaccurate readings.
9.2 beberesih
Pikeun ngabersihkeun multimeter, usap wadahna ku adamp cloth and a mild detergent. Do not use abrasives or solvents. Ensure the unit is completely dry before use.
9.3 Inspeksi Uji Coba
Regularly inspect the test leads for any signs of damage, such as cracked insulation, exposed wires, or loose connections. Replace damaged leads immediately to prevent electric shock hazards.
10. Cara ngungkulan
- Teu aya tampilan atanapi tampilan anu samar: Pariksa batréna. Ganti upami diperyogikeun.
- Bacaan anu salah:
- Ensure the rotary switch is set to the correct function and range.
- Pariksa batré voltage; replace if low.
- Pastikeun lead test disambungkeun leres tur teu ruksak.
- For resistance measurements, ensure the circuit is de-energized.
- 'OL' (Overload) ditampilkeun: The measured value exceeds the selected range. Select a higher range or ensure the circuit is within the meter's capabilities.
- Fuse blown (during current measurement): If the meter stops measuring current, the internal fuse may have blown. Refer to a qualified technician for fuse replacement.
11. Garansi jeung Rojongan
Warranty information for the Velleman DVM810 Digital Multimeter is typically provided with your purchase documentation or can be found on the official Velleman website. For technical support, service, or further inquiries, please refer to the contact information provided by your retailer or the manufacturer's official support channels.