![]() HT1 Thermostat Touch
HT1 Thermostat Touch
Screen Simple Programming
Instruction Manual

 |
Touch Screen |
|
Simple Programming |
|
5+2 / 7 Day Schedules |
|
User-friendly Menu |
|
Vertical / Horizontal models |
INSTALLATION AND WIRING
Carefully separate the front half of the thermostat from the back plate by placing a small flat head terminal driver into the slots on the bottom face of the thermostat.
Carefully unplug the cable connector which is plugged into the front half of the thermostat.
Place the thermostat front half somewhere safe.
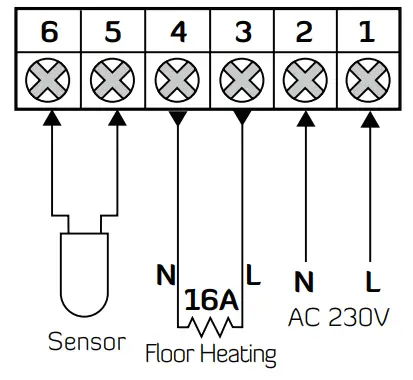
Follow the Wiring Diagram to do the wiring.
Screw the thermostat back plate on to the flush box Re-connect the thermostat cable and clip the two halves together.
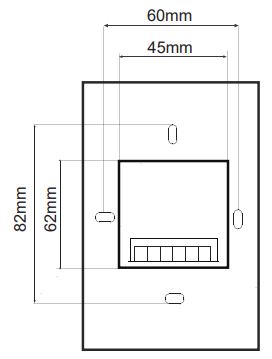
DIMENSIONS
WIRING DIAGRAM
LCD SYMBOLS
| power on / off | |
| M | mode button / menu button program button |
| confirm the settings | |
| increase | |
| decrease | |
| auto mode | |
| manual mode | |
| key lock symbol | |
| the heating is turned on | |
| P1,P2,P3,P4 | the program numbers |
| SET | set temperature |
| Er | sensor not installed or error |
| A | air sensing mode |
| F | floor sensing mode |
| FA | air & floor sensing mode |
TECHNICAL INFORMATION
| SPECIFICATIONS | |
| SUPPLY VOLTAGE | 5°C ~35°C |
| SWITCHING CAPABILITY | 230-240 VAC |
| TEMP RANGE(A) | 16A |
| FLOOR SENSOR resistance default to 25°C |
10 Kohm. |
| IP RATING | 30 |
| ORIENTATION | VERTICAL |
SETTING THE OPERATING SCHEDULES
For 7 day programmable mode
Default Settings
| MONDAY – SUNDAY | ||
| PROGRAM | TIME | TEMP |
| P1 | 7 | 22° |
| P2 | 9.3 | 16° |
| P3 | 16.3 | 22° |
| P4 | 22.3 | 16° |
Press and M hold for 5 seconds,the day display will flash.
Use the![]() arrows to select the day.
arrows to select the day.
Press and hold the![]() arrow for about 5 seconds to select all 7 days of the week, and to cancel press and and hold
arrow for about 5 seconds to select all 7 days of the week, and to cancel press and and hold![]() the arrow for about 5 seconds again.
the arrow for about 5 seconds again.
Press M,the time for P1 will flash.
Use the![]() arrows to adjust the time for P1.
arrows to adjust the time for P1.
Press M,the temperature for P1 will flash.
Use the![]() arrows to adjust the temperature for P1.
arrows to adjust the temperature for P1.
Press M,the time for P2 will flash.
Use the![]() arrows to adjust the time for P2.
arrows to adjust the time for P2.
Press ,M the temperature for P2 will flash.
Use the ![]() arrows to adjust the temperature for P2.
arrows to adjust the temperature for P2.
Repeat above steps for P3 and P4.
![]() Note:
Note:
For Saturday and Sunday,
if you want to clear the time period of P2 and P3, press
![]() Press again to cancel.
Press again to cancel. ![]() during programing.
during programing.
SETTING THE OPERATING SCHEDULES
For 5+2 day programmable mode(default)
Default Settings
| MONDAY – FRIDAY | SATURDAY – SUNDAY | |||
| PROGRAM | TIME | TEMP | TIME | TEMP |
| P1 | 7 | 22°C | 7 | 22°C |
| P2 | 9.3 | 16°C | 9.3 | 16°C |
| P3 | 16.3 | 22°C | 16.3 | 22°C |
| P4 | 22.3 | 16°C | 22.3 | 16°C |
How to change the programs for Monday- Friday?
Press and hold for 5 seconds,the time for P1 will flash.
Use the ![]() arrows to adjust the time for P1.
arrows to adjust the time for P1.
Press M,the temperature for P1 will flash.
Use the![]() arrows to adjust the temperature for P1.
arrows to adjust the temperature for P1.
Press M,the time for P2 will flash.
Use the![]() arrows to adjust the time for P2.
arrows to adjust the time for P2.
Press M,the temperature for P2 will flash.
Use the![]() arrows to adjust the temperature for P2.
arrows to adjust the temperature for P2.
Repeat above steps for P3 and P4.
How to change the programs for Saturday- Sunday?
When Monday- Friday programs has been set, continue to press M,the time for P1 will flash.
Use the![]() arrows to adjust the time for P1.
arrows to adjust the time for P1.
Press M the temperature for P1 will flash.
Use the ![]() arrows to adjust the temperature for P1.
arrows to adjust the temperature for P1.
Press M,the time for P2 will flash.
Use the ![]() arrows to adjust the time for P2.
arrows to adjust the time for P2.
Press M,the temperature for P2 will flash.
Use the ![]() arrows to adjust the temperature for P2.
arrows to adjust the temperature for P2.
Repeat above steps for P3 and P4.
![]() Note:
Note:
For Saturday and Sunday,
if you want to clear the time period of P2 and P3, press ![]() during programing.
during programing.
Press![]() again to cancel.
again to cancel.
ADJUSTING THE PARAMETER VALUES
Turn the thermostat off by pressing![]() After turning the thermostat off, press M The following menu will be displayed.
After turning the thermostat off, press M The following menu will be displayed.
Use the ![]() arrows to adjust.
arrows to adjust.
PressM to move to next menu.
Press ![]() to store and exit.
to store and exit.
- Sensor Mode: A / AF / F
A =Air Sensing Only(Has built in sensor)
AF =Air & Floor sensing(Floor probe must be installed)
F =Floor Sensing(Floor probe must be installed) - Switching Differential
1°C, 2°C….10°C ( 1°C by default) - Air Temp Calibration
-5°C ~ 5°C ( 0°C by default) - Floor Temp Calibration
-5°C ~ 5°C ( 0°C by default) - Auto Exit Time
5 ~ 30 seconds ( 20 seconds by default) - Temperature Display Mode
A : display air temperature only (by default)
F : display floor temperature only
AF : display air and floor temperature alternately - Max Floor Temp Limit
20°C ~ 40°C ( 40°C by default) - Backlight Timer
0,10,20,30,40,50,60, ON ( 20 seconds by default) - Clock Format
12 / 24 Hour clcok format ( 24 Hour clock by default) - Frost protection
00 ,01 (default 00=not activated, 01=activated) - 5+2 / 7 Day Program Option
01 = 5+2 Day Program ,02= 7 Day Program (default 01)
SETTING THE TIME AND DAY
Press ![]() , the time display will flash.
, the time display will flash.
Use the ![]() arrows to adjust.
arrows to adjust.
Press ![]() , the day display will flash.
, the day display will flash.
Use the ![]() arrows to adjust.
arrows to adjust.
Now press![]() to store and exit.
to store and exit.
AUTO / MANUAL MODE
Press M to select Auto or Manual mode.
Auto mode:![]()
Manual mode:![]()
In Manual mode, press the![]() arrows to set the desired temperature.
arrows to set the desired temperature.
In Auto mode, press the ![]() arrows will override the current programed temperature unitl the next programmed period.
arrows will override the current programed temperature unitl the next programmed period.
LOCK THE KEYPAD
To lock the keypad, press and hold![]() for 5 seconds, you will see a lock symbol
for 5 seconds, you will see a lock symbol ![]() . To unlock, repeat the steps above and the lock symbol will disappear.
. To unlock, repeat the steps above and the lock symbol will disappear.
TEMPORARY TEMPERATURE OVERRIDE
In Auto mode, press the![]() arrows, the temperature display will start to flash.
arrows, the temperature display will start to flash.
Use the![]() arrows to adjust the temperature.
arrows to adjust the temperature.
Press![]() to confirm.
to confirm.
Now you will see “ O/RIDE ” below the temperature display. Your thermostat will maintain the new set temperature until the next programmed period. To cancel the override setting, press and hold M for about 5 seconds.
Documents / Resources
 |
Thermafloor HT1 Thermostat Touch Screen Simple Programming [pdf] Instruction Manual HT1 Thermostat Touch Screen Simple Programming Programmable, HT1, Thermostat Touch Screen Simple Programming Programmable, Touch Screen Simple Programming Programmable, Simple Programming Programmable, Programming Programmable, Programmable |


