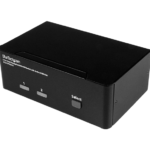
SEADA SD-MV-KM43 4K60Hz KVM Matrix with Multiviewer and Matrix Switch

Specifications
- Product: SD-MV-KM43 4K60Hz KVM Matrix with Multiviewer & Matrix Switch
- Resolution: Up to 3840×2160@60Hz
- Inputs: 4 x HDMI2.0, 4 x PC USB/BM
- Outputs: 2 x HDMI2.0, 1 x HDMI2.0 loop out
- Control: Front panel buttons, remote control, RS232 commands, Mouse & keyboard
Product Usage Instructions
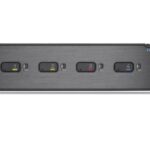
Front Panel
The front panel of the device has various buttons for control:
- IR: Receive signals from the remote control.
- Input Selection: Short press to select input on full screen, long press for loop out.
- View Modes: Quad-view, dual-view, etc.
- Scenes Recall: Recall preset layouts.
- Resolution: Switch output resolution.
- Power: Power on/off switch.
- USB Ports: Share external USB devices among input PCs.
Rear Panel
The rear panel of the device includes various interfaces:
- HDMI Inputs & Outputs: Interfaces for HDMI input and output with resolutions up to 4K60hz.
- USB Inputs: USB/BM input interfaces for connecting PCs an devices.
- Keyboard/Mouse: USB/AM interface for connecting keyboard or mouse for KVM control.
FAQ
How do I switch between different input sources?
You can switch between different input sources using the front panel buttons or the remote control provided with the device.
Introduction
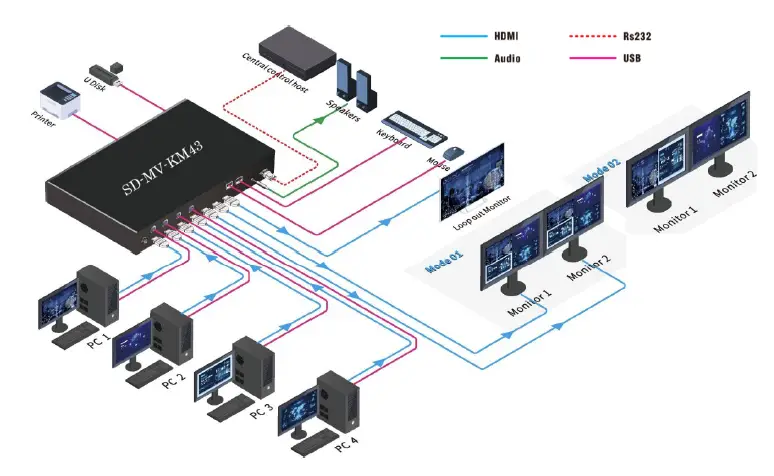
The SD-MV-KM43 KVM Matrix with Multiviewer & Matrix Switch is designed to display multi video inputs anywhere & any size onto one or two displays. It features four HDMI inputs supporting up to 4K and 2 HDMI outputs with resolution up to 4K as well. It also provides a HDMI loop out for any one of 4 inputs and 1 analog output for audio processing. It is extremely flexible and seamless switching capable multiviewer making it perfect for applications such as broadcasting, security, boardroom, TV studio and so on.
SD-MV-KM43 supports KVM for all 4 HDMI input signals. Customers can display all 4 PC signals onto signal monitor and KVM control them simultaneously or customer can display those 4 PC signals onto two monitors and use the ‘move and switch’ feature to control them which means that the very same set of keyboard & mouse can move freely between two screens when 2 HDMI outputs is set up as 1×2 KVM station. It supports access to external devices, such as printers, USB disk etc, and all external USB devices can be shared by all 4 PCs simultaneously.
Control is quick and comprehensive on SD-MV-KM43, it can be controlled using buttons at the front panel, the remote control, RS232 commands, or Mouse & keyboard directly.
Features
- 4 x HDMI2.0 inputs and 2 x HDMI2.0 output with resolution up to 3840×2160@60Hz.
- 1 x HDMI2.0 loop out, resolution up to 3840 x 2160@60Hz.
- Support 4 in 2 out matrix switching
- Support Multiview each screen with quad-view, triple view, dual-view and full view
- All signal windows position and size can be adjusted arbitrarily.
- 4 x PC USB/BM input, 2 x USB/AM mouse and keyboard input.
- Support access to external USB devices by 4 PCs simultaneously.
- 3 customized screen layouts save and recall.
- PIP transparency setting, signals switching and scenes save/recall through mouse and keyboard.
- Operate 4 computers at the same time by a set of mouse and keyboard.
- 3.5mm stereo audio output for de-embedding.
- Control by front panel buttons, IR remote control, Mouse & keyboard, RS232(Third party control)
Front Panel

| No. | Menu | Function |
| 1 | IR | Receive signals from the remote control. |
| 2 | 1 | Short press the button to select input 1 on full screen.
Long press for 3 seconds to select input 1 as loop out. |
| 3 | 2 | Short press the button to select input 2 on full screen.
Long press for 3 seconds to select input 2 as loop out. |
| 4 | 3 | Short press the button to select input 3 on full screen.
Long press for 3 seconds to select input 3 as loop out |
| 5 | 4 | Short press the button to select input 4 on full screen.
Long press for 3 seconds to select input 4 as loop out. |
| 6 | Quad-view mode for 2 duplicated outputs
Dual-view mode for 2 different outputs |
|
| 7 | Scenes | Recall preset layoutss from M1, M2 and M3. |
| 8 | Audio | Switching audio output from 4 HDMI inputs. |
| 9 | Resolution | Press the button to switch output resolution. |
| 10 | Power | Power on/off switch. |
| 11 | USB | External USB device can be shared by 4 input PCs at the
same time via these 2 USB ports. |
Rear Panel
| No. | Menu | Function |
| 1 | Input 1 | HDMI input interface 1, resolution up to 4K60hz |
| 2 | Input 2 | HDMI input interface 2, resolution up to 4K60hz |
| 2 | Input 3 | HDMI input interface 3, resolution up to 4K60hz |
| 4 | Input 4 | HDMI input interface 4, resolution up to 4K60hz |
| 5 | Output 1 | HDMI output interface 1, resolution up to 4K60hz |
| 6 | Output 2 | HDMI output interface 2, resolution up to 4K60hz |
| 7 | LOOP | HDMI loop out interface, resolution up to 4K60hz |
| 8 | USB 1 | USB/BM input interface 1 |
| 9 | USB 2 | USB/BM input interface 2 |
| 10 | USB 3 | USB/BM input interface 3 |
| 11 | USB 4 | USB/BM input interface 4 |
| 12 | Keyboard | Connect this USB/AM interface with keyboard or mouse for KVM control. |
| 13 | Mouse | Connect this USB/AM interface with keyboard or mouse for KVM control. |
| 14 | Audio | HDMI audio de-embedding output via this 3.5mm analog audio jack. |
| 15 | RS232 | Third party central control via this RS232 interface. |
| 16 | DV12V | Power interface |
Remote Control Operation
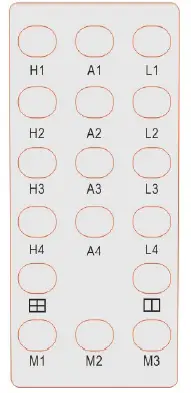
| Button | Function |
| H1 | Select input 1 on full screen display |
| H2 | Select input 2 on full screen display |
| H3 | Select input 3 on full screen display |
| H4 | Select input 4 on full screen display |
| A1 | Switch to audio of HDMI input 1 |
| A2 | Switch to audio of HDMI input 2 |
| A3 | Switch to audio of HDMI input 3 |
| A4 | Switch to audio of HDMI input 4 |
| L1 | Select input 1 as loop out |
| L2 | Select input 2 as loop out |
| L3 | Select input 3 as loop out |
| L4 | Select input 4 as loop out |
| Quad-view display for 2 duplicate outputs | |
| Dual-view display for 2 different outputs | |
| M1 | Recall preset mode 1 |
| M2 | Recall preset mode 2 |
| M3 | Recall preset mode 3 |
Mouse & Keyboard Operation
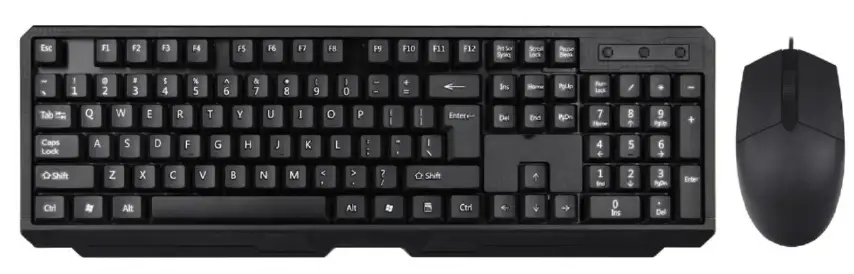 Mouse Wheel: By double-clicking the mouse wheel, you can switch between the functions of KVM and controlling the signal windows for Multiview and signal switching.
Input Signals Management
When the operation menu is shown on the top of the screen, the system is in the mode of signals management for Multiview and signal switching.
Users can manage the input signal window size, layout, signal switching, resolution adjustment, audio switching and so on.
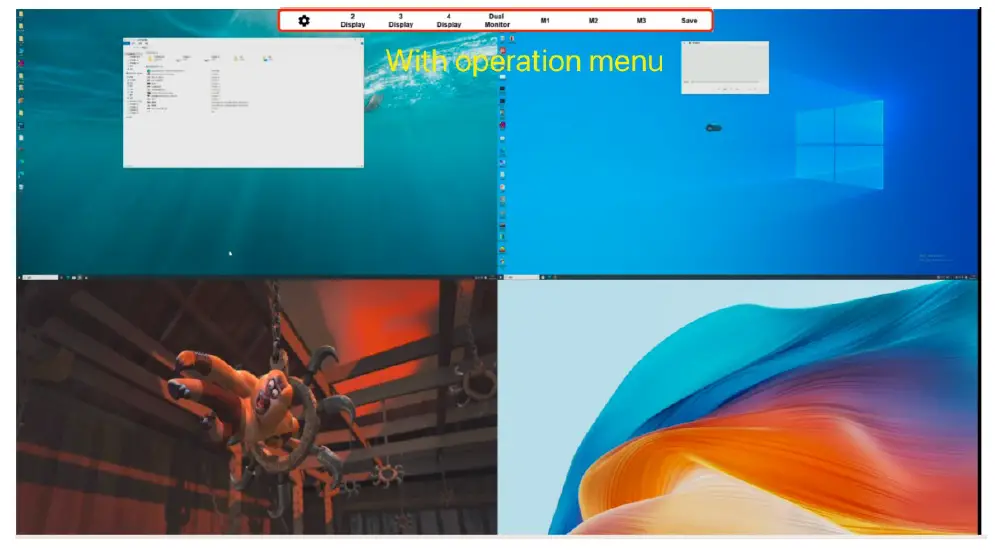
Operation Menu
Signals Setup
Users can set up the parameters of the device and signals in this section 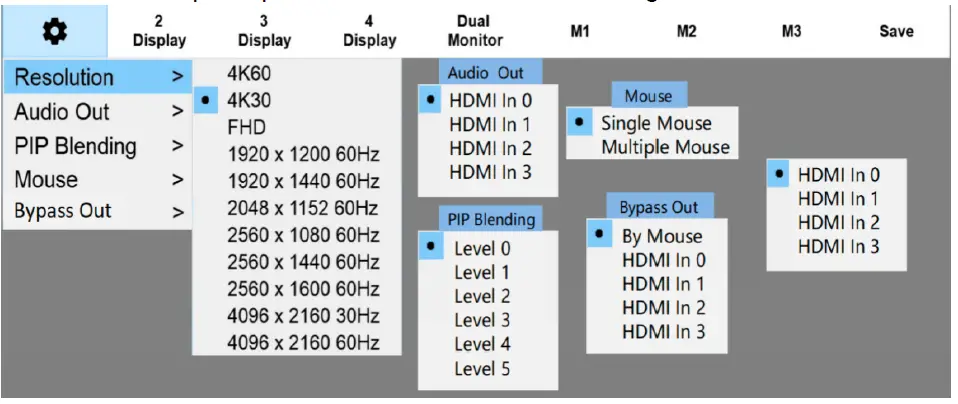
| Resolution | Select output resolution, there are 11 options. |
| Audio Out | Select audio output from HDMI input 1 to input 4. |
| PIP Blending | In PIP mode, using this menu to set the sub-window
transparency. There are 6 options from level 0 to level 5. |
| Mouse | Switch between single mouse and multi-mouse mode. Single Mouse: Users can control any one of the computers across the screen. Multiple Mouse: Users can control 4 computers at the same time. |
| Bypass Out | Loop out setting.
By Mouse: It will automatically loop out the computer signal that the mouse is controlling. HDMI In 0-4: To select the loop out from option HDMI input 1 to HDMI input 4(HDMI In 0 to HDMI In 3). |
| Sigal Switch | Right click the mouse on any of the signal window to open the drop-down menu to select the required signal. |
| Signal in full display | In non-PIP mode, double-click the left mouse button on any window to make the current signal in full-screen.
Double-click again to return to the original layout. |
| Signals location swap | In PIP mode, double clicking on the top layer window to swap location with the bottom layer window. |
Signals Layout Setup
Users can set up the multiview layouts here. Users are able to customize the size and position of the signal windows and save it as preset layouts. 
| Duplicated outputs Users can customize the layouts and save them
onto M1-M3 |
2 Display | Dual view display, there are 2 layouts |
| 3 Display | Triple view display, there are 3 layouts | |
| 4 Display | Quad view display, there are 4 layouts | |
| Dual Monitor (2 different outputs) | 4 preset layouts, users can customize
the layouts and save them onto M1-M3 |
|
| M1 | Recall Layout 1 | |
| M2 | Recall Layout 2 | |
| M3 | Recall Layout 3 | |
| Save
(customize and save the preset layouts) |
M1 | Save Layout 1 |
| M2 | Save Layout 2 | |
| M3 | Save Layout 3 | |
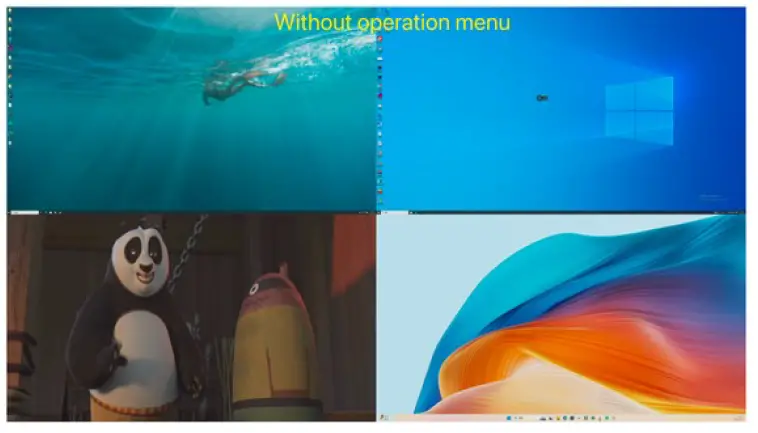
KVM Signals Management
By double-clicking the mouse wheel to hide the Operation Menu to access the KVM mode. Users can manage up to 4 PCs on a single monitor or across two monitors
Single Monitor: Mouse can be moved freely between different PC windows and KVM control them
Dual Monitors: Mouse can be moved freely between these two monitors and control any of the PCs.
System Diagram
RS232 command
Communication protocol
Default baud rate: 115200 Data bit:8 Stop bit:1 Parity bit: None
Note: ‘<’ and ‘>’ in the following commands are sending characters, and the command ‘,’ or ‘.’ cannot be omitted. Please note the upper and lower case in the command.
| RS232 command | Function | Remarks | Examples |
| <switch,video,0,in,out> | Signal
switching |
in: 0-3 correspond to input signal 1/2/3/4
out: 0-3 correspond to windows 1/2/3/4 |
Switch input signal 3 to window 2
<switch,video,0,2,1> |
| <switch,audio,0,in,out> | Audio
switching |
in: 0/1/2/3 correspond to input audio 1/2/3/4
out: 0 |
Switch the output audio to input 4
<switch,audio,0,3,0> |
| <switch,loop,0,in,out> | Loop out switching | : 0-4 out:2 in: 0 is to loop out the PC signal that the mouse is controlling
automatically. in: 1-4 correspond to input 1-4 |
Loop out the input 3
<switch,loop,0,3,2> |
| <config,output,reso,0,fmrt> | Set output resolution | fmrt: 0-10 correspond to 11 resolutions in the menu:
|
Set the out resolution with 4K60 <config,output,reso,0,0> |
| <config,pip,blend,0,level> | Set PIP transparency | level:0-5 (available in PIP mode) | Set the PIP transparency to level 2 |
| <config,pip,blend,0,2> | |||
| <recall,display,0,wins,mode> | Set output display layout | wins:0-4 0: Dual-view for 2 different outs 1: full screen 2: Dual-view 3: Triple-view 4: Quadview mode: 0-4 correspond to modes 1-5 (the list as show below) | Setting the output display layout to
quad-view with the 1st mode layout. |
| <save,scene,0,index> | Save Preset
scene |
index: 0-2 correspond to preset scene 1-3 | Save Preset scene 2
<save,scene,0,1> |
| <load,scene,0,index> | ecall preset scene | index: 0-2 correspond to preset scene 1-3 | Recall Preset scene 3
<load,scene,0,2> |
Documents / Resources
 |
SEADA SD-MV-KM43 4K60Hz KVM Matrix with Multiviewer and Matrix Switch [pdf] User Manual SD-MV-KM43 4K60Hz KVM Matrix with Multiviewer and Matrix Switch, SD-MV-KM43, 4K60Hz KVM Matrix with Multiviewer and Matrix Switch, KVM Matrix with Multiviewer and Matrix Switch, Matrix with Multiviewer and Matrix Switch, Multiviewer and Matrix Switch, Matrix Switch, Switch |