Microtech DESIGNS e-LOOP Micro Wireless Vehicle Detection

Specifications
- Frequency: 433.39 MHz
- Security: 128-bit AES encryption
- Range: up to 25 metres
- Battery life: up to 2 years
- Battery type: CR123A 3V 1500 m/a Lithium Battery x1 (included)
- Replacement battery type: CR123A 3V 1500 m/a x 1
Product Usage Instructions
Step 1 – Wiring the e-TRANS 20
Option 1. Short-range coding with magnet
- Connect the e-Trans 20 wires to the matching terminals on a gate motor.
- Power up the e-Trans 20, then press and release the CODE button.
- Place the magnet on the CODE recess on the e-Loop.
- The systems are now paired, and you can remove the magnet.
Option 2. Long-range coding with magnet (up to 25 metres)
- Power up the e-Trans 20, then place the magnet on the code recess of the e-Loop.
- The systems will pair, and you can remove the magnet.
Step 2 – Fitting the e-LOOP Micro to Driveway
Using a 5mm concrete masonry drill, drill two mounting holes 40mm deep, then use the provided screws to fix to the driveway.
IMPORTANT: Never fit near high voltage cables as this can affect the e-Loop’s vehicle detection and radio range capabilities.
FAQ
- Q: How do I know when to replace the battery?
- A: The battery life is up to 2 years, but if you notice a decrease in performance or range, it’s recommended to replace the battery with a CR123A 3V 1500 m/a x 1.
- Q: Can I extend the range beyond 25 meters?
- A: The device is designed for a range of up to 25 meters. Attempting to extend the range may affect performance and reliability.
Specifications
- Frequency: 433.39 MHz
- Battery type: CR123A 3V 1500 m/a Lithium Battery x1 (included)
- Battery life: up to 2 years
- Range: up to 25 metres
- Security: 128-bit AES encryption
- Replacement battery type: CR123A 3V 1500 m/a x 1

e-LOOP Micro Fitting Instructions
Installation in 3 simple steps

Step 1 — Wiring the e-TRANS 20
Option 1. Short-range coding with magnet
Connect the e-Trans 20 wires to the matching terminals on a given gate motor. Power up the e-Trans 20, then press and release the CODE button. The LED on the e-Trans 20 will light up, now place the magnet on the CODE recess on the e-Loop, the yellow LED on the e-loop will flash, and the LED on the e-Trans 20 will flash 4 times. The systems are now paired, and you can remove the magnet.
Option 2. Long range coding with magnet (up to 25 metres) Power up the e-Trans 20, then place the magnet on the code recess of the e-Loop, the yellow code LED will flash once now remove magnet and the LED will come on solid, now walk over to the e-Trans 20v and press and release the CODE button, the yellow LED will flash and the LED on the e-Trans 20 will flash 3 times, after 15 seconds the e-loop code LED will turn off.
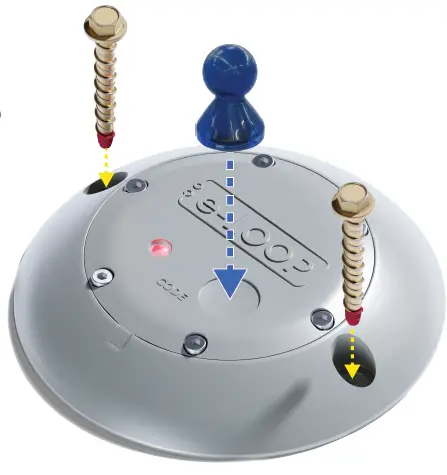
Step 2 — Fitting the e-LOOP Micro to Driveway
Using a 5mm concrete masonry drill, drill the two mounting holes 40mm deep, then use the 5mm concrete screws supplied to fix to the driveway.
IMPORTANT: Never fit near high voltage cables, this can effect the e-Loop’s vehicle detection and radio range capabilities.
- Microtech Designs
- enquiries@microtechdesigns.com.au
- microtechdesigns.com.au
Documents / Resources
 |
Microtech DESIGNS e-LOOP Micro Wireless Vehicle Detection System [pdf] Instructions ELMIC-MOB, ELMIC, e-LOOP Micro Fitting, e-LOOP, Micro Fitting, Fitting, e-LOOP Micro Wireless Vehicle Detection System, e-LOOP, Micro Wireless Vehicle Detection System, Vehicle Detection System, Detection System |


