KATHY FC-S02 Automatic Cat Feeder with Camera

Please read this manual carefully before use.
Product Description
Front View
- Lid Lock
- Lid
- Food Tank
- Rotor
- Reset Button/ Manual Feed Button
- Camera
- Tank Base
- Food Outlet
- Stainless Steel Bowl
- Bowl Tray

Bottom View - Non-slip Rubber Pad
- Battery Compartment
- USB-C Power Port
- Speakers
- Battery Compartment Cover

How to Install
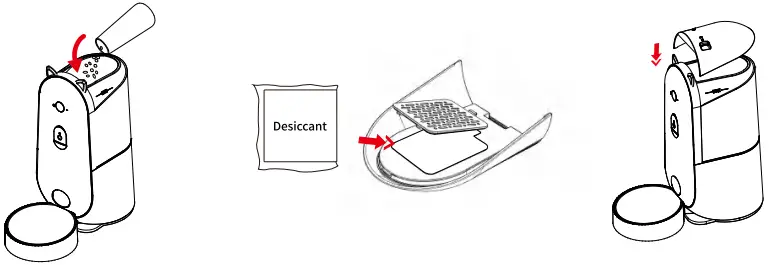
- Squeeze both fingers inwards at the same time and lift upwards to open the lid.

- Remove all fittings by lifting the drum upwards.

- Plug in the power adapter. If you want, install 4*AA alkaline batteries
(Not included) in case of a power failure.
Note: Batteries are powered for back-up only and should not be used as the main power source.

- Install the grain drum by aligning the drum with the slot and pressing down.

- Fill the food bin with your pet’s favourite dry food. Place the desiccant bag in the desiccant box and close the lid.
Note: Suitable for dry food with kibble size ranging from 2-15mm(0.07-0.6in) in diameter. Larger kibble may get stuck at the food outlet.
- Place stainless steel bowl into the food tray. Lift feeder and slide the holder into the groove on the bottom of the feeder.

- Adjust the camera angle according to your needs.

How to Set Pet Feeder
Preparation Process
- The wifi password is composed of no more than 12 digits and letters.
No specialsymbols are supported. Do not use Chinese. - Make sure Bluetooth and Location Services “on” on your phone.
- Please keep the feeder close to the wifi router . The distance between pet feederand Wifi router doesn’t exceed 33ft/10m and there is no wall barriers betweenthem.
Download the App & Log in
- Scan the QR code or search for ” Smart lif ” on App Store or Google Play to download the app.

Smart life

App Store

Google Play - Sign up or Log in your account.

Note: APP language depends on your mobile default language.
Add Device
QR code configuration
- Click the “Add Device” button on the home page, or click the “+” sign in the upper right corner and then select “Add Device” to configure.

- Click Add Device, select “Small Home Appliances” on the leftside, and find “Pet Feeder With Camera (2.4GHz&5GHz)”.

- Confirm that the top-right corner of the network allocation method is”QR Code for Camera”, tick the box and click”Next”afteryou hear the network allocation beep from the device.

- Select the connected WiFi and fill in the correct password, confirm and click “Next”.

- Point the QR code of your mobile phone to the lens of the device at a distance of about 15- 20cm, and click “I Heard a Prompt” when the device emits a beep.

- Wait for the successful conflguration.

- The interface of adding device will pop up, click “Done”. If the connection fails, restart the device and try again.

- Click “Feed”, select the number of servings to be fed and click “Feed” to complete the manual feeding function.

Add Meal Plan
- Click on ” Feed “below, click on “Schedule “to enter the timing page.

- Click “Add” button to add feeding plan.

- Set the schedule & portion based on needs.Click “Save”to finish.

Add Meal Interface Explanation
Plan1
08:30(Every Wed.Thur.Fri.Sat.)/6 Portions.

Plan2
12:00 Every Day/12 Portions

Feed Record
- Click “Record”.

- Enter “Feed record”page.

Note: After disconnecting your network,machine will keep feeding your pet according to yourfeeding plan without feeding record.
Voice Recording
- Enter the “Feed” interface.

- Click”Feeding audio” to record the page prompts “Feeding short sound recording Startrecording near the feeding machine”, click again to stop and save the recording.

- When the feeder feeds, the recording will be played automatically.

Video interface display
- Video screen:
Click on the home page of the feeder device to enter the control panel interface of the device, which displays the live screen (with network speed and time stamp display)

- Video clarity:
HD, SD can be switched at will

- Sound:
When the sound is turned on, the APP can receive the sound from the device side

- Zoom in and out of the picture:
Click on the image to enlarge it for viewing

Bottom Menu Bar
- Video Full Screen:
Switch the live screen to landscape mode

- Take a photo:
After clicking on the photo icon, you will be prompted to click on it to enter the album to view and share, and synchronise with local albums.

- Voice Intercom:
One-way intercom: long press the microphone icon to open and intercom, the device side can receive sound

- Two-way intercom:
Click the phone icon to open the call function, both the device side and the APP side can transmit and receive sound.

- Video:
Click on the video icon to open the video recording function after saving a successful prompt, you can click into the album to view and share!

- Upper/lower drop-down bar:
Click on the drop-down bar to show the function box, click again to hide the function box.

Menu Functions
- Messages:
When the feeder is connected to the network, or when there is no food in the food bucket, it will be reported to the APP, click message, the message page can be queried for the history oqueried for the history of the device’s alarm records.

- Gallery:
Aftersaving the captures and videos, you can click to access to view the screenshots and videos of the captures and recordings, and click on the screenshots or videos to delete and share them.

- Night Mode:
Click on the IR night vision icon, automatically pops up the IR night vision auto, off (off the IR night vision screen for full colour), on (on the IR night vision screen for grey and white) 3 options.

Basic Function Settings
- Enter the device control panel click on the upper right corner “…”

- Enter the settings page click on the “BaSiC Function Settings”.

- Status Indicator:
Click “Status Indicator”, turn on/off the Status Indicator (successful operation will give a prompt, the device indicator will respond to light on/off).

- Flip Screen:
Click “Flip Screen”to set the video image flip. The defaultstate is Off, you can also choose to flip.

- Talk mode:
Click “Talk mode” to switch, provide One-Way Communication , Two-Way Talk two ways, return to the real-time video page for intercom.

Device Settings
- Restart device:
Go to the Settings page and click “Restart Device”, make sure the device will be restarted after restart and will be paired with the APP automatically.

- Remove Device Way 1:
Enter the setting page and click “Remove Device”, the device will be reset after removing the device, and the data will be cleared after restarting and need to be re-networked.

- Remove Device Way 2:
Enter the APP home page and long tap the device icon to select the device, then click the “Remove Device”.

Disassemble for Cleaning
- Unplug the power cord, remove the cover and take out the desiccant.
Note: It is recommended that the desiccant bag be replaced every 30 days.

- Remove the bowl tray by pulling he grain drum upwards.

- Slide the grain dispensing dial to the left to unlock it.

- Bowl tray, stainless bowl, hopper and lid can be washed by water.

- The base unit cannot be submerged in water. Just use cloth to wipe up.

Indicators Lights
| Status Indicator | Action | Meaning |
| Blue Light | Constant blue | Normal operation |
| Blue flashing | WIFI connection | |
| Red Light | Red always on | Grain shortage reminder |
| Green Light | Green flashing | Dispensing |
|
|
Short press the button twice to feed a portion of food manually at once. Keep pressing the button for 5s, the feeder isreset. |
Specifications
| Model | FC-S02 | power supply | DC Power/4 * AA Battery |
| Input | AC 100-240V 50/60Hz | Dimensions | 250“166*162mm/10”6.5*6.4in |
| Capacity | 4L | Weight | 1.26kg |
| Material | ABS | Cable length | 1.5m |
Troubleshooting
| Problem | Solution |
| Can’t configure the feeder on your phone. |
|
| Problem | Solution |
| Feeder appears disconnected from WiFi. | Weak disconnection, please check that the distance between your feeder and router is no more than 33ft/10m, and no concrete walls or too many obstacles between them. Otherwise the WiFi network can be weak and cause unstable connection. |
| The feeder can’t dispense food or the feed portion is not accurate. |
|
| The pet feeder is not working when turned on. |
|
| The color live vide stream turns black and white. |
|
FCC STATEMENT
This device complies with Part 15 of the FCC Rules. Operation is subject to the following two conditions:
- This device may not cause harmful interference, and
- This device must accept any interference received, including interference that may cause undesired operation.
Warning: Changes or modifications not expressly approved by the party responsible for compliance could void the user’s authority to operate the equipment.
NOTE: This equipment has been tested and found to comply with the limits for a Class B digital device, pursuant to Part 15 of the FCC Rules. These limits are designed to provide reasonable protection against harmful interference in a residential installation. This equipment generates uses and can radiate radio frequency energy and, if not installed and used in accordance with the instructions, may cause harmful interference to radio communications. However, there is no guarantee that interference will not occur in a particular installation. If this equipment does cause harmful interference to radio or television reception, which can be determined by turning the equipment off and on, the user is encouraged to try to correct the interference by one or more of the following measures:
- Reorient or relocate the receiving antenna.
- Increase the separation between the equipment and receiver.
- Connect the equipment into an outlet on a circuit different from that to which the receiver is connected.
- Consult the dealer or an experienced radio/TV technician for help.
FCC Radiation Exposure Statement:
This equipment complies with FCC radiation exposure limits set forth for an uncontrolled environment. This equipment should be installed and operated with minimum distance 20cm between the radiator & your body.
Kathy Pro X Feeder
Model: FC-S02
Company: Shenzhen Haobang Biological Medicine Co.,LTD
Manufacture: Shenzhen Haobang Biological Medicine Co.,LTD
Address: 2 Floor, No 1 Facility Building, Xiangxiang Industrial Park,Yingrenshi Community,Shiyan Street, Baoan District, Shenzhen, Guangdong,China

Please read this manual carefully and avoid causing errors or damaged. If you have any questions, please feel free to contact us via email: rojecoservice@126.com and include your order number in it. We’ll get back to you as quick as possible
Documents / Resources
 |
KATHY FC-S02 Automatic Cat Feeder with Camera [pdf] User Manual FC-S02, FC-S02 Automatic Cat Feeder with Camera, Automatic Cat Feeder with Camera, Cat Feeder with Camera, Feeder with Camera, Camera |


