![]() Solidcom SE Pro
Solidcom SE Pro
Quick Guide
V1.0
Foreword
Thank you for choosing the Solidcom SE Pro for on-site communication. If you have never used a wireless intercom system before, then you are about to experience one of the most exciting products in the industry. This Quick Guide will show you how to get started with the product.
Please read this Quick Guide carefully. We wish you a pleasant experience. To obtain Quick Guide information in other languages, please scan the QR code below.
Configuration 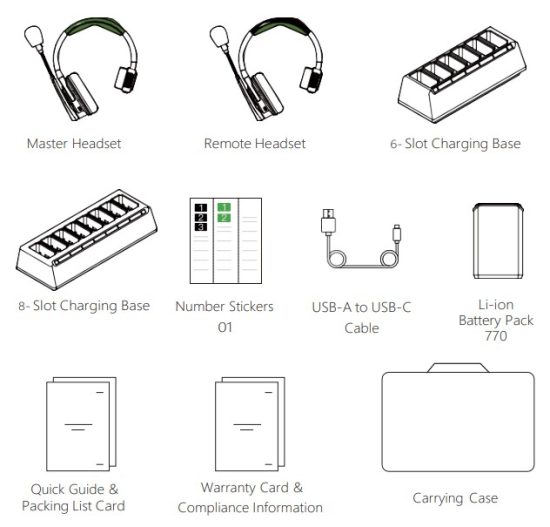 Note: The quantity of the items depends on the product configuration detailed on the packing list card.
Overview
Indicator Introduction
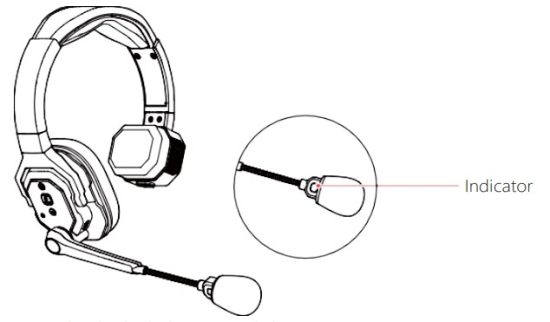
- Disconnected*: slowly flashing green light
- Pairing: rapidly flashing green light
- TALK Status: solid green light
- MUTE Status: solid red light
- Low Battery: slowly flashing red light
- USB-C Charging:
A. Charging While Powered On: slowly flashing yellow light for 3s before returning to the former light
B. Charging While Powered Off: slowly flashing yellow light - USB-C Fully Charged: solid yellow light
- Upgrading: alternately flashing red and green light
Notification Sound Introduction
- Low Battery: low battery level
- Ding: maximum volume
- Tick: mic boom in position of mic on or off
- Connected: device connected
- Disconnected: device disconnected
- Unmuted: mic on
- Muted: mic off
* While disconnected, the remote headset shows slowly flashing green light while the master headset shows solid green light.
Operations
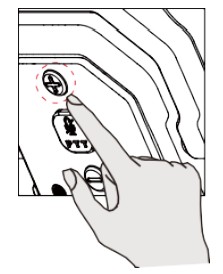
- Installing and removing the battery
Place the battery into the battery compartment for installation.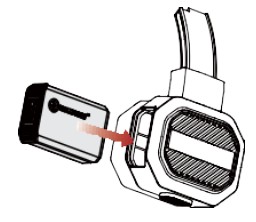 Press the battery compartment button to pop out the battery for removal.
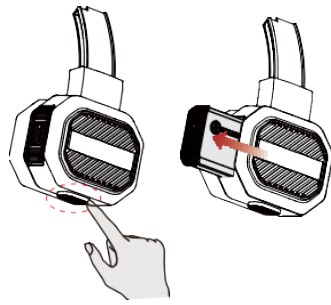
- Turning on the device and confirming connection
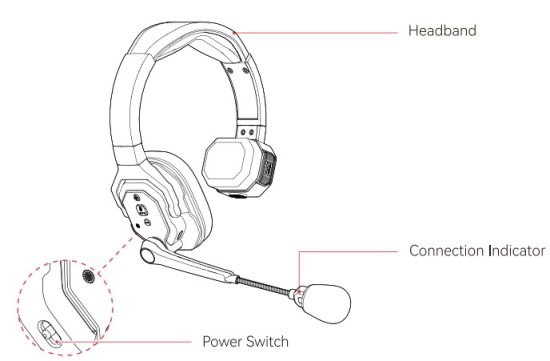
- Toggle the power switch to turn on the headsets.
- The indicator light changing from flashing green to solid green indicates successful connection.
- The master headset has a brown headband while the remote headset has a black headband.
Turning on the microphone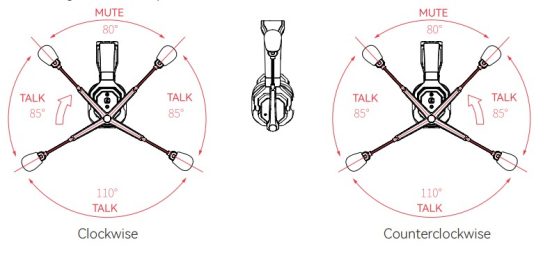 Beginning your work
Headset Pairing
All remote headsets are prepaired with the master headset at the factory, so they are ready to use upon poweron. Pairing is only necessary when adding new headsets to an existing system. Ensure that the master headset and all remote headsets are powered
on while pairing.
- Long press the volume + button on both the master and remote headsets for 5s and the indicator lights will flash rapidly.
- The indicator lights turning solid indicates successful connection.
- One master headset can connect to up to seven remote headsets.
Specifications
| Product Name | Full-Duplex Wireless Intercom System |
| LOS Range | 1,100ft (350m) |
| Operating Frequency | 1.9 GHz (DECT) |
| Modulation Mode | GFSK |
| Transmit Power | < 20dBm (100mW) (Only for CE) |
| Receiver Sensitivity | < -90 dBm |
| Battery Capacity | 770 mAH (2.926Wh) |
| Charging Time | < 3 hours |
| Frequency Response | 150 Hz – 7 kHz (±10dB) |
| SNR | 71±2dB @94dB SPL, 1 kHz |
| Distortion | < 1% @94dB SPL, 150 Hz – 7 kHz |
| Microphone Type | Electret |
| Maximum Input SPL | > 115dB SPL |
| Output SPL | 98dB SPL (@94dB SPL, 1kHz) |
| Environmental Noise Reduction | > 20dB (from all directions) |
| Weight | rc- 185.2g (with battery) |
| Temperature | 0 – 45°C (working) -10 – 60°C (storage) |
Note: Due to differences in various countries and regions, there may be variations in the operating frequencyand wireless transmit power of the product.
| Product Name | 6-Slot Charging Base | 8-Slot Charging Base |
| Port | USB-C Port; Charging Contacts | |
| Dimensions | 119.3 x 57.6 x 34.6mm (4.7 x 2.3 x 1.4in.) |
154.5 x 57.6 x 34.6mm (6.1 x 2.3 x 1.4in.) |
| Weight | 91.1g | 121.6g |
| Charging Power | 5. 10W | |
| Power Supply | 4.75 – 5.25V | |
| Charging Current | 380mA/Slot | |
| Charging Time | < 3 hours (6 batteries) | < 4 hours (8 batteries) |
| Temperature | 0 – 45°C working) -20 – 60°C (storage) |
|
Disclaimer
Safety Precautions
Do not place the device near or inside heating devices (including but not limited to microwave ovens, induction cookers, electric ovens, electric heaters, pressure cookers, water heaters, and gas stoves) to prevent the battery from overheating and exploding.
Use the original charger, data cables, and batteries provided with the product. Using unauthorized or incompatible chargers, data cables, or batteries may cause electric shock, fire, explosion, or other dangers.
Support
If you encounter any problems in using the product or need any help, please contact Hollyland Support Team via the following ways:
| Hollyland User Group | |
| HollylandTech | |
| HollylandTech | |
| HollylandTech | |
| support@hollyland.com | |
| www.hollyland.com |
Statement:
All copyrights belong to Shenzhen Hollyland Technology Co., Ltd. Without the written approval of Shenzhen Hollyland Technology Co., Ltd., no organization or individual may copy or reproduce part or all of any written or illustrative content and disseminate it in any form.
Trademark Statement:
All the trademarks are owned by Shenzhen Hollyland Technology Co., Ltd.
Note:
Due to product version upgrades or other reasons, this Quick Guide will be updated from time to time. Unless otherwise agreed, this document is provided as a guide for use only. All representations, information, and recommendations in this document do not constitute warranties of any kind, express or implied.
![]() Manufacturer: Shenzhen Hollyland Technology Co., Ltd.
Manufacturer: Shenzhen Hollyland Technology Co., Ltd.
Address: 8F, 5D Building, Skyworth Innovation Valley, Tangtou
Road, Shiyan Street, Baoan District, Shenzhen, 518108, China
MADE IN CHINA
Documents / Resources
 |
HOLLYLAND SE Pro Solidcom Wireless Intercom Systems [pdf] User Guide SE Pro, SE Pro Solidcom Wireless Intercom Systems, Solidcom Wireless Intercom Systems, Wireless Intercom Systems, Intercom Systems |