EasyFlex No Dig Landscape Edging with Anchoring
Spikes Instruction Manual

INSTALLATION INSTRUCTIONS
Always use proper safety precautions when cutting and spiking edging. Protective eyewear and gloves are recommended during installation.
- Clear the installation area of all grass, loose soil, mulch, and debris. Place edging in desired shape on cleared surface with anchoring tabs* facing the planting bed.

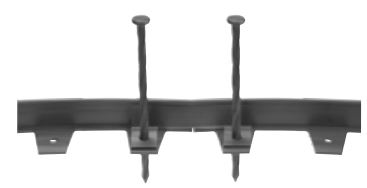
- Hammer anchoring spikes through tabs to secure the edging. Typical installations require one spike every 10 tabs. Additional spikes are available separately.

- Backfill to the top of the edging with mulch, river rock, or other ground cover. Assure tabs are completely covered with a thick layer of bedding material.

USING THE CONNECTOR
 Place the connector on top of the end tabs of each piece. Spike through the holes in the connector and each of the end tabs.
CUTTING THE EDGING
 Cut edging at the midpoint between the anchoring tabs using hand snips or a fine tooth saw.
HELPFUL TIPS & INFORMATION
Site Preparation:
Soil must be solid and level. Assure there is no debris between the edging tab and the dirt below. Compact the cleared soil prior to installation to reduce spike movement from shifting ground and frost heave.
Weed fabric can minimize the spread of invasive weeds and grass. Install fabric according to product directions, then place the landscape edging over the fabric and hammer spikes through the tabs and fabric.
Allow the edging to relax in the sun to allow for thermal expansion. Installing the edging when expanded and pulling tightly can reduce undesirable waves in straight installations.
Installation:
Enough anchoring spikes are included to accommodate a typical installation. Certain conditions and landscape designs will require additional spikes, which are available in stores and online.
Anchoring spikes should be hammered only to the top of the edging tab. Hammering the spike to the point the tab bends will result in wavy edging.
Backfill sufficiently to the top of the edging immediately after installing the edging. Heavy bedding materials, such as rock and mulch, tend to perform best.
MADE IN THE
*Tab designs may vary. FROM RECYCLED MATERIALS
Documents / Resources
 |
EasyFlex No Dig Landscape Edging with Anchoring Spikes [pdf] Instruction Manual No Dig Landscape Edging with Anchoring Spikes, No Dig, Landscape Edging with Anchoring Spikes, Edging with Anchoring Spikes, Anchoring Spikes |