DIGITAL GuardDawg DGD-KIM-SS Keyless Ignition Module

Digital Guard Dawg
World Leader in Keyless Technology
DGD-KIM-SS Keyless Ignition Module Installation Guide
KIM-SS Quick Start Overview
6 Easy Steps
- Remove the vehicle’s dash panel and locate the ignition switch connector.
- Match the KIM-SS ignition power harness connector to the vehicle’s ignition switch connector and plug them together.
- Locate a key-free ground location under the steering column. Attach the KIM-SS ground lug to the bolt and tighten.
- Remove the faceplate bezel and unplug the stock ignition switch.
- Remove the ignition switch and install the knockout plate in your dash, and insert the rocker switch.
- Test your keyless ignition system. Simply push the RFID Dawg Tag to activate. Push the start button and your engine starts. Your installation is now complete!
Contents
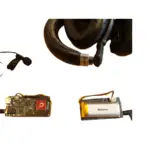
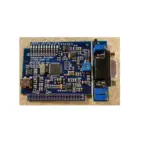
- Keyless Ignition Module
- Ignition Power Harness
- Rocker Switch
- Ignition Switch Cover
- 10 UF Capacitor Connector
- Transmitter Dawg Tag
Installation Steps
- Making the Ignition Switch Connections
- Mounting the Rocker Switch
- Connecting the Rocker Switch
- Grounding the System and Reassembly
- Testing
Digital Guard Dawg Keyless Ignition Module Overview
- Unplug the existing key switch and plug the KIM-SS power connector into the ignition harness.
- Mount the rocker switch in the knockout on the dash.
- Connect the black ground wire to the negative battery terminal.
- This is the optional accessory switch.
Step 1: Making the Connections to Your Ignition Key Switch
To access your key switch, remove the 3 bolts located underneath your steering column. Slightly tilt it down and pull it out. Once the panel is removed, see the key switch connectors. Attach the KIM-SS power harness connector to the ignition switch connector. Ensure connectors are fully locked together. Zip tie the unused key side of the connector out of the way.
Step 2: Mounting the Rocker Switch into the Center Console
Start by removing the head unit. There are 4 screws to take out. Once removed, disconnect the two connectors attached to the unit. There are 4 sockets with connectors attached to the back of the head unit. Pay attention to where each connects. Unplug connectors and remove the head unit. Use a screwdriver to pop out the factory rocker switch cap in your center console while pressing on the release clips from behind.
Specifications
| Component | Description |
|---|---|
| Keyless Ignition Module | Main module for keyless ignition |
| Ignition Power Harness | Connects to vehicle’s ignition system |
| Rocker Switch | Used to activate the ignition |
| Transmitter Dawg Tag | RFID device for activation |
FAQ
- What is the purpose of the KIM-SS module?
The KIM-SS module allows for keyless ignition in your vehicle, enhancing convenience and security. - How do I install the rocker switch?
Follow the steps in the guide to remove the head unit and install the rocker switch in the center console. - Is the installation reversible
Yes, you can revert to the original ignition system by removing the KIM-SS module and reconnecting the original components.
KIM-SS Quick Start Overview


DGD-KIM-SS CONTENTS

Keyless Ignition Module Installation for Polaris “Slingshot”

Installation Consists of 5 steps
- Making the Ignition Switch Connections
- Mounting the Rocker Switch
- Mounting Module / Connecting Rocker Switch
- Grounding the System and Reassembly
- Testing
Digital Guard Dawg Keyless Ignition Module Overview
Unplug the existing Key switch and plug the KIM-SS Power Connector into the ignition harness.
- STEP 1 Making the connections to your Ignition Key Switch.
To access your key switch, remove the 3 bolts located underneath your steering column as pictured. In order to pull this panel out you will slightly tilt it down and pull it out.
Once this panel is removed you will Attach the KIM-SS Power see the key switch connectors on the Harness connector to the right-hand side of the column.
Push Ignition Side of the seperated down on the connectors locking clip to key switch connecter. Be sure unplug the Ignition Switch Connector to listen for the “Click” that indicates the conectors are fully locked together. Zip tie the unused Key side of the connector u and out of the way.
- STEP 2 Mounting the rocker switch into the center console.
Start by removing the Head unit, there are 4 screws that will need to be taken out. Once the screws are taken out the head unit will pull forward, On the back you will need to disconnect the two connectors that are attached to the unit.
There are 4 sockets with 2 or more connectors attached to the back of the Head unit. Pay attention to where each these connectors attach, Unplug the connectors and remove the Head unit. NOTE: the connectors that you will unplug are labeled as to which socket they plug into.
Once the head unit is removed, use a screwdriver to pop out the factory rocker switch cap in your center console while pressing on the release clips on the side of the switch from behind.
Documents / Resources
 |
DIGITAL GuardDawg DGD-KIM-SS Keyless Ignition Module [pdf] Installation Guide DGD-KIM-SS, DGD-KIM-SS Keyless Ignition Module, Keyless Ignition Module, Ignition Module, Module |