DELL iSM Software Raid Features in Idrac Service Module

Product Information
Specifications
- Product Name: iDRAC Service Module
- Feature: Software RAID
- Compatibility: Dell PowerEdge servers
- Release Date: December 2024
- Model Number: WP642
Software RAID features in iDRAC Service Module
Abstract
This technical whitepaper provides information about the software RAID feature on iDRAC Service Module (iSM), and guides you through the steps to perform enumeration, configuration, and monitoring of the controllers, physical disks, and virtual disks that are attached to Dell PowerEdge servers.
December 2024
Revisions
| Date | Description |
| December 2024 | Initial release |
Acknowledgments
- Author: Akshay Dutt, Harish Babu
- Support: Reeti Vel—Content Development Engineer (Content Engineering)
- Other:
The information in this publication is provided “as is.” Dell Inc. makes no representations or warranties of any kind with respect to the information in this publication, and specifically disclaims implied warranties of merchantability or fitness for a particular purpose.
Use, copying, and distribution of any software described in this publication requires an applicable software license.
This document may contain certain words that are not consistent with Dell’s current language guidelines. Dell plans to update the document over subsequent future releases to revise these words accordingly.
This document may contain language from third party content that is not under Dell’s control and is not consistent with Dell’s current guidelines for Dell’s own content. When such third party content is updated by the relevant third parties, this document will be revised accordingly.
Copyright © 2024 Dell Inc. or its subsidiaries. All Rights Reserved. Dell Technologies, Dell and other trademarks are trademarks of Dell Inc. or its subsidiaries. Other trademarks may be trademarks of their respective owners. [12/20/2024] [Technical Whitepaper]
Executive summary
- The software RAID feature in iDRAC Service Module (iSM), facilitates enumeration, configuration and monitoring of the controllers, physical disks, and virtual disks that are attached to PowerEdge servers.
- This technical whitepaper serves as a comprehensive reference which helps you to migrate from Dell OpenManage Server Administrator (OMSA) to iSM before the End Of Life (EOL) of OMSA.
- The technical whitepaper provides information about the software RAID functionalities on iSM, providing instructions for its configuration. By simplifying the complexities of transitioning to iSM, this whitepaper aims to provide an understanding of software RAID capabilities, ensuring a seamless adoption of iSM Software RAID feature in place of Dell OpenManage Server Administrator (OMSA).
Access operations of software RAID in iDRAC Service Module (iSM)
When you migrate from OMSA to iSM, you can use the Command-Line Interface (CLI) to perform operations pertaining to the software RAID features.
Prerequisites
Install the iSM software on the operating system.
About this task
To view software RAID operations in iSM, complete the following tasks:
Steps
- From the Start menu, start CLI as an administrator.
- To view the Online Help content of the Software RAID feature, run the following command: dcismcfg.exe -swraid
The following table lists the dcismcfg CLI options of the Software RAID feature:
| iSM command | Description |
| dcismcfg.exe -swraid -getctrl | To display the Software RAID controller properties. |
| dcismcfg.exe -swraid -ctrlID=0/1 [-getpd]/[-getvd] | To display the Physical or Virtual Disk properties managed by the controller 0/1. |
| dcismcfg.exe -swraid -getpd | To display the Physical Disk properties. |
| dcismcfg.exe -swraid -getvd | To display the Virtual Disk properties. |
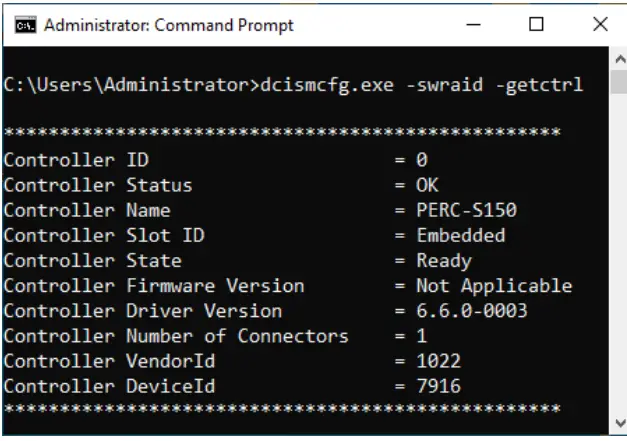
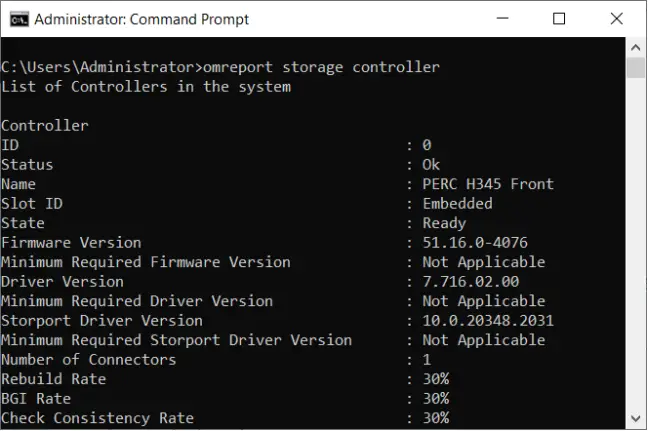
Display controller properties
To display the properties of the software RAID controller, run the following commands of iSM and OMSA:
| iSM command | OMSA command |
| dcismcfg.exe -swraid -getctrl | omreport storage controller |
 |
 |
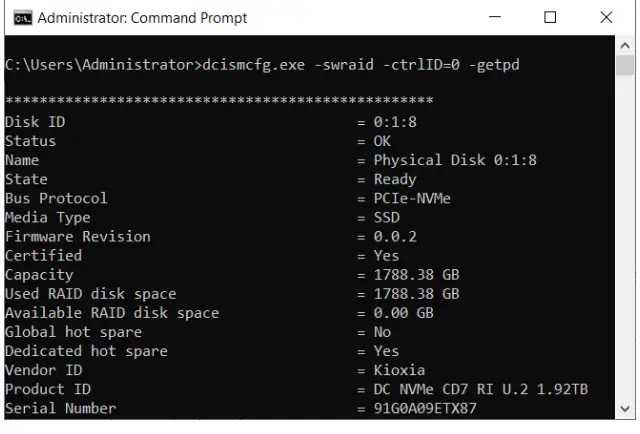
Display physical disk properties
To display the physical disk properties, run the following commands of iSM and OMSA:
| iSM command | OMSA command |
| dcismcfg.exe -swraid -ctrlID=0 – getpd | omreport storage pdisk controller=id |
 |
 |
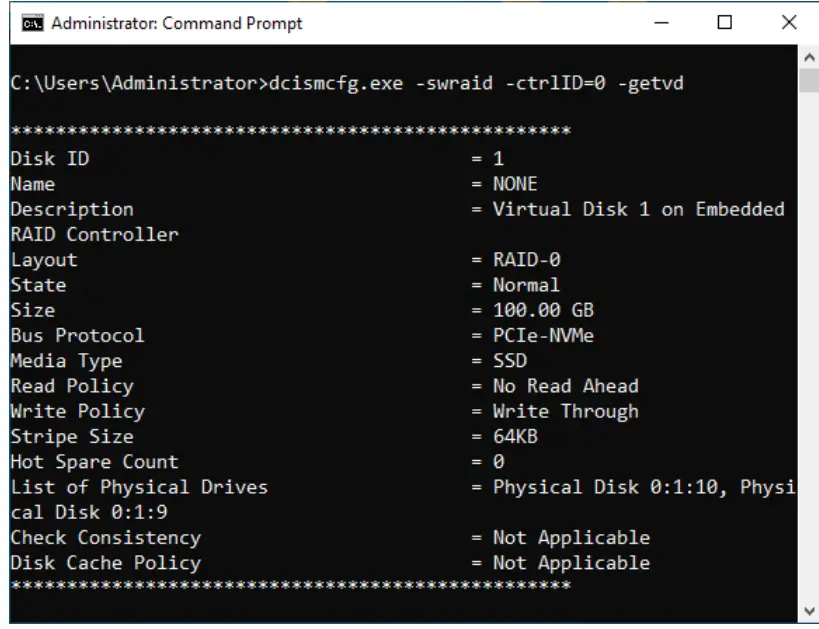
Display virtual disk properties
To display the virtual disk properties, run the following commands of iSM and OMSA:
| iSM command | OMSA command |
| dcismcfg.exe -swraid -ctrlID=0 – getvd | omreport storage vdisk controller=id |
 |
 |
Create a virtual disk
To create a virtual disk from one or more physical disks of a specific RAID level, run the following commands of iSM and OMSA:
NOTE: The size parameter is optional in iSM.
| iSM command | OMSA command |
| dcismcfg.exe -swraid -ctrlID=0/1
-createVD/-cvd -raidlevel/- rl=<RAID Type> -pdisk/-pd=<comma separated physical disk IDs> – vdName/-vdn=<virtual disk ID> – size/-s -rwpolicy/-rp -wpolicy/- wp -diskCachePolicy/-dcp |
omconfig storage controller action=createvdisk controller=id raid=<c | r0 | r1| r1c | r5 | r6 | r10 | r50 | r60> size=<number | b
| m | g | max | min> pdisk=<PDISKID> [stripesize=< 2kb | 4kb | 8kb | 16kb | 32kb | 64kb | 128kb | 256kb | 512kb | 1mb >] [cachepolicy=<d | c>] [readpolicy=<ra | nra | ara | rc | nrc>] [writepolicy=<wb | wt | wc | nwc | fwb>] [diskcachepolicy=<default | disabled | enabled>] [name=<string>] [spanlength=<n>] | [secureflag=yes] [vdpienabled=yes] |
 |
 |
You can verify if the virtual disk is created by viewing the properties of the new virtual disk. To display the virtual disk properties, run the following iSM command:
iSM command
dcismcfg.exe -swraid -ctrlID=0 -getvd
Example 1: To create a virtual disk of type RAID <5>, using three physical disks with IDs <0:1:0>, <0:1:1>, and <0:1:2> that have storage disk space <100> GB, run the following command:
C:\Users\Administrator>dcismcfg.exe -swraid -ctrlID=0 -cvd -rl=r5 –
pd=0:1:0,0:1:1,0:1:2 -size=100
When a virtual disk is created successfully, the following message is displayed:
Creating a virtual disk of size 100.00 GB The virtual disk is successfully created.
Example 2: To create a virtual disk of type RAID <0>, using two physical disks with IDs <0:1:0> and <0:1:1> that have storage space <100> GB, run the following command:
C:\Users\Administrator>dcismcfg.exe -swraid -ctrlID=0 -cvd -rl=r0 –
pd=0:1:0,0:1:1 -s=100
When a virtual disk is created successfully, the following message is displayed:
Creating a virtual disk of size 100.00 GB The virtual disk is successfully created.
Create virtual disk with dedicated hot spare devices
To create a virtual disk with one or more dedicated hot spare devices, run the following:
NOTE: The maximum number of dedicated hot spare devices that can be assigned to a virtual disk is six.
| iSM command | OMSA command |
| dcismcfg.exe -swraid -ctrlID=0/1 -createVD/-cvd – raidlevel/-rl -pdisk/-pd=<comma separated physical disk IDs > -adhs=<comma separated physical disk IDs> | Not available |
 |
You can verify if the virtual disk is created by viewing the properties of the new virtual disk. To display the virtual disk properties, run the following iSM command:
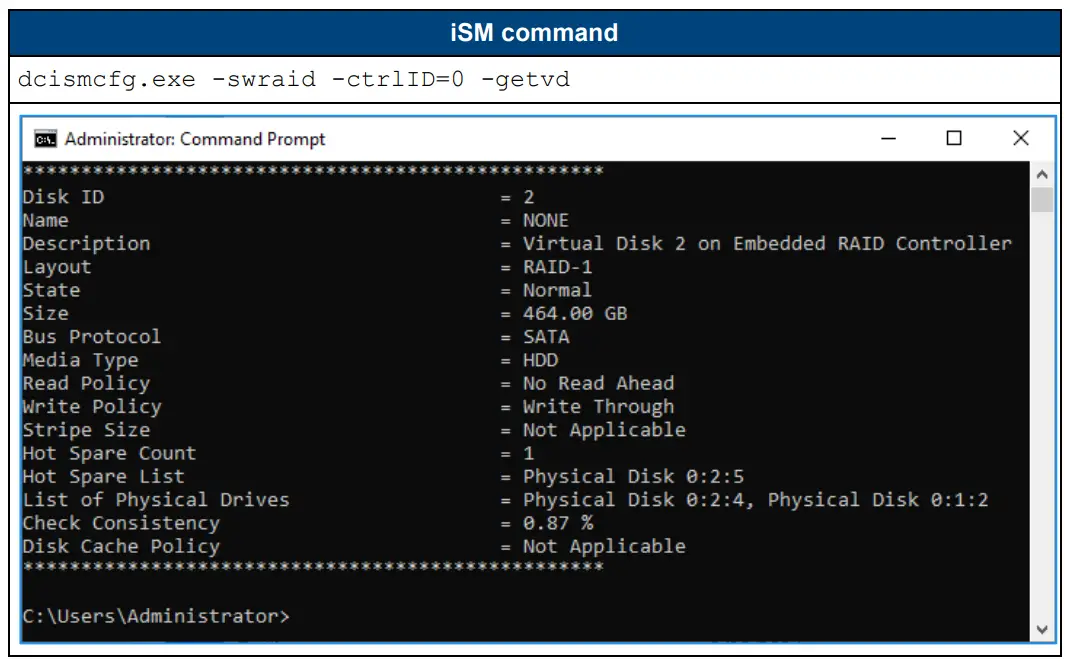
Example 1: To create a virtual disk of type RAID <5>, using three physical disks with IDs <0:1:0>, <0:1:1>, and 0:1:2 that have storage disk space <100> GB and a dedicate hot spare device associated with disk ID <0:1:3>, run the following command:
C:\Users\Administrator>dcismcfg.exe -swraid -ctrlID=0 -cvd -rl=r5 –
pd=0:1:0,0:1:1,0:1:2 -size=100 -adhs=0:1:3
When a virtual disk is created successfully, the following message is displayed:
Creating a virtual disk of size 100.00 GB The virtual disk is successfully created.
Example 2: To create a virtual disk of type RAID <1>, using two physical disks with IDs <0:1:0> and <0:1:1> that have storage disk space <100> GB and dedicate hot spare devices associated with disk IDs <0:1:2> and <0:1:3>, run the following command:
C:\Users\Administrator>dcismcfg.exe -swraid -ctrlID=0 -cvd -rl=r1 -pd=0:1:0,0:1:1-size=100 -adhs=0:1:2,0:1:3
When a virtual disk is created successfully, the following message is displayed:
Creating a virtual disk of size 100.00 GB
The virtual disk is successfully created.
Delete a virtual disk
To delete a virtual disk, run the following commands of iSM and OMSA:
NOTE: Ensure that the virtual disk is not the boot device.

Example: To delete a virtual disk associated with disk ID <2>, run the following command:
C:\Users\Administrator>dcismcfg.exe -swraid -ctrlID=0 -dvd -vd=2
All data will be lost. Ensure that this virtual disk is not your boot device. To delete enter [Y/N]:y
When a virtual disk is deleted successfully, the following message is displayed:
The virtual disk 2 is successfully deleted.
Check-consistency operation
Check-consistency is a background operation that verifies data parity on software RAID storage. iDRAC Service Module enables you to start and cancel the check-consistency operation.
Start the check-consistency operation
To start the check-consistency operation, run the following commands of iSM and OMSA:

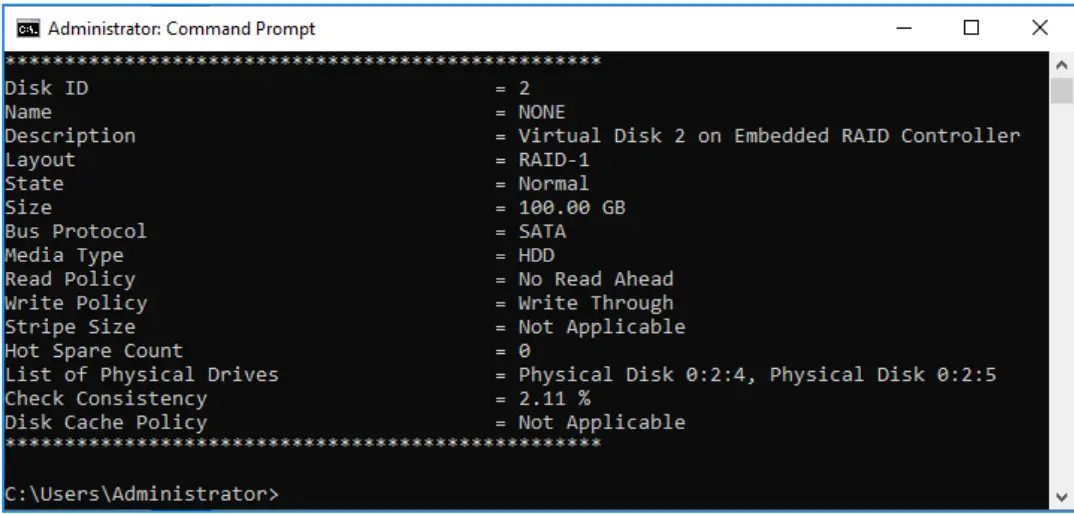
You can verify the percentage completed of the check-consistency operation through virtual disk properties. To display the virtual disk properties, run the following iSM command:
iSM command
dcismcfg.exe -swraid -ctrlID=0 -getvd
Example: To start the check-consistency operation on a virtual disk with disk ID <3>, run the following command:
C:\Users\Administrator>dcismcfg.exe -swraid -ctrlID=0 -ccs -vd=3
When the check-consistency operation is completed successfully, the following message is displayed:
The operation is successfully performed on disk 3.
Cancel the check-consistency operation
To cancel the check-consistency operation, run the following commands of iSM and OMSA:

Example: To cancel check-consistency operation on a virtual disk with disk ID <3>, run the following command:
C:\Users\Administrator>dcismcfg.exe -swraid -ctrlID=0 -cce -vd=3
When the check-consistency operation is completed successfully, the following message is displayed:
The operation is successfully performed on disk 3.
Assign and unassign hot spare devices
Prerequisites
- The physical disk which must be assigned as a dedicated hot spare must be in Ready state.
Limitations
- A dedicated hot spare device cannot be assigned to a virtual disk with Volume or RAID 0 type.
- A dedicated hot spare device cannot be assigned for different media type disks.
- A maximum of six dedicated hot spare devices can be assigned to a virtual disk.
- A physical disk cannot act both as a global hot spare device and a dedicated hot spare device.
Assign dedicated hot spare devices
To assign one or more dedicated hot spare devices to a virtual disk, run the following commands of iSM and OMSA:
| iSM command | OMSA command |
| dcismcfg.exe -swraid -ctrlID=0/1
-adhs=<comma separated physical disk IDs> -vdisk/-vd=<disk ID> |
omconfig storage vdisk action=assigndedicatedhotspare controller=<ID> vdisk=id pdisk=<pdisk id> assign=yes |
 |
 |
You could verify if the assign dedicated hot spare operation is completed using the physical disk ID in the hot spare devices list of VD properties. To display the virtual disk properties, run the following iSM command:
| iSM command |
| dcismcfg.exe -swraid -ctrlID=0 -getvd |
 |
Example 1: To assign a dedicated hot spare associated with physical disk ID <0:1:0>, to a virtual disk with disk ID <1>, run the following command:
C:\Users\Administrator>dcismcfg.exe -swraid -ctrlID=0 -adhs=0:1:0 -vd=1
When a dedicated hot spare is assigned successfully to the virtual disk, the following message is displayed:
The physical disk 0:1:0 is successfully assigned as dedicated hot spare to the virtual disk 1.
Example 2: To assign dedicated hot spares associated with physical disk IDs <0:1:0> and <0:1:1>, to a virtual disk with disk ID <1>, run the following command:
C:\Users\Administrator>dcismcfg.exe -swraid -ctrlID=0 -adhs=0:1:0,0:1:1 -vd=1
When dedicated hot spares are assigned successfully to the virtual disk, the following message is displayed:
The physical disks 0:1:0,0:1:1 are successfully assigned as dedicated hot spare to the virtual disk 1.
Unassign dedicated hot spare devices
To unassign one or more dedicated hot spare devices to a virtual disk, run the following commands of iSM and OMSA: 
When dedicated hot spare devices are assigned successfully to the virtual disk, the following message is displayed:
Example 1: To unassign a dedicated hot spare associated with physical disk ID <0:1:0> from a virtual disk with disk ID <1>, run the following command:
C:\Users\Administrator>dcismcfg.exe -swraid -ctrlID=0 -udhs=0:1:0 -vd=1
When the dedicated hot spare is unassigned successfully from the virtual disk, the following message is displayed:
The physical disk 0:1:0 is successfully unassigned as dedicated hot spare to the virtual disk 1.
Example 2: To unassign dedicated hot spares associated with physical disk IDs <0:1:0> and <0:1:1>, from a virtual disk with disk ID 1, run the following command:
C:\Users\Administrator>dcismcfg.exe -swraid -ctrlID=0 -udhs=0:1:0,0:1:1 -vd=1
When the dedicated hot spare is unassigned successfully from the virtual disk, the following message is displayed:
The physical disks 0:1:0,0:1:1 are successfully unassigned as dedicated hot spare to the virtual disk 1.
Assign global hot spare devices
To assign one or more global hot spare device to a virtual disk, run the following commands of iSM and OMSA:

Example 1: To assign a global hot spare device associated with physical disk ID <0:1:0>, run the following command:
C:\Users\Administrator>dcismcfg.exe -swraid -ctrlID=0 -aghs=0:1:0
When a global hot spare device is assigned successfully to the virtual disk, the following message is displayed:
The physical disk 0:1:0 is successfully assigned as the global hot spare.
Example 2: To assign two global hot spare devices associated with physical disk IDs <0:1:0> and <0:1:1>, run the following command:
C:\Users\Administrator>dcismcfg.exe -swraid -ctrlID=0 -aghs=0:1:0,0:1:1
When the global hot spare devices are assigned successfully to the virtual disk, the following message is displayed:
The physical disks 0:1:0,0:1:1 are successfully assigned as the global hot spare.
Unassign global hot spare devices
To unassign one or more global hot spare devices to a physical disk, run the following commands of iSM and OMSA:

Example 1: To unassign a global hot spare device associated with physical disk ID <0:1:0>, run the following command:
C:\Users\Administrator>dcismcfg.exe -swraid -ctrlID=0 -ughs=0:1:0
When a global hot spare device is unassigned successfully from the virtual disk, the following message is displayed:
The physical disk 0:1:0 is successfully unassigned as the global hot spare.
Example 2: To unassign two global hot spare devices associated with physical disk IDs <0:1:0> and <0:1:1>, run the following command:
C:\Users\Administrator>dcismcfg.exe -swraid -ctrlID=0 -ughs=0:1:0,0:1:1
When a global hot spare device is unassigned successfully from the virtual disk, the following message is displayed:
The physical disks 0:1:0,0:1:1 are successfully unassigned as the global hot spare.
Rename a virtual disk
To rename an existing virtual disk, run the following commands of iSM and OMSA:
| iSM command | OMSA command |
| dcismcfg.exe -swraid -ctrlID=0/1
-rename -vd=<disk ID> – vdName=<new VD name> |
omconfig storage vdisk omconfig storage vdisk action=rename controller=id vdisk=id name=new name |
 |
 |
You can verify if the virtual disk is renamed, through the virtual disk name in virtual disk properties. To display the virtual disk properties, run the following iSM command:

Example 1: To rename a virtual disk with disk ID <1> with <OLD NAME> to <NEW NAME>, run the following command:
C:\Users\Administrator>dcismcfg.exe -swraid -ctrlID=0 -rename -vd=1 -vdName=NEW NAME
When a virtual disk is renamed successfully, the following message is displayed:
The operation is successfully completed.
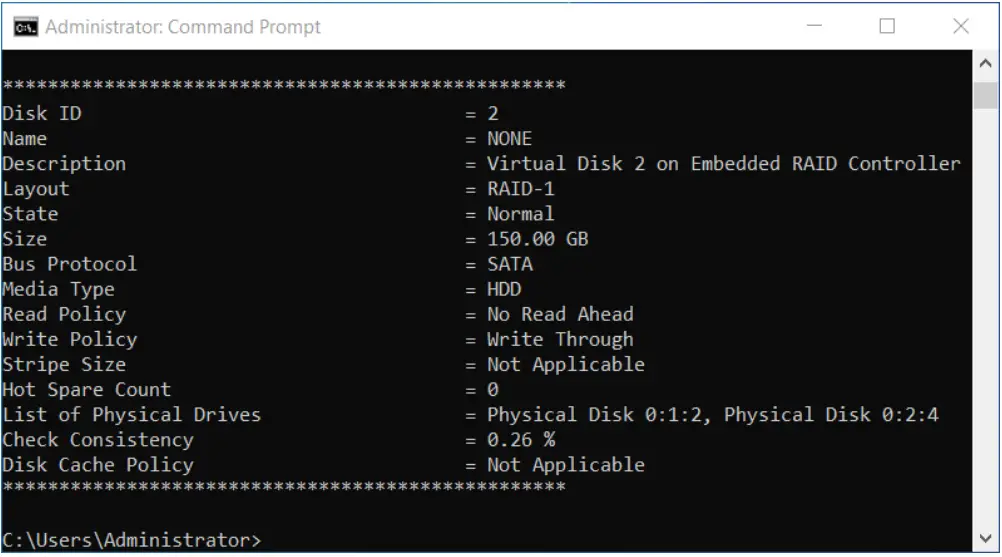
Reconfiguration of Virtual Disk
To reconfigure an existing virtual disk, run the following commands of iSM and OMSA:
| iSM command | OMSA command |
| dcismcfg.exe -swraid -ctrlID=0/1
-reconfigure -vd=<disk ID> – size/-s=<Size> -pdisk/-pd=<Disk ID>] |
omconfig storage vdisk action=reconfigure controller=id vdisk=id raid=<c|r0|r1|r1c|r5|r10> pdisk=<PDISKID>[size=<size>vdcapac |
| ityexpansion=yes sizeinpercent=<1 to 100>] | |
 |
 |
You can verify if the virtual disk is reconfigured, through the virtual disk size in virtual disk properties. To display the virtual disk properties, run the following iSM command: 
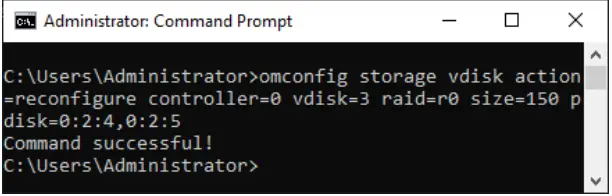
Example 1: To reconfigure a virtual disk with disk ID <2> of size <100> GB to <150> GB, run the following command:
C:\Users\Administrator>dcismcfg.exe -swraid -ctrlID=0 -reconfigure -vd=2 -size=150
When a virtual disk is reconfigured successfully, the following message is displayed:
The operation is successful.
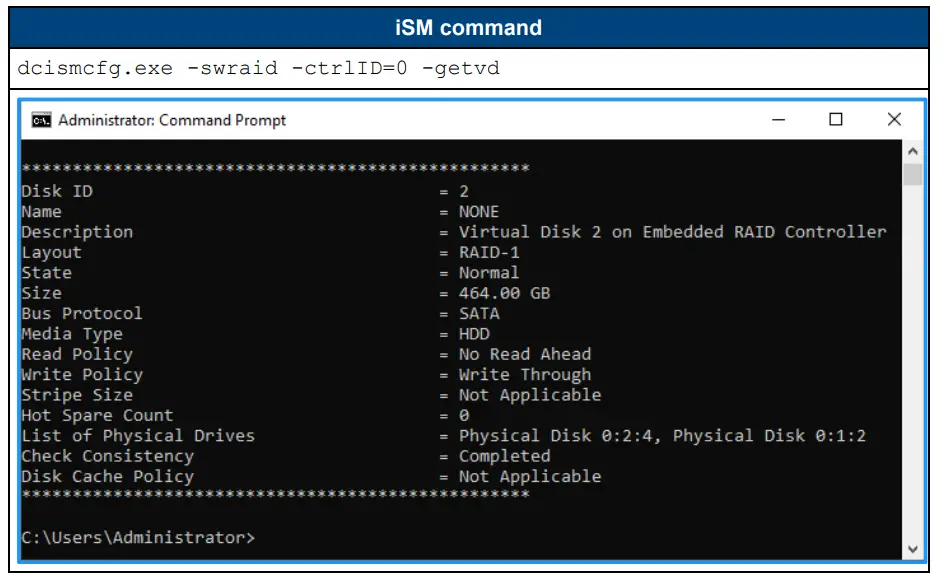
Example 2: To reconfigure a virtual disk with disk ID <2> of size <100>GB to <200>GB with additional physical disk of disk ID <0:1:2>, run the following command:
C:\Users\Administrator>dcismcfg.exe -swraid -ctrlID=0 -reconfigure -vd=2 -size=200 -pd=0:1:2
When a virtual disk is reconfigured successfully, the following message is displayed:
The operation is successful.
View the maximum size of a virtual disk for reconfiguration
To view the maximum size supported of a virtual disk up to which it can be reconfigured, run the following command:
| iSM command | OMSA command |
| dcismcfg.exe -swraid -ctrlID=0/1 -getsize -vd=<disk ID> -pdisk/-pd=<Disk ID>] | Not available |
 |
Example 1: To display the maximum size to which a virtual disk can be reconfigured with virtual disk ID <3>, run the following command:
C:\Users\Administrator>dcismcfg.exe -swraid -ctrlID=0 -getsize -vd=3
When the above command is run successfully, the following message is displayed:
The maximum virtual disk size that is supported for reconfiguration operation is 1711.96 GB.
The operation is successful.
Example 2: To display the maximum size to which a virtual disk can be reconfigured with virtual disk ID <4> and with additional physical disks of disk IDs <0:1:2> and <0:1:3>, run the following command:
C:\Users\Administrator>dcismcfg.exe -swraid -ctrlID=0 -getsize -vd=4 –
pd=0:1:2,0:1:3
When the above command is run successfully, the following message is displayed:
The maximum virtual disk size that is supported for reconfiguration operation is 1711.96 GB.
The operation is successful.
Access operating system logs using Event Viewer
iDRAC Service Module (iSM) monitors alerts when OpenManage Server Administrator (OMSA) is running on the operating system. However, the alerts are logged only in the Lifecycle Controller log, and not in the operating system log. When OMSA is not running on the operating system, iSM logs the alerts in the operating system log and the Lifecycle Controller log. The source name for alerts that are logged in the operating system log is iDRACServiceModule-SWRAID. iSM monitors the alerts every 15 minutes, and a maximum of 50 alerts are logged per day.
To view the operating system logs using the Event Viewer, perform the following:
- Start Windows Event Viewer application on your system.
- On Event Viewer, click Windows Logs > System.
- On the System tab, click to view the Lifecycle Controller Log events. You can view the event information under the General tab.

Frequently Asked Questions (FAQ)
Q: What is the purpose of the software RAID feature in iDRAC Service Module?
A: The software RAID feature facilitates enumeration, configuration, and monitoring of controllers, physical disks, and virtual disks attached to Dell PowerEdge servers.
Q: How can I migrate from Dell OpenManage Server Administrator (OMSA) to iDRAC Service Module?
A: Refer to the technical whitepaper provided to understand the steps for migrating from OMSA to iSM before OMSA’s End Of Life (EOL).
Documents / Resources
 |
DELL iSM Software Raid Features in Idrac Service Module [pdf] User Guide iSM Software Raid Features in Idrac Service Module, Features in Idrac Service Module, Idrac Service Module, Service Module |


