Apps E-CON KIT Wired Intercom System with Smartphone App

Specifications
- Power Supply 15VDC 1.3A
- Internet Connection Ethernet or Wifi to Monitor
- App Support Tuya Smart
- Phone Support iOs & Android
- Weather Resistant Gate Station Only
- Mounting Height Monitor: 1.5m Gate Station: 1.2 – 1.5m
- Monitor Support 6 (Maximum)
- Gate Station Support 2 (Maximum)
Cabling Overview
- It is recommended to use CAT6 for all cabling on the EliteConnect intercom system.
- Direct burial or gel-filled CAT6 is recommended for externally run cable (including inside conduit).
Tuya App Requirements:
Internet Connection
E-CON MONITOR must have an Ethernet or Wifi internet connection for the Tuya Smart app to operate.
Smartphone
- Apple iOS 77.0 & Above
- Android 5.0 & Above
Account
All APP Owners & invited Users must have an active Tuya Smart account

Wiring Schematic

This example shows 2 x gate stations connected to 3 x monitors
Wiring & Addressing the E-CON System (Important)
- A maximum of 6 monitors can be wired to 1 system.
- A maximum of 2 gate stations can be wired to 1 system.
- Gate stations 1& 2 must always be wired to ‘Monitor 1.
- Each monitor requires its own 15V 1.3A power supply.
- Each monitor is default set as ‘Monitor 1. For systems with more than 1 monitor, each monitor must be set to a unique address. See below for more details:
How to Address Monitors
- Tap the screen to bring up the main menu. Go to ‘Settings’ then ‘System.
- Here you can change the ‘Device ID’ to the next unique & available number.
- The monitor should now restart as the new selected number.
Wiring Colours
E-CON MONITOR
Power IN
- RED 15VDC
- BLACK = GND
Comms
- RED = V+
- WHITE= AUDIO
- BLACK = GND
- YELLOW =VIDEO
Clean Contact Triggered by Monitor “Key Icon’
- BLACK= NO
- RED COM
- YELLOW = NC
Ethernet
- RED = RxN
- BROWN= RxP
- BLACK= TxN
- YELLOW= TXP
E-CON GATE KP
Power IN
- PURPLE = 12-15VDC
- GREY = GND
Comms
- RED= V+
- WHITE = AUDIO
- BLACK= GND
- YELLOW = VIDEO
Clean Contact Triggered by Monitor ‘Gate lcon’ & smartphone APP
- GREEN= NO
- ORANGE = COM
- BROWN = NC
REX (N/O Button)
- BLUE = OPEN
- TRG GREY GND
E-CON GATE
- See Schematic
App & Site Setup with Monitor Connected via Ethernet
Before proceeding, make sure your monitor has an Ethernet internet connection & your smartphone is connected to the Wi-Fi of the same router,
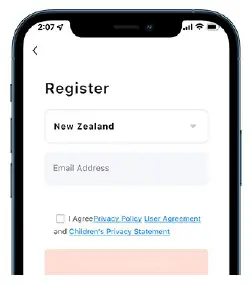
- Download the App t Search ‘Tuya Smart’ on the ‘App’ or Play Store or scan the QR link at the top right of this page.

- Create a Tuya account All users must have an active Tuya Smart account to either add a device or operate an E-CON KIT from any smart device.
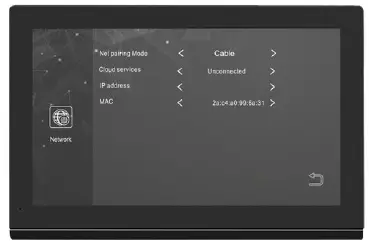
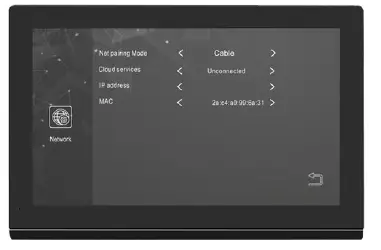
- Monitor Setup m Go to ‘Settings, then ‘Network Settings & select ‘Cable’ under ‘Netpairing Mode’ Next press the back button & the monitor will restart in the newly selected mode.
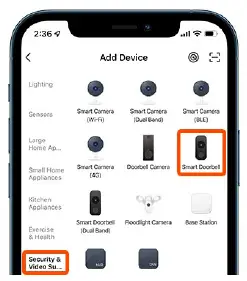
- Add Device From the ‘Home’ screen, press ‘Add Device’. This can also be accessed via the orange circle/plus icon.
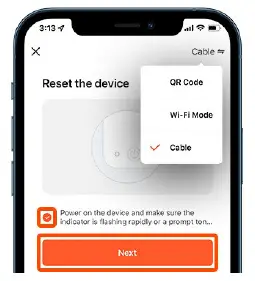
- Pairing Device Press the top right of the Screen, then select ‘Cable from the drop-down list. Next press the ‘Power on the device… tick. Lastly, press the large orange ‘Next’ button.
- Search/Add The app should now begin searching for the monitor.

- Once found, the device will be added to your app. If searching fails, make sure the device is powered & has an active internet connection
Intercom App Overview

- Hang up/ Exit.
- Audio from door station ON/OFF.
- Snapshot – Capture image & save to phone app or gallery
- Turns on/off the microphone for two-way communication.
- Opens the door/gate connected to the relay of monitor 1.
- Switches communication between gate stations 1&2.
- Playback of recordings from monitor SD card (if fitted).
- Access to images from intercom snapshot history.
- Opens the door/gate connected to the gate station relay.
- Records video during gate station communication.
- Turns video into full-screen mode. 12. Settings menu.
Monitor Wifi Setup

- Use this page in conjunction with Ethernet setup. Swap out steps 3 &5 as detailed below:
- Make sure your smartphone is connected to the same wifi that the monitor is being connected to. Wifi must be 2.4GHz only
Monitor Setup
- Go to ‘Settings, then ‘Network Settings & select ‘EZ Mode Netpairing Mode’ under. Next press the back button & the monitor will restart in the newly selected mode.
Pairing Devices
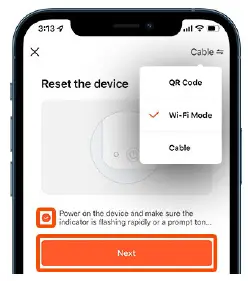
- Press the top right of the screen, then select ‘Wi-Fi Mode’ from the drop-down list.
- Now press ‘Next step, then the ‘EZ Mode’ button. Enter the Wi-Fi password that you are connected to then press ‘Next’.
Monitor Buttons During Communication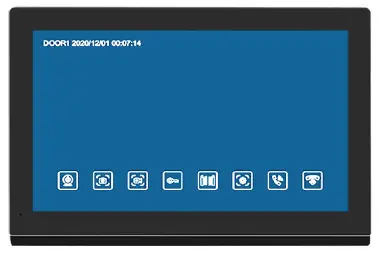
![]()
- View door station camera.
- Snapshot image during communication (requires SD card).
- Video recording during communication (requires an SD card).
- Triggers relay contact from within the monitor.
- Triggers relay contact from within the call station’ Adjust volume, brightness, contrast & saturation.
- Transfer call station call to another connected device.
- Answer/enable 2-way communication between call station & monitor Hang up/cancel communication between call station & monitor.
- Return to the previous screen.
Extra Functions & Features
- The E-CON MONITOR 8& E-CON GATE (KP) supports extra features that are not detailed in this manual such as: ‘Motion detection’, ‘Relay reset times’ & ‘Custom standby screen images.
- If you wish to use these functions, please follow the intuitive monitor user interface to access &enable these settings. ‘Custom screen images’ require images to be loaded onto an SD card that is then inserted into the monitor (SD card not included).
- Wifi monitor connection is not recommended as a connection can easily be lost by interference, changing your router (or router password). Please use Ethernet/Cable connection where possible.
Inviting Users & Device Ownership
The person who first registers a device becomes the ‘Owner’ & can add or remove users directly from the app. Invited users must have an active Tuya account. See step 2 on page 3 of this manual for information on how to register.
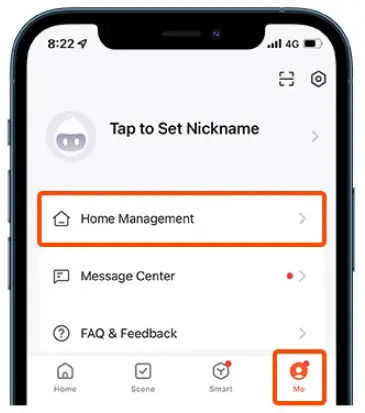
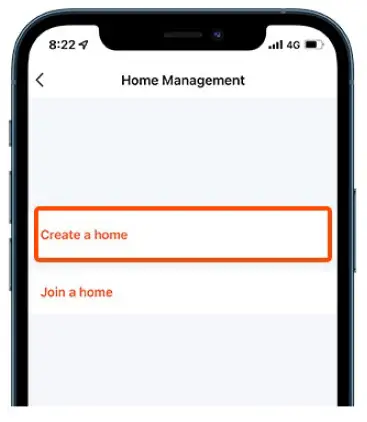
- Create a Home From the home screen, select ‘Me’ found at the bottom right. Then press ‘Home Management.
- Create a Home Press ‘Create a home’
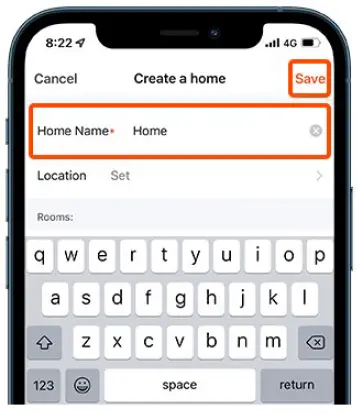
- Name Home Enter a ‘Home Name’ then press ‘Save’ found at the top right to Continue.
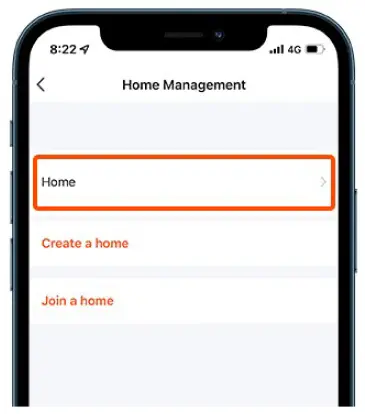
- Open Created Home Next, press on the ‘Home’ that you created in step 3 to access the ‘Add Member’ options.
- Add Member Press ‘Add Member, then select the path you would like to send via. I.e. Text, email, or other.
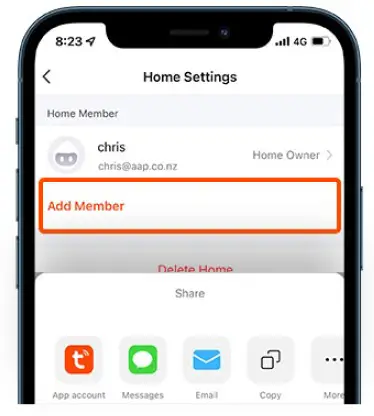
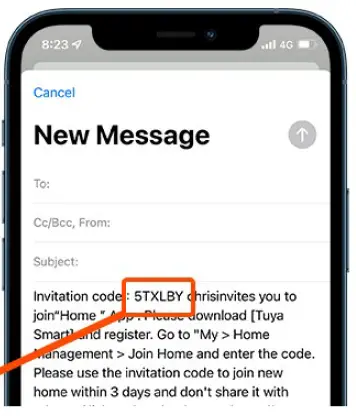
- Send Invitation Code Enter the invited users’ details and press ‘Send’. The invited user is required to use the code shown here in the steps detailed below:
Accepting Invitations
Invited users must enter the invitation code detailed above (in step 6) to start using the device
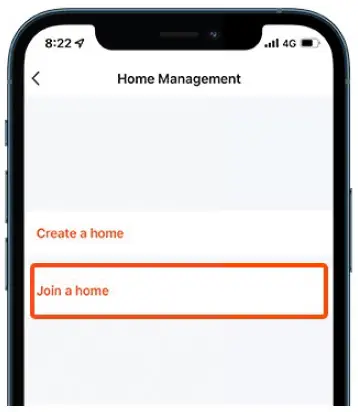
- Join a Home From the home screen, select ‘Me’ found at the bottom right. Then press ‘Home Management
- Join a Home Press ‘Join a home’.
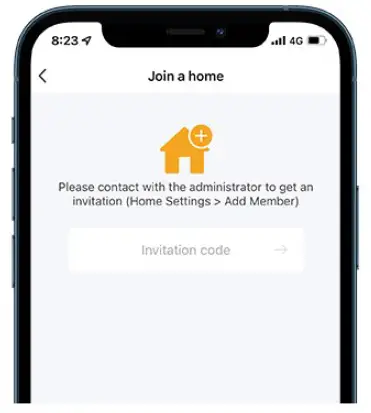
- Invitation Code Enter the invitation code that was sent by the device owner shown in step 6.
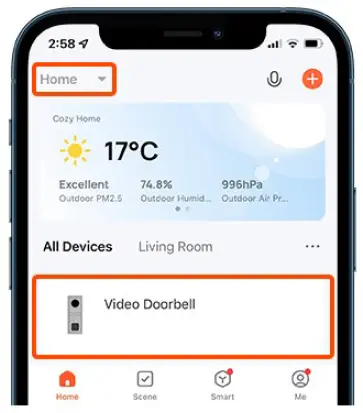
- Use the Device (D The device should now appear in the ‘Home’ tab found on the ‘Home’ screen
Keypad Code & Swipe Tag Simple Programming (E-CON GATE KP Only)

- Simple programming includes l x ‘User Keypad Code’ & up to 2 x ‘Swipe Tags’. See the advanced manual link at the bottom of this page if you require extra functionality.
- When programming: 2 beeps= Successful entry & 4 beeps= Unsuccessful entry.
Entering Management Mode
Press*, then 999999, then#. You will hear a double beep and the numbers will flash slowly, indicating that you are in management mode.
Note: 999999 is the default management code. You are required to reset the unit to enter management mode if this has changed.
Adding/Changing a User Keypad Code
Enter ‘Management Mode’. Press O (keypad will fast flash), then press ll followed by#. Now enter a (4-6 digit) code followed by#, then enter the same code again followed by#.
Call Station Relay Reset Time
Enter ‘Management Mode’. Press 4 (keypad will fast flash), then select a reset time from 00 – 99(sec), followed by# & the new time will be saved.
Note: 00 = Latching
Changing Management Code
Enter ‘Management Mode’. Press O (keypad will fast flash), then press 77 followed by#. Now enter a new 6-digit code, followed by#, then enter the same code again followed by#.
Adding/Changing a User Keypad Code
Enter ‘Management Mode’. Press O (keypad will fast flash), then press ll followed by#. Now enter a (4-6 digit) code followed by#, then enter the same code again followed by#
Call Station Relay Reset Time
Enter ‘Management Mode’. Press 4 (keypad will fast flash), then select a reset time from 00 – 99(sec), followed by# & the new time will be saved.
Note: 00 = Latching
Deleting Swipe Tags
Enter ‘Management Mode’. Press 2 (keypad will fast flash), then select a slot to delete from 001 – 199, followed by#. The keypad will beep 3 times to confirm the deletion. Restore F
Restore Factory Management Code”
Power down gate station. Short blue wire (REX) to grey wire (GND) while powering up the gate station. Keep shorted until you hear 3 beeps & the management code will now be reset to 999999.
Proudly Supplied by Arrowhead Alarm Products Ltd, 344B Rosedale Rd, Albany 0632, Auckland, New Zealand – www.aap.co.nz
Documents / Resources
 |
Apps E-CON KIT Wired Intercom System with Smartphone App [pdf] Instruction Manual E-CON KIT, Wired Intercom System with Smartphone App, E-CON KIT Wired Intercom System with Smartphone App |


