1. Uvod
This manual provides detailed instructions for the installation, operation, and maintenance of your DCOLOR U8 HDMI TV Stick DVB-T2 HD Receiver. This device allows you to receive DVB-T2/DVB-C digital terrestrial and cable channels in Full HD 1080P, supporting H.265 HEVC 10-bit and Dolby Audio. It also features PVR recording and multimedia playback via USB.
Please read this manual carefully before using the product to ensure proper functionality and to maximize your viewizkušnje.
2. Izdelek je končanview
2.1 Ključne lastnosti
- Plug and Play: Compatible with all TV systems featuring an HDMI socket. Powered by TV USB port for a tidy setup.
- Full HD 1080P: Supports HEVC H.265 10-bit for DVB-T2/DVB-C HD channels.
- PVR Record & Playback: Connect a USB 2.0/3.0 (FAT32) disk to record TV shows and play back various multimedia formats (MP3, JPEG, BMP, AVI, DivX, VOB, MKV, AC3, etc.).
- Podpora za Dolby Audio: Enjoy enhanced audio for a cinematic experience.
- 2-in-1 Programmable Remote Control: Control both the receiver and your TV.

Figure 1: DCOLOR U8 HDMI TV Stick Key Features
2.2 Vsebina paketa
Po odprtju paketa se prepričajte, da so prisotni vsi naslednji elementi:
- 1 x DVB-T2 HD Receiver (U8 HDMI TV Stick)
- 1 x 2-in-1 Programmable Remote Control (batteries not included)
- 1 x HDMI kabel
- 1 x Mini USB Infrared Sensor Receiver (1 meter)
- 1 x USB to DC Power Cable (1 meter)
- 1 x User Manual (English and Italian)

Slika 2: Vsebina paketa
2.3 Komponente naprave
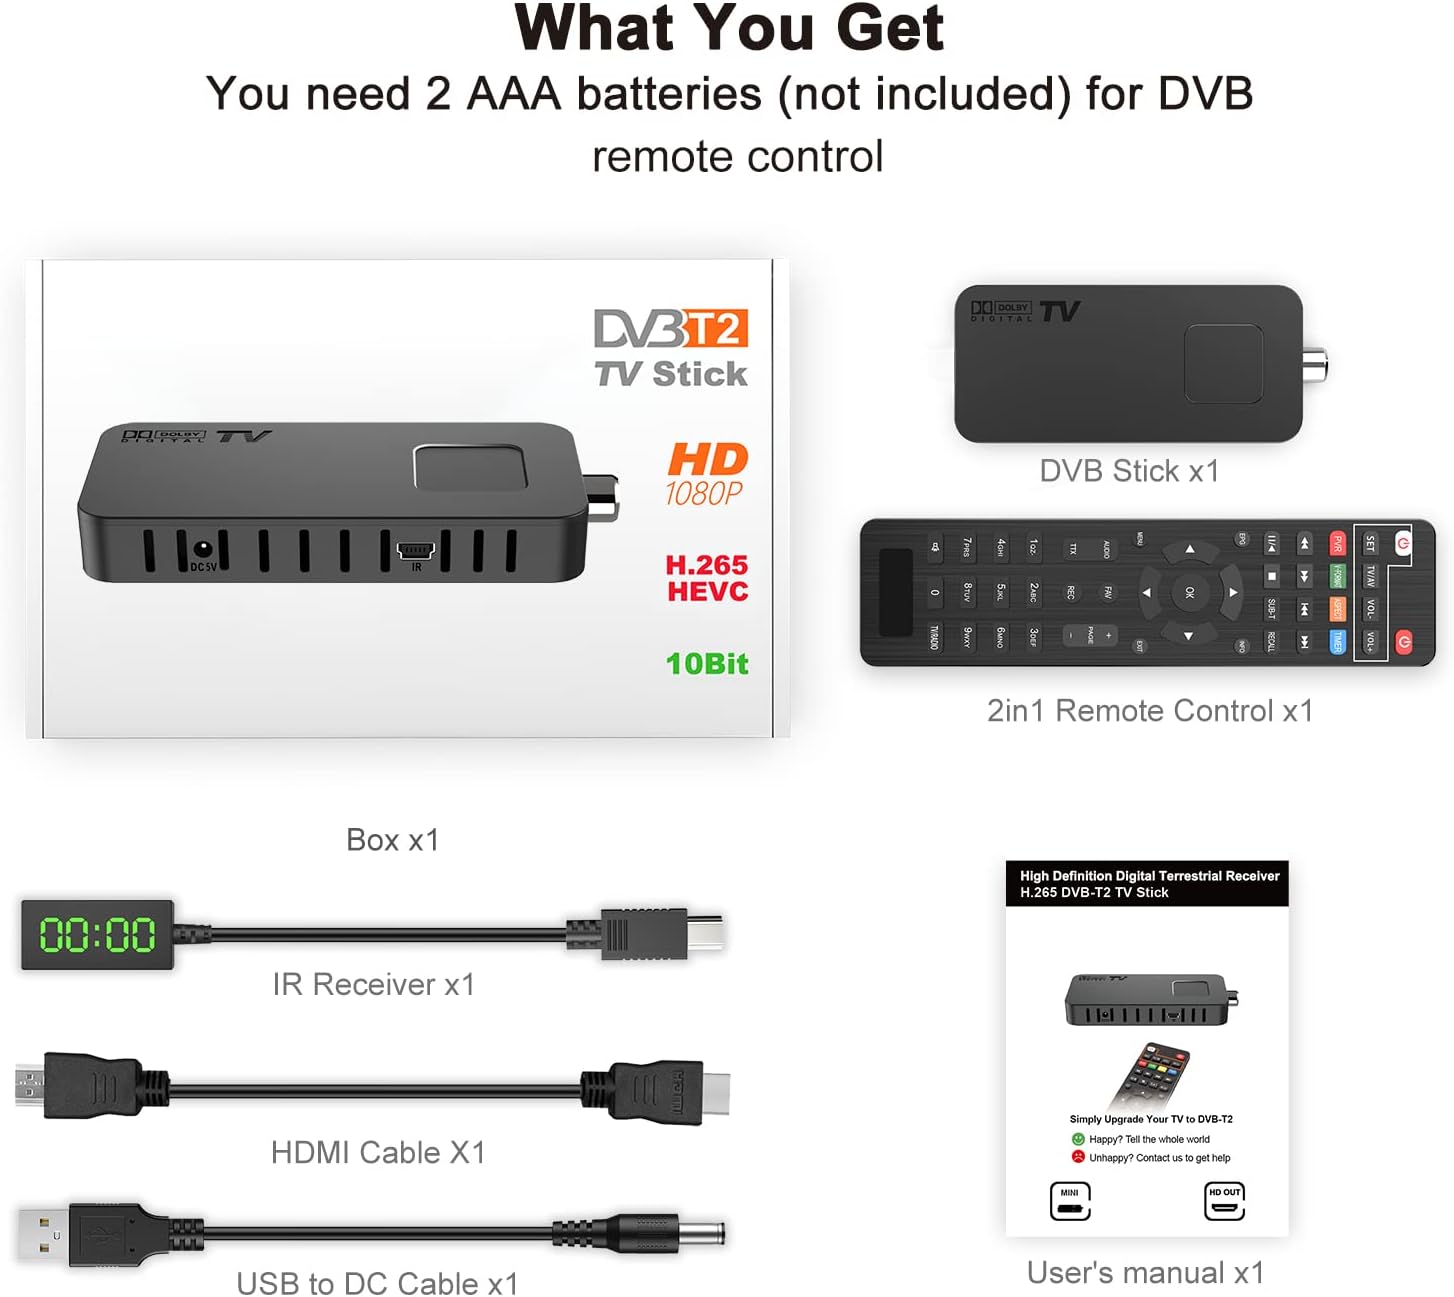
Figure 3: DVB-T2 HD Receiver Ports and Connections
- HDMI povezava: 1080P Full HD output to your TV or projector.
- Vrata USB: For storage devices (PVR) or USB WiFi Dongle (MT7601).
- DVB-T2/C Tuner (ANT IN): Priključite zemeljsko ali kabelsko anteno.
- Vhodna moč DC 5V: Power the device via TV USB port or a USB 5V wall adapter.
- IR vhod: Connect the infrared sensor receiver for remote control.
3. Navodila za nastavitev
Follow these steps to set up your DCOLOR U8 HDMI TV Stick:
- Priključitev na HDMI vrata televizorja: Plug the DVB-T2 HD Receiver directly into an available HDMI port on your television. The included HDMI cable can be used if direct connection is not feasible or if an extension is needed.
- Priključite napajanje: Connect the USB to DC power cable to the receiver's DC 5V input. Plug the USB end into a TV USB port (5V, 1A minimum recommended) or a USB 5V wall adapter (not included).
- Priključite IR sprejemnik: Plug the mini USB infrared sensor receiver into the IR input port on the DVB-T2 HD Receiver. Position the IR sensor in a location where it has a clear line of sight to your remote control.
- Priključitev antene: Connect your DVB-T2/C antenna to the ANT IN port on the receiver. For optimal reception, ensure you are using a suitable antenna for your region.

Figure 4: Simple Setup Guide

Figure 5: Receiver Hidden Behind TV for a Tidy Setup

Slika 6: Celoten diagram povezave
4. Navodila za uporabo
4.1 Začetni vklop in iskanje kanalov
After connecting all components and powering on your TV, switch your TV's input source to the HDMI port where the DVB-T2 HD Receiver is connected. The device will typically boot up and initiate an automatic channel scan upon first use. This process may take a few minutes. Ensure your antenna is properly connected for successful channel detection.
4.2 Funkcije daljinskega upravljalnika
The included 2-in-1 remote control allows you to operate both the receiver and your TV. Insert 2 AAA batteries (not included) into the remote control.

Slika 7: Razporeditev in funkcije daljinskega upravljalnika
Programmable TV Buttons: The top section of the remote (POWER, TV/AV, VOL-, VOL+) can be programmed to control your TV. Refer to the manual's specific section on remote programming for detailed steps.

Figure 8: Programmable TV Control Buttons
- MOČ: Vklopi/izklopi sprejemnik.
- CH+/CH-: Spreminja kanale.
- GLASNOST+/GLASNOST-: Prilagodi glasnost.
- V REDU: Potrdi izbire v menijih ali prikaže informacije o kanalu.
- MENI: Dostopi do glavnega menija za nastavitve in funkcije.
- IZHOD: Zapre trenutni meni ali zaslon.
- EPG: Displays the Electronic Program Guide (if available).
- PVR: Initiates recording (with USB storage connected).
- USB multimedija: Use the USB port for playing media files.
4.3 PVR Recording and Multimedia Playback
To use the PVR function or play multimedia files, connect a USB 2.0 or 3.0 storage device (formatted to FAT32) to the USB port on the receiver. You can then access recording options via the remote's PVR button or navigate to the multimedia player through the main menu.
4.4 Dolby Audio Experience
The receiver supports Dolby Audio, providing enhanced sound quality for your viewing experience. Ensure your TV's audio settings are configured to output Dolby Digital if supported.

Figure 9: Enjoying Enhanced Dolby Audio
4.5 Projector Compatibility
The DCOLOR U8 HDMI TV Stick can also be connected to a projector via its HDMI output, allowing you to watch free TV channels on a larger screen.

Figure 10: HDMI 1080P Output for Projectors
5. Vzdrževanje
To ensure the longevity and optimal performance of your DCOLOR U8 HDMI TV Stick, follow these maintenance guidelines:
- Čiščenje: Za čiščenje naprave uporabite mehko, suho krpo. Ne uporabljajte tekočih čistil ali abrazivnih materialov.
- Prezračevanje: Ensure the device has adequate ventilation. Do not cover the ventilation slots.
- Napajanje: Always use the recommended 5V, 1A (or higher) power supply. Inadequate power can lead to operational issues.
- Posodobitve programske opreme: While not frequently required, check the manufacturer's webZa morebitne posodobitve vdelane programske opreme, ki lahko izboljšajo delovanje ali dodajo nove funkcije, obiščite spletno mesto ali se obrnite na podporo.
6. Odpravljanje težav
If you encounter issues with your DCOLOR U8 HDMI TV Stick, refer to the following common problems and solutions:
| Težava | Možen vzrok | rešitev |
|---|---|---|
| Device displays "booting" continuously. | Insufficient power supply. Older TV USB ports (USB1) may only provide 500mA, while the receiver requires at least 1A. | Connect the receiver to a USB 5V wall adapter (e.g., a smartphone charger) that provides at least 1 Ampprej. |
| No signal or "No Channel" message. | Antenna not connected, poor antenna signal, or incorrect input source on TV. | Ensure the antenna is securely connected. Check antenna positioning. Verify your TV is on the correct HDMI input. Perform a channel scan. |
| Channels disappear or cannot be found. | Signal fluctuations or an issue with the channel list. | Perform a new channel scan. If the issue persists, try a factory reset and then rescan. |
| Daljinski upravljalnik se ne odziva. | Batteries are dead or incorrectly inserted, IR sensor blocked, or remote not paired/programmed. | Replace batteries. Ensure the IR sensor has a clear line of sight to the remote. Check remote programming for TV control functions. |
| Ni zvoka ali slaba kakovost zvoka. | TV audio settings, incorrect audio output selected, or cable issue. | Check TV volume and mute settings. Ensure the correct audio output is selected on the receiver (if applicable). Verify HDMI cable connection. |
Če težava po poskusu teh rešitev še vedno obstaja, se obrnite na podporo strankam.
7. Specifikacije
| Funkcija | Podrobnost |
|---|---|
| Znamka | BARVA |
| Številka modela | U8 HDMI TV Stick |
| Tehnologija povezljivosti | HDMI, USB |
| Vrsta priključka | HDMI, USB 3.0 |
| Skupno število vrat HDMI | 1 |
| Teža | 200 gramov |
| Poraba energije | 5 vatov |
| Kanali | 4 |
| Video ločljivost | Full HD 1080P |
| Podpora za video kodeke | H.265 HEVC 10-bitni |
| Avdio podpora | Dolby Audio |
| Funkcionalnost PVR | Yes, via USB 2.0/3.0 (FAT32) |
| Predvajanje multimedije | MP3, JPEG, BMP, AVI, DivX, VOB, MKV, AC3, etc. |
8. Garancija in podpora
DCOLOR provides customer support for this product. If you have any questions or require assistance, please do not hesitate to contact us.
- Spletna storitev: We offer 24-hour online service for inquiries.
- Kontakt: Refer to the contact information provided in your product packaging or the included user manual for specific support channels (e.g., email address).
Information regarding spare parts availability and guaranteed software updates is not available at this time. Please contact customer support for the most current information.


