 Miniature Force Sensor System
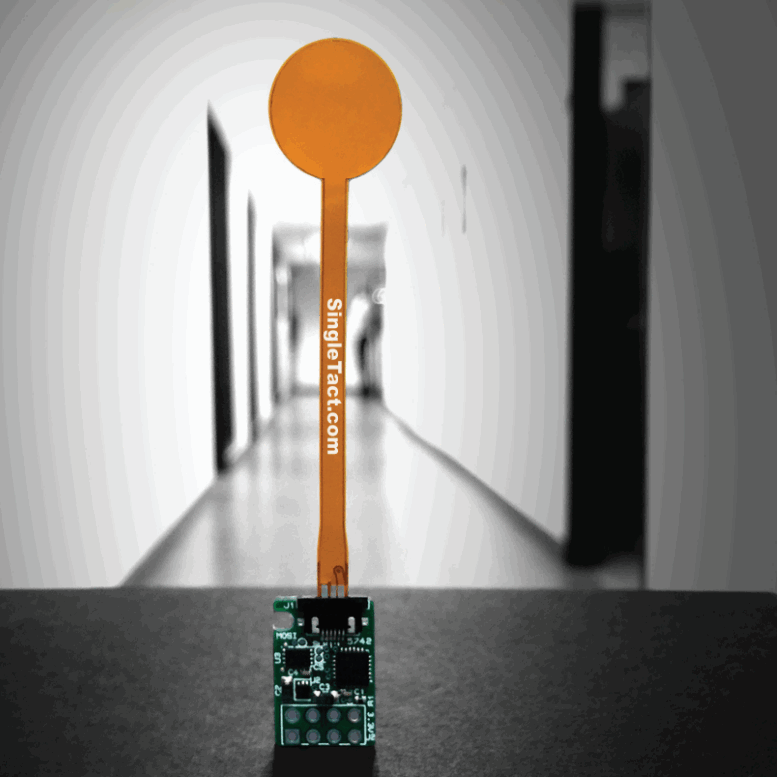 User Guide
Miniature Force Sensor System
Congratulations on your purchase of a SingleTact sensor system!
This quick start guide will show you how to set up your SingleTact interface system, connect your SingleTact pressure sensor to an external system or standalone product, and begin taking recorded measurements in both the analogue and digital domains.
If you are using the SingleTact USB system, please refer to the separate USB quick start guide.
| REPEATABILITY SingleTact has repeatability errors that are less than 1.0% of FSR. |
|
| ACCURACY SingleTact has the best accuracy among |
|
| EASY TO USE SingleTact Sensors are designed to |
|
| CUSTOM DESIGN SingleTact can be customized for your OEM Applica |
Getting Started Notes
- The Interface Board requires external circuitry in order to be used (microcontroller or analogue controller).
- Each board can only interface with a single SingleTact pressure sensor at a time.
- Multiple boards can be connected to an external controller.
- The SingleTact Interface Board features an analogue output and a configurable I2C output as standard.
- Our modules are compatible with all SingleTact sensors, and tail extenders. BLUE/BLACK
- Our obsolete modules are not compatible with SingleTact tail extenders. GREEN

Connecting the Sensor to the Board
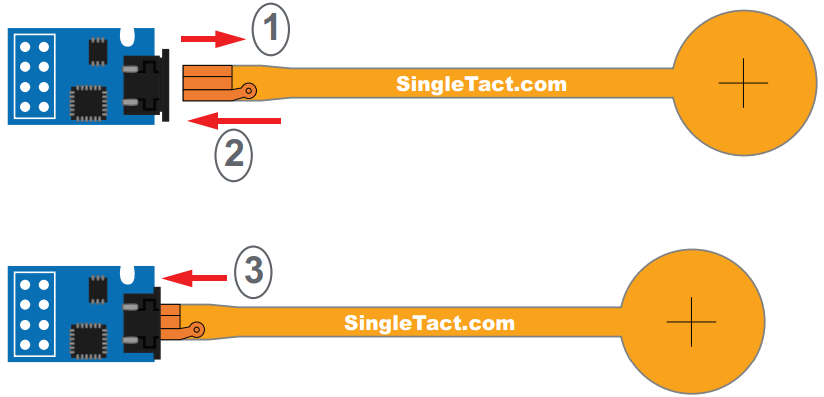
- Pull out the Sensor Locking Tab gently (it will only move about 2mm)
- Insert the SingleTact Sensor into the FCC Connector, matching the orientation shown in diagram to right
- Push the Sensor Locking Tab back in Proceed to section 1.2 for analog output or section 1.3 for digital output setup.
Analog Output Setup
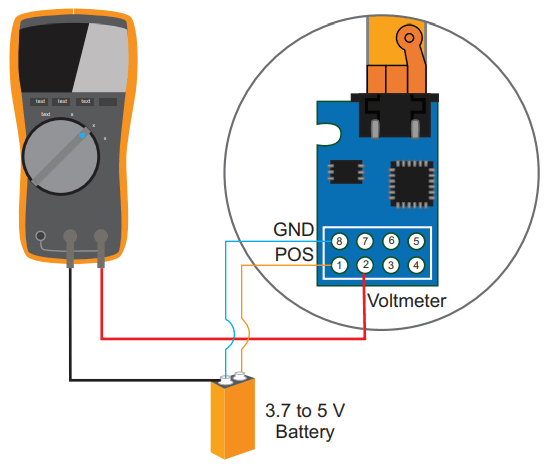
- Connect a positive supply (3.7V to 5V) to the SingleTact Interface Board Pin 1 and a ground supply (0V, GND) to SingleTact Interace Board Pin 8
- Measure voltage on SingleTact Interface Board Pin 2 with a voltmeter, oscilloscope, or microcontroller
NOTE: The analog output swings from 0V to 2V, with valid outputs ranging from 0.5V (no force) to 1.5V (FSR force). As pressure increases beyond the full-scale range (FSR), the output increases to 2V and then saturates.
The measured force will be given by the following equation*:
Force (N) = (Voltage Output(V) x Sensor Rated Force(N)) 1.5
*This equation is only to be used as an estimate unless you are using a calibrated sensor pair.
Digital Output Setup
This section is for using an Arduino Uno to read data from the SingleTact sensor. This is the recommended method.
For other I2C implementations on MSP430 and Raspberry Pi, or using multiple sensors, consult the relevant application note. For custom implementations on other platforms, consult the manual.
NOTE: Always program your Arduino, or other hardware, before connecting the SingleTact sensor.
Failure to do this can damage your SingleTact. Unplug the Arduino before making hardware changes.
- Download and install the Arduino Software from: https://www.arduino.cc/en/main/software
- Download the SingleTact Arduino firmware (Example Arduino Interface) from: https://github.com/SingleTact/ExampleArduinoInterface
- Connect the Arduino to the PC using a USB cable
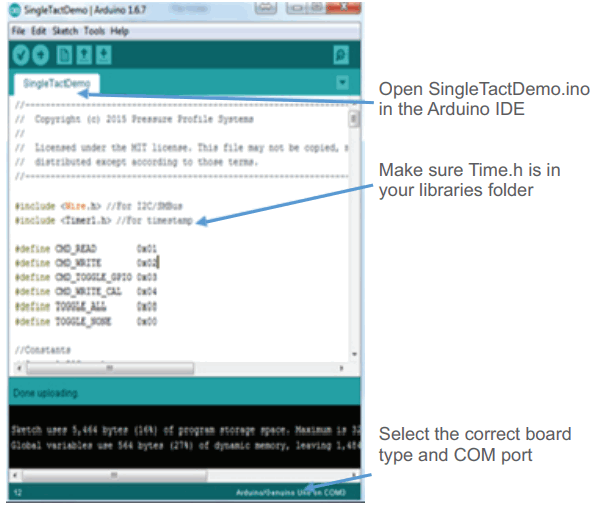
- Open the Arduino IDE software:
a. Go to File > Open and open “SingleTact Demotion”
b. Go to Sketch > Include Library > Add .zip Library and select “Timer1.zip”
c. Go to Sketch > Verify/Compile
d. Go to Sketch > Upload - You should see “Done uploading” in the green bar
a. If you receive an error, make sure the Arduino is selected under Tools > Port - Connect the sensor to the Interface Board as described in section
- Connect the following SingleTact Interface Board Pins to the Arduino pins:
a. Pin 1 to the Arduino 5V pin
b. Pin 8 to the Arduino GND pin
c. Pin 3 to Arduino pin A5 (SCL)
d. Pin 6 to Arduino pin A4 (SDA) - Connect the Arduino to the computer using a USB cable
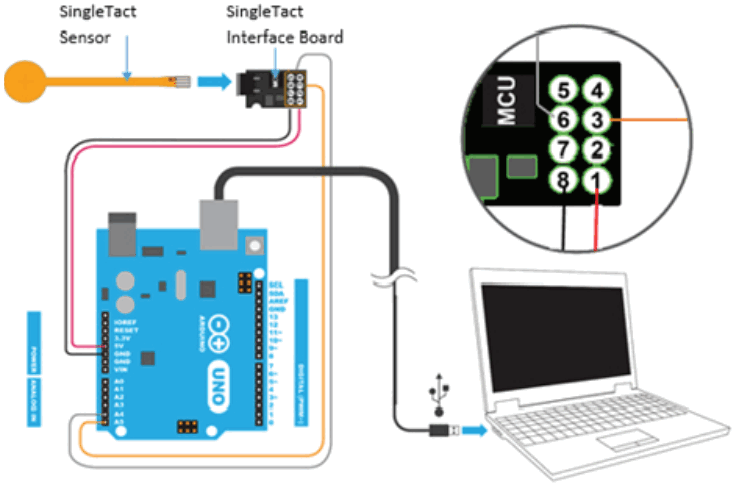
NOTE: USB communication may need additional driver installation from the Arduino software package.
Taking Measurements
The SingleTact Data Acquisition (DAQ) software is the graphic user interface (GUI) and recording tool for SingleTact pressure sensors.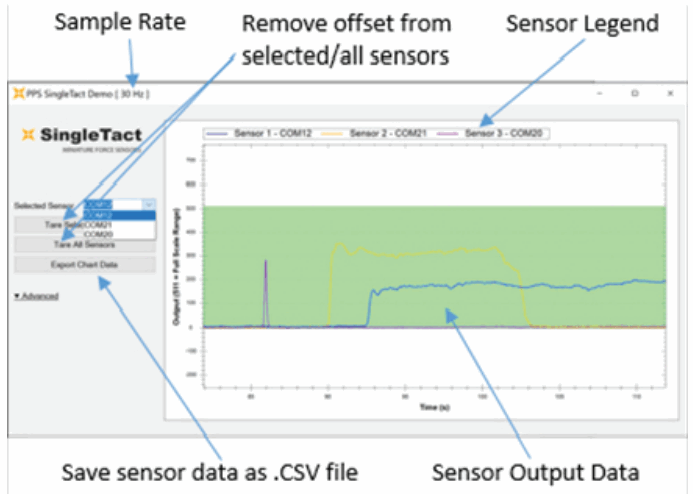
- Download the executable app from: http://www.singletact.com/software-download/download-links/
- Connect the assembled SingleTact system to the PC
- Run ‘SingleTact Demo.exe’
- The sensor data will be shown on the GUI graph
a. You can choose whether to interface with a single sensor or all sensors at once
b. The sensor data can be saved as a .CSV file for later analysis using the GUI
You are now ready to use your SingleTact system to make pressure and force measurements!
Additional Information
- For more information, such as how to use SingleTact Tail Extenders, Advanced DAQ Options, and Troubleshooting, please see the SingleTact Manual.
- The manual can be found online at: http://www.singletact.com/SingleTact_Manual.pdf
- If you are looking to use multiple sensors on a single microcontroller, or are wanting examples for the MSP430 and Raspberry Pi platforms, then consult the appropriate application notes: https://www.singletact.com/app-notes/
- Assistance for your specific application may be found on https://www.singletact.com/faq/
- For all else, send us an email at info@singletact.com
Copyright © 2023
www.SingleTact.com
Documents / Resources
 |
SingleTact Miniature Force Sensor System [pdf] User Guide Miniature Force Sensor System, Miniature Force Sensor, Force Sensor, Sensor |


