sentiotec CPR-EMO-L1 Concept R Heater Railing Emotion Instruction Manual

About this instruction manual
Read these instructions for installation carefully and keep them within reach of the product. This ensures that you can refer to information regarding your safety and regarding installation at any time.
Symbols
In these installation instructions, symbols and signal words are used which have the following meanings:
ATTENTION!
This keyword is a warning that damage to property can occur.
Important information for your safety
Intended use

General safety information
- Remove any packaging residue from the bracket. This could ignite during operation of the sauna heater.
- Mount the railing bracket and the finished railing with a normal screwdriver. The product can be damaged by a cordless drill.
- For your own safety, consult your supplier in the event of problems that are not described in sufficient detail in the operating instructions.
Scope of delivery
- 2 pcs railing bracket

- Small wood railing (CPR-EMO-L1, CPR-EMO-N1)

Large wood railing (CPR-EMO-L2, CPR-EMO-N2)

- 4 pcs rounded head screws (A2 M 3 x 6 mm
Installation
ATTENTION!
Damage to the product
The product can be damaged by a cordless drill.
● Use a normal screwdriver to install the railing bracket.
Installing the railing bracket
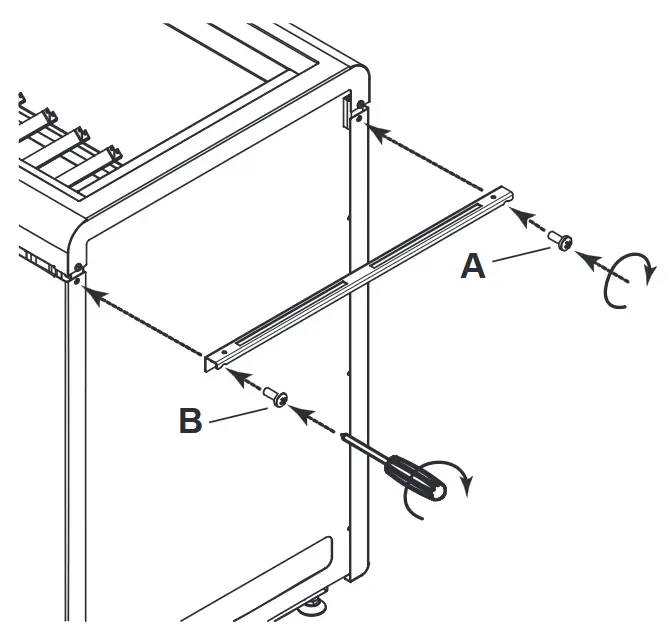
Step 1
Remove screws A and B from the sauna heater using a screwdriver.

Step 2
Screw the railing bracket 1 to the sauna heater. To do this, use screws A and B.
Install the second railing bracket in the same way on the opposite side of the heater.
Installing the railing
ATTENTION!
Damage to the product
The product can be damaged by a cordless drill.
● Use a screwdriver to install the railing.
Step 3
Screw the railing 2 from above to the railing brackets. To do this, use the rounded head screws provided 3.

Disposal
![]()
- Please dispose of packaging materials in accordance with the applicable disposal regulations.
- Used products contain reusable materials. Therefore, do not dispose of your used product with household waste, but do so in accordance with the locally applicable regulations.
NOTES
![]() GLOBAL: Harvia Finland Oy I P.O. Box 12 I Teollisuustie 1-7 I 40951 Muurame I FINLAND I +358 207 464 000 I harvia@harvia.fi
GLOBAL: Harvia Finland Oy I P.O. Box 12 I Teollisuustie 1-7 I 40951 Muurame I FINLAND I +358 207 464 000 I harvia@harvia.fi
CENTRAL EUROPE: Harvia Austria GmbH | Wartenburger Straße 31 I A-4840 Vöcklabruck I +43 (0) 7672/22900-50 | info@harvia.com www.harvia.com
![]()
Documents / Resources
 |
sentiotec CPR-EMO-L1 Concept R Heater Railing Emotion [pdf] Instruction Manual CP-RB-090, CP-RB-105, CP-RB-120, CP-RB-150, CP-RCB-090, CP-RCB-105, CPR-EMO-L1 Concept R Heater Railing Emotion, Concept R Heater Railing Emotion, Heater Railing Emotion, Railing Emotion |