![]()
Software Settings
Open the SGD Software and connect the G9 machine to the computer with a USB cable. After successful connection, you can select “Device information” to check the basic information, modify accessories and display settings. The accessory information needs to be configured when using the slide extension kit, meanwhile, Safety Door should be in a closed status. PLEASE NOTE that the slide extension is prohibited for hot-swap use and must be connected when the G9 machine is off.
 User Password: sculpfun001
The parameter settings are as follows
Slide Extension Kit


Accessories Installation
Take it out from the package. Install the working platform on the base with the attached screws. NOTE that it is in the right direction when the reset button is facing left and the scale of the platform is facing up.


You can adjust it through the two screw holes on the front platform to tighten it when the working platform wobbles too much.
NOTE: Over tightening the screws will affect platform movement. Connect the accessory to the machine with a data cable.
Operating Steps
Step 1: Preparation
Create a new canvas. You can change the mode to “Expanded engraving” in the lower right corner of the SGD interface, and the canvas size will automatically change to fit the slide extension.
 Step 2: Installation
Place it on the machine working platform. And there is a special slot of the slide extension base to match the machine working platform.
NOTE: It is in the correct placement position when the reset button and connection port are facing left.

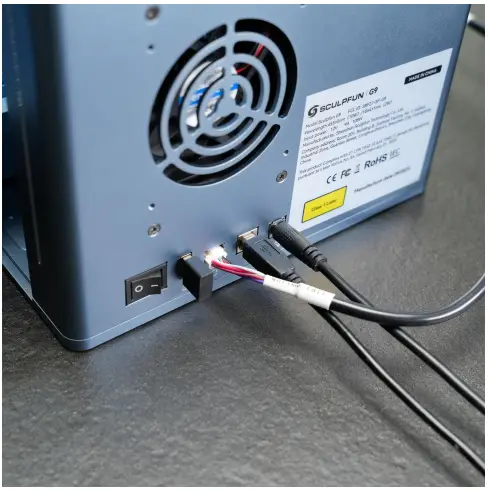
Step 3: Connection
Connect it to the G9 machine with a connection cable. You can turn on the machine after completing the connection.

Step 4: Engraving
- Focus
Place the engraving materials on the working platform of the slide extension and click to focus. Red and blue dots will appear on the materials, adjusting them with the electric lift button to make the two dots coincide to complete the focus.
- Parameters Settings
You can edit patterns or text on the canvas and select proper parameters according to the engraving content and materials.
- Preview
Press the reset button to reset the slide extension to the origin before previewing. Click on “Preview” and it will prompt you to perform a reset. You can check the working range of the machine after completing the reset and clicking on “Yes”.

- Start Engraving
Press the reset button to reset the slide extension to the origin before engraving. Click on “Marking” and it will prompt you to perform a reset. You can start working after completing the reset and clicking on “Yes”.
![]()
Documents / Resources
 |
SCULPFUN G9 Slide Extension Kit [pdf] Instructions G9 Slide Extension Kit, G9, Slide Extension Kit, Extension Kit |
 |
SCULPFUN G9 Slide Extension Kit [pdf] Instruction Manual G9 Slide Extension Kit, G9, Slide Extension Kit, Extension Kit |


