![]() RG-ES116G-L Switch
RG-ES116G-L Switch
Installation Guide
RG-ES116G-L Mbps Unmanaged Non PoE Switch
Document Version: V1.2
Date: 2024.05.13
Copyright © 2024 Ruijie Networks
Copyright
copyright © 2024 Ruijie Networks
All rights are reserved in this document and this statement.
Without the prior written consent of Ruijie Networks, no organization or individual is permitted to reproduce, extract, back up, modify, or distribute the content of this document in any manner or form. It is also prohibited to translate the document into other languages or use any or all parts of it for commercial purposes.
![]() trademarks are owned by Ruijie Networks.
trademarks are owned by Ruijie Networks.
All other trademarks or registered trademarks mentioned in this document are owned by their respective owners.
Disclaimer
The products, services, or features you purchase are subject to commercial contracts and terms. Some or all of the products, services, or features described in this document may not be within the scope of your purchase or use. Unless agreed upon otherwise in the contract, Ruijie Networks does not provide any explicit or implicit statements or warranties regarding the content of this document.
The names, links, descriptions, screenshots, and any other information regarding third-party software mentioned in this document are provided for your reference only. Ruijie Networks does not explicitly or implicitly endorse or recommend the use of any third-party software and does not make any assurances or guarantees concerning the applicability, security, or legality of such software. You should choose and use third-party software based on your business requirements and obtain proper authorization. Ruijie Networks assumes no liability for any risks or damages arising from your use of third-party software.
The content of this document is subject to constant change due to product version upgrades or other reasons.
Ruijie Networks reserves the right to modify the content of the document without any notice or prompt.
This manual serves solely as a user guide. While Ruijie Networks endeavors to ensure the accuracy and reliability of the content when compiling this manual, it does not guarantee that the content of the manual is free of errors or omissions. All information contained in this manual does not constitute any explicit or implicit warranties.
Preface
Intended Audience
This document is intended for:
- Network engineers
- Technical support and servicing engineers
- Network administrators
Technical Support
- The official website of Ruijie Reyee: https://reyee.ruijie.com
- Technical Support Website: https://reyee.ruijie.com/en-global/support
- Case Portal: https://www.ruijienetworks.com/support/caseportal
- Community: https://community.ruijienetworks.com
- Technical Support Email: service_rj@ruijienetworks.com
- Online Robot/Live Chat: https://reyee.ruijie.com/en-global/rita
Conventions
- Signs
The signs used in this document are described as follows:
 Danger
An alert that contains important safety instructions. Before you work on any equipment, be aware of the hazards involved and be familiar with standard practices in case of accidents.
 Warning
An alert that calls attention to important rules and information that if not understood or followed can result in data loss or equipment damage.
 Caution
An alert that calls attention to essential information that if not understood or followed can result in function failure or performance degradation.
 Note
Note
An alert that contains additional or supplementary information that if not understood or followed will not lead to serious consequences.
 Product/Version Support
An alert that contains a description of product or version support. - Note
This manual presents installation instructions, troubleshooting techniques, technical specifications, cable and connector requirements, and usage guidelines. It is intended for users who want to gain insight into the above content and have some experience in installing and maintaining network hardware. It is assumed that users are already familiar with relevant terms and concepts.
Product Overview
1.1 Introduction
| Model | 1000M/100M/10M Base-T Auto-negotiation Ethernet Port 1 | 1000Base-X SFP Port | Console Port | Fan Modules | Power Supply |
| RG-ES116G-L | 16 | / | / | / | Fixed power supply module |
![]() Note
Note
1000BASE-T ports are downward compatible with 100BASE-T and 10BASE-T.
1.2 Package Contents
Table 1-1 Package Contents
| No. | Name | Quantity | Unit | Remarks |
| 1 | Main unit | 1 | – | |
| 2 | Rubber pad | 4 | – | |
| 3 | Mounting bracket | 2 | – | |
| 4 | User manual | 1 | Certificates | – |
| 5 | M4 x 8 mm screw | 6 | – | |
| 6 | Warranty card | 1 | – | |
| 7 | Power cord | 1 | Pcs |
![]() Note
Note
The package contents above are intended to provide a general overview, and are subject to the terms of the order contract. Check your goods carefully against the order contract. If you have any questions, please contact the distributor.
1.3 Product Appearance
RG-ES116 G-L The front panel of the Ethernet switch provides 16 x One 1000M/100M/10M Base-T Ethernet port with auto-negotiation, one switch, and a series of LED indicators The rear panel provides an AC power input port and a ground pin. The following figures show the product appearance.  1.3.1 Front Panel
Figure 1-1 Front Panel
 Table 1-2 Ports and Buttons on the Front Panel
| ID | Interface information | Description |
| 1 | System status LED ( SYS ) | Off: the switch is not powered on. Fast blinking green (10 Hz): the switch is upgrading or starting up and cannot be used. Solid green: the switch is running properly. |
| 2 | Working mode switching button | Move the dialing button to the leftmost position (default Mode): all ports can communicate with each other, and flow control is enabled on all ports. Intermediate (traffic control disabled): all ports can communicate with each other, and traffic control is disabled on all ports. Moved to the rightmost position (port isolation): 1–14 Ports cannot communicate with each other, but can communicate with port 15. 、16 Port communication; 15 、16 Enable flow control on all ports so that the ports can communicate with each other. |
| 3 | Status LED of the ethernet interface (1000M electrical port) | Off: the port is not connected. Solid green: the port works at 1000 Mbps /100 Mbps /10 Mbps and no data is being transmitted. Blinking green: the port works at the rate of 1000 Mbps /100 Mbps /10 Mbps and data is being transmitted. |
| 4 | Ethernet port (1000M electrical port) | 1000/100/10Base-T ports with auto-negotiation, connected to cat5e cables. |
| 5 | Nameplate | At the bottom of the device |
1.3.2 Rear Panel
Figure 1-2 Rear Panel  Table 1-3 Ports and Buttons on the Rear Panel
| ID | Button and ports | Description |
|
1 |
Power input connector | Connects to an external AC power supply. |
|
2 |
Grounding screw | Secures the grounding lug to connect the chassis to earth ground. |
1.4 Technical Specifications
Table 1-4 Technical Specifications
| Model | RG-ES116G-L |
| Ports | 16 10/100/1000 Mbps auto-sensing ethernet ports (Auto MDI/MDIX) |
| DIP Switch | Three working modes: ● Move the slider to the leftmost position (Standard): all ports can communicate with each other, and flow control is enabled on all ports. ● Intermediate (traffic control disabled): all ports can communicate with each other, and traffic control is disabled on all ports. ● Rightmost (port isolation): 1- 14 The port cannot communicate with other ports. It can only communicate with 15 、16 Port communication 15 、 16 Enable flow control on all ports so that the ports can communicate with each other. |
| Power Supply | AC input: ● Rated voltage range: 100 V AC to 240 V AC ● Maximum voltage range: 90 V AC to 264 V AC ● Frequency: 50 hz to 60 hz ● Rated current: 0. 6 A |
| PoE | Not supported |
| Power Consumption | 11 W |
| Operating Temperature | 0°C to 45°C (32°F to 113°F) |
| Storage Temperature | -40°C to 70°C (-40°F to 158°F) |
| Operating Humidity | 10% to 90% RH (non-condensing) |
| Storage Humidity | 5%~95% RH, no condensation |
| Number of Fans | Fanless |
| Certification | CE |
| Dimensions (W X D X H) (Unit: Mm) |
280mmx125mmx43.6mm |
| Switching Capacity | 32Gbps |
| Port Surge Protection | Common Mode 4 kV |
| Net Weight | 1.049 kg |
![]() Warning
Warning
Operation of this equipment in a residential environment could cause radio interference.
Preparing for Installation
2.1 Safety Precautions
![]() Note
Note
- To avoid personal injury and device damage, carefully read the safety precautions before you install the device.
- The following safety precautions do not cover all possible dangers.
2.1.1 General Safety Precautions
- Install the device in a standard 19-inch rack.
- Do not place the device in a wet position, and keep the device away from liquid. Keep the chassis clean and dust-free.
- Install the device in a position far away from heat sources.
- Ensure that the rack and power distribution system are properly grounded.
- Do not place the device in walking areas.
- During installation and maintenance, do not wear loose clothes, ornaments, or any other things that may be hooked by the chassis.
- Keep tools and components away from the walking area.
2.1.2 Handling Safety
- Avoid handling the device frequently.
- Cut off all power supplies and unplug all power cords and cables before handling the AP.
- At least two persons are required to move a device. Do not move a device alone. Take care not to hurt your legs and feet or twist your waist.
2.1.3 Electric Safety
![]() Warning
Warning
- Improper or incorrect electric operations may cause a fire, electric shock, and other accidents, and lead to severe and fatal personal injury and device damage.
- Direct or indirect touch through a wet object on high-voltage and mains supply can bring a fatal danger.
- Observe local regulations and specifications during electric operations. Only personnel with relevant qualifications can perform such operations.
- Check whether there are potential risks in the work area. For example, check whether the power supply is grounded, whether the grounding is reliable, and whether the ground is wet.
- Find out the position of the indoor emergency power switch before installation. Cut off the power switch in the case of accidents.
- Make sure that the device is powered off when you cut off the power supply.
- Equip the power supply system with a leakage protector (also referred to as “leakage current switch” or “leakage current breaker”) to automate the power cut-off in the case of power leakage or shock. When selecting the leakage protector, observe the following rule:
- The rated leakage action current of each leakage protector is greater than twice of the theoretical maximum leakage current of all the power supplies in the system.
For example, if a system is equipped with 16 identical power supplies, the leakage current of each power supply is at most 3.5 mA, and the leakage current of the system totals 56 mA (maximum theoretical value).
A leakage protector with 30 mA rated action current supports less than nine power supplies (that is, Action current of the leakage protector/2/Maximum leakage current of each power supply = 30/2/3.5 ≈ 4.28).
In other words, the leakage protector with a rated action current of 30 mA supports up to four power supplies. In this case, the 16 power supplies in the system require at least four leakage protectors with a rated action current of 30 mA and each leakage protector supports four power supplies.
If power supplies in a system differ in models, the rated leakage action current of each leakage protector divided by two is greater than the sum of maximum leakage currents of all the power supplies. - The rated leakage non-action current of a leakage protector shall be 50% of the leakage action current. If the non-action current value is too small, the high sensitivity level may cause the circuit to break, causing power cut-off and service interruption even if the leakage current value is normal.
Take a leakage protector with a rated action current of 30 mA as an example. The rated leakage nonaction current shall be 15 mA. When the leakage current is less than 15mA, the protector shall not act.
- The rated leakage action current of each leakage protector is greater than twice of the theoretical maximum leakage current of all the power supplies in the system.
![]() Caution
Caution
- To guarantee personal safety, the rated leakage action current of each leakage protector in the system must be equal to or less than 30 mA (human body safety current is 30 mA). When twice of the total leakage current of the system is greater than 30 mA, the system must be equipped with two or more leakage protectors.
- The leakage current values vary with products. For the leakage current of each product, see .1.4 Technical Specifications lists the technical specifications of the device.
2.1.4 Static Electricity
- Properly ground the device and floor.
- Keep the indoor installation environment clean and free of dust.
- Maintain appropriate humidity conditions.
- Before installing the various pluggable modules, please wear an anti-static wrist strap and make sure that it is well grounded.
- Do not touch the components and printed circuit board of the module directly with your hands.
- Use an ESD bag to keep the module.
- Avoid contact between the clothing and other items with the printed circuit board. The ESD wrist strap can only prevent damage to the printed circuit board caused by static electricity on the body. Static electricity on clothing cannot be prevented.
![]() Note
Note
The band ports are located at the upper right and lower right corners of the front of the device.
RG-ES 116G-L Switches must be used indoors to ensure normal operation and prolong the service life.
The installation site must meet the following requirements.
2.2.1 Bearing
Evaluate the weight of the device and its accessories (such as the cabinet, chassis, and power supply) and ensure that the ground of the installation site meets the requirements.
2.2.2 Ventilation
Reserve sufficient space in front of air vents to ensure normal heat dissipation. After various cables are connected, bundle the cables or place them in the cable management arm to avoid blocking air inlets.
2.2.3 Clearance
To have sufficient room for chassis handling and module swapping, you are advised to maintain an indoor pathway of at least 800 mm (31.50 in.) wide.
Do not install the device against the wall. Instead, maintain a minimum clearance of 400 mm (15.75 in.) around the device for ventilation and maintenance.
2.2.4 Temperature and Humidity
To ensure the normal operation and prolonged service life of the device, maintain an appropriate temperature and humidity in the equipment room.
The equipment room with too high or too low temperature and humidity for a long period may damage the AP.
- In an environment with high relative humidity, the insulating material may have poor insulation or even leak electricity.
- In an environment with low relative humidity, the insulating strip may dry and shrink, resulting in screw loosening.
- In a dry environment, internal circuits are prone to static electricity.
- A high temperature can accelerate the aging process of insulation materials, greatly reducing the reliability of the device and severely affecting its service life.
![]() Note
Note
The ambient temperature and humidity of the device are measured at the point that is 1.5 m (4.92 ft.) above the floor and 0.4 m (1.31 ft.) before the device when there is no protective plate in front or at the back of the device.
2.2.5 Cleanliness
Dust poses a major threat to the device. The indoor dust takes on a positive or negative static electric charge when falling on the switch, causing poor contact of the metallic joint. Such electrostatic adhesion may occur more easily when the relative humidity is low, not only affecting the service life of the switch, but also causing communication faults. The following table describes the requirements for the dust content and granularity in the machine room.
Table 2-1 Requirements for Dust
| Dust | Unit | Maximum Quantity |
| Dust particles (diameter≥ 0. 5 μ m) | Particles/m3 | ≤3.5×10⁶ |
| Dust particles (diameter ≥ 5 μ m) | Particles/m3 | ≤3.5×10⁴ |
Apart from dust, the salt, acid, and sulfide in the air of the equipment room must meet strict requirement. These harmful substances will accelerate metal corrosion and component aging. Therefore, the equipment room should be properly protected against the intrusion of harmful gases, such as sulfur dioxide, hydrogen sulfide, nitrogen dioxide, and chlorine gas. The following table lists limit values for harmful gases.
Table 2-2 Requirements for Gases
| Gas | Average (Mg/m3) | Maximum (Mg/m3) |
| Sulfur dioxide (SO2) | 0.3 | 1.0 |
| Hydrogen sulfide (H2S) | 0.1 | 0.5 |
| Nitrogen dioxide (NO2) | 0.5 | 1.0 |
| Chlorine gas (CI2) | 0.1 | 0.3 |
![]() Note
Note
Average refers to the average value of harmful gases measured in one week. The Maximum value is the upper limit of the harmful gas measured in one week for up to 30 minutes every day.
2.2.6 Grounding Requirements
Reliable grounding is the foundation for stable and reliable device operations, and the prerequisite for lightning protection and interference resistance. Carefully check the grounding conditions at the installation site according to the grounding specifications, and complete grounding properly based on the actual situation.
Safety Grounding
Ensure that the cabinet and power distribution device are securely grounded when the device uses the AC power supply. Otherwise, electric shock may occur when the insulation resistance between the power supply inside the switch and the chassis becomes small.
![]() Caution
Caution
- The building should provide a protective ground connection to ensure that the device is connected to a protective ground.
- Check whether the AC socket is reliably connected to the building’s protective ground. If not, the O&M personnel should use a protective earth conductor from the AC outlet protective earth lug to the building protective earth.
- The cross-sectional area of the protective grounding cable should be at least 0.75 mm2 (18 AWG).
- Lightning Grounding
The lightning protection system of facilities is standalone, and is composed of a lightning rod, a down conductor, and a connector connected to the grounding system. The grounding system is usually used for power reference grounding and safety grounding of the rack. Lightning grounding is required only for facilities and is not required for the device. - EMC Grounding
Grounding required for electromagnetic compatibility includes shielded grounding, filter grounding, noise and interference suppression, and level reference which contribute to the overall grounding requirements. The grounding resistance should be smaller than 1 ohm. The grounding terminal must be grounded before the device is operated.
2.2.7 Anti-interference Requirements
- Take effective measures to prevent interference from power grid to the power supply system.
- Keep the device far away from the grounding facility or lightning and grounding facility of the power device as much as possible.
- Keep the device far away from high-frequency current devices such as the high-power radio transmitting station and radar launcher.
- Take electromagnetic shielding measures when necessary.
2.2.8 Surge Protection
- The device can guard against lightning strikes. As an electric device, too strong lightning strikes may still damage the device. Take the following lightning protection measures: Ensure that the grounding cable of the cabinet is in good contact with the ground.
- Ensure that the neutral point of the AP power socket is in good contact with the ground.
- You are advised to install a power lightning arrester in front of the power input end to enhance surge protection for the power supply.
2.2.9 Installation Site Requirements
Regardless of whether the device is installed in a rack or on a workbench, observe the following conditions:
- Maintain proper clearance around air vents for heat dissipation.
- The switch is equipped with fans to draw air from side to rear. Maintain a minimum clearance of 150 mm (5.91 in.) around the ventilation openings for heat dissipation. You are advised to install the device in a standard 19-inch rack. Or, place the device on a clean workbench. In hot areas, air-conditioning is recommended.
- The installation site has good cooling and ventilation.
- The installation site is sturdy enough to support the weight of the device and its accessories.
The installation site is properly grounded.
2.3 Rack Requirement
If you plan to install the device in a cabinet, ensure that the cabinet meets the following conditions.
- Use a four-post 19-inch cabinet.
- The left and right square hole rack posts are 465 mm (18.31 in.) apart.
Figure 2-1 19-Inch Rack
- The square hole rack post is at least 180 mm (7.09 in.) from the front door, and the front door is at most 25 mm (0.98 in.) thick. This ensures an available clearance of at least 155 mm (6.10 in.). The rack depth (distance between front and rear doors) is at least 1000 mm (39.37 in.).
- The guide rails can bear the weight of the switch and its accessories.
- The rack has a reliable grounding lug for the chassis to connect to earth ground.
The rack has a good ventilation system. The open area of front and rear doors is greater than 50%.
2.4 Tools
Table 2-3 Tools
| Common Tools | Phillips screwdriver, power cords, ethernet cables, cage nuts, diagonal plier, and cable ties |
| Special Tools | ESD-preventive glove, wire stripper, crimping plier, crystal connector crimping plier, and wire cutter |
| Meters | Multimeter |
![]() Note
Note
The switch is delivered without a tool kit. You need to prepare the tools listed in the tool table.
Mounting
![]() Caution
Caution
Before installing the device, make sure that you have carefully read the requirements described in Chapter 2.
3.1 Installation Procedure
Figure 3-1 Installation Flowchart 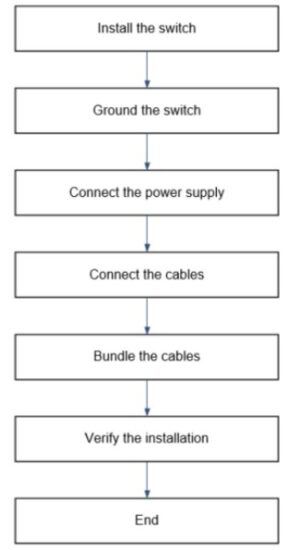 3.2 Preparing for Installation
- The installation site can provide enough space to meet the heat dissipation requirements.
- The installation site meets the temperature and humidity requirements.
- The power supply is available on the installation site and meets requirement for current.
- Ethernet cables have been deployed at the installation site.
- The selected power supply meets requirement for the system power.
- Find out the position of the emergency power switch before installation, so that the power switch can be cut off in case of accidents.
3.3 Mounting the Switch
- The installation site can provide enough space to meet the heat dissipation requirements.
- The installation site meets the temperature and humidity requirements.
- The power supply is available on the installation site and meets requirement for current.
- Ethernet cables have been deployed at the installation site.
- The selected power supply meets requirement for the system power.
- Find out the position of the emergency power switch before installation, so that the power switch can be cut off in case of accidents.
3.4 RG-ES116G-L Switch Installation
3.4.1 Installing the Switch in a Rack
Before installing the device in a cabinet, use the screws delivered with the device to secure the mounting brackets to the device, as shown in Figure 3-2.
Figure 3-2 Mounting Bracket Installation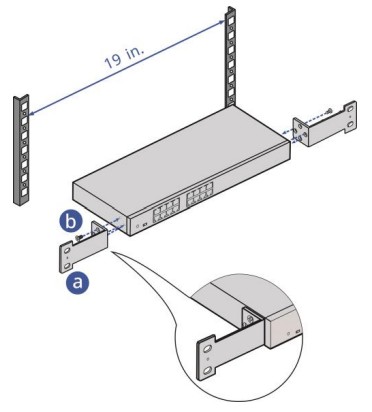
The steps of installing the device in a 19-inch cabinet are as follows:
- Check whether the front mounting brackets are fixed on both sides of the device.
- Install the floating nut on the square hole of the pole.
- An installer holds the bottom of the switch and moves it to the desired position in the cabinet.
- The other installer uses M6 screws and floating nuts to secure the device to the mounting brackets on the rack.
Figure 3-3 Device Installation in a Rack 3.4.2 Installing the Switch on a Workbench
In many cases, users do not have standard wiring cabinets. In this case, the common method is to place the device on a clean workbench. This operation is simple. The installation process is as follows:
- Example Figure 3-4 as shown in the following figure, and paste the four rubber pads provided in the package to the four corners of the bottom of the single chassis.
Figure 3-4 Paste the Sticky Pads.
- Example Figure 3-5 as shown in the following figure.
Figure 3-5 Device Placement on a Flat Surface
3.5 Connect Cables
![]() Warning
Warning
Use the delivered power cords. Otherwise, security accidents may occur.
After the device is installed in a cabinet, connect the device to external devices.
- Plug the power cables delivered with the system into the power sockets.
- Ensure that the total power is off before plugging in the power cord.
- Connects to the system network. The network cable is a standard RJ45 cable.
3.6 Verifying Installation
![]() Turn off the power to avoid personal injury and damage to components caused by incorrect connection.
Turn off the power to avoid personal injury and damage to components caused by incorrect connection.
- If the cloud server is installed in a cabinet, check whether the angle iron used for installation is securely fastened. If the cloud server is installed on a workbench, check whether there is sufficient space for heat dissipation around the cloud server and whether the workbench is stable.
- Check whether the power cables meet the specifications of the cloud server.
- Verify that the cabinet is well grounded.
- Check whether the cloud server is correctly connected to other devices, such as the configuration terminal.
- Verify that the power cord is long enough to avoid the taut state.
Verifying Operating Status
4.1 Powering on the Switch
4.1.1 Checklist Before Power-On
- The switch is connected to earth ground.
- The power cord is properly connected.
- The power voltage meets the requirement.
4.1.2 Checklist After Power-on
After the device is powered on, check the following items:
- LEDs of the switch are in the normal state.
- The main program is loaded properly.
- Service ports can forward data properly.
FAQs
5.1 Troubleshooting Flowchart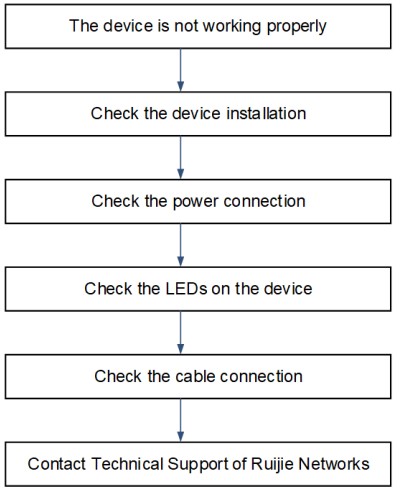 5.2 Common Troubleshooting
| Fault Symptom | Possible Cause | Solution |
| The SYS indicator is off after the switch is powered on. | No power is supplied to the switch or the power cord is loose. | Check whether the power socket in the machine room is normal and whether the power cord connected to the switch is loose. |
| An RJ45 port is disconnected or a frame sending/receiving error occurs. | The twisted pair cable is not connected properly. The cable length exceeds 100 m (328. 08 feet). The port has special configuration, which is different from the interconnection switch. Common working mode |
Replace the twisted pair cable. Use optical fibers or cascade switches. Make sure that the port works in the same mode as the interconnected switch. |
| The RJ45 port transmits and receives frames normally, but the electrical port status LED is off. |
The LED of the RJ45 port is abnormal. The electrical port status LED indicates the PoE power supply status and the port is not powered by PoE. |
When the port LED mode switch is moved to the leftmost position, the port LED indicates the working status of the switch. |
Connectors and Media
6.1 1000BASE-T/100BASE-TX/10BASE-T Port
The 1000BASE-T/100BASE-TX/10BASE-T is a 10/100/1000 Mbps auto-negotiation port that supports auto MDI/MDIX Crossover.
Compliant with IEEE 802.3ab, 1000BASE-T requires Category 5e 100-ohm UTP or STP (recommended) with a maximum distance of 100 meters (328 feet).
The 1000BASE-T port requires all four pairs of wires to be connected for data transmission. Figure 6-1 shows the twisted pair connections for the 1000BASE-T port.
Figure 6-1 1000BASE-T Twisted Pair Connections
In addition to cables with the above-mentioned specifications, the 100BASE-TX/10BASE-T port can be connected using 100-ohm Category 3, 4, and 5 cables for 10 Mbps speed or using 100-ohm Category 5 cables for 100 Mbps speed with a maximum link length of 100 meters (328.08 ft.). The following table shows 100BASETX/10BASE-T pin assignments.
Figure 6-2 100BASE-TX/10BASE-T Pin Assignments
| Pin | Socket | Plug |
| 1 | Input Receive Data+ | Output Transmit Data+ |
| 2 | Input Receive Data- | Output Transmit Data- |
| 3 | Output Transmit Data+ | Input Receive Data+ |
| 6 | Output Transmit Data- | Input Receive Data- |
| 4、5、7、8 | Not Used | Not Used |
The following figure shows feasible connections of the straight-through and crossover twisted pairs for a 100BASE-TX/10BASE-T port.
Figure 6-3 100BASE-TX/10BASE-T Twisted Pair Connections 
Appendix B — Lightning Protection
7.1 Installing an AC Power Arrester (Lightning Resistance Socket)
When an AC power cord is introduced from outdoors and directly connected to the power port of the switch, the AC power port must be connected to an external lightning protection power strip to protect the switch against lightning strokes. The lightning resistance socket can be fixed on the rack, workbench, or wall in the machine room by using cable ties and screws. AC power enters the lightning protection power strip and then enters the switch.
Figure 7-1 Power Arrester
![]() Caution
Caution
The power arrester is not delivered with the switch. Please purchase it based on actual requirements.
Important points:
- Make sure that the PE terminal of the power arrester is well grounded.
- After the AC power plug of the switch is connected to the socket of the power arrester (lightning resistance socket), the lightning protection function is implemented only if the RUN indicator is green and the ALARM indicator is OFF.
- If the ALARM indicator on the power arrester is red, check whether it is caused by poor grounding connection or by the reversed connection of the Null and Live lines. The detection method is as follows: Use a multimeter to measure the polarity of the power socket for the arrester when the indicator is red. If the N line is on the left and the L line is on the right (facing the socket), the arrester’s PE terminal is not grounded. If not, the polarity of the arrester power cord should be reversed. In this case, you should open the power arrester and rectify the polarity of the connection. If the indicator is still red, the arrester’s PE terminal is not grounded.
7.2 Installing the Ethernet Port Arrester
Connect an Ethernet port arrester to the switch to prevent the damage by lightning before connecting an outdoor network cable to the switch.
Tools: Phillips screwdrivers or flat-head screwdriver, multimeter, and diagonal pliers Installation Steps:
- Tear one side of the protective paper for the double-sided adhesive tape and paste the tape to the enclosure of the Ethernet port arrester. Tear the other side of the protective paper for the double-sided adhesive tape and paste the Ethernet port arrester to the switch enclosure. The paste position for the Ethernet port arrester should be as close to the grounding terminal of the switch as possible. over any of its shares arising under its Articles of Association;
- According to the distance between the switch grounding terminal and the Ethernet port arrester, cut the grounding cable for the Ethernet port arrester and firmly crimp the grounding cable to the grounding terminal of the switch.
- Use a multimeter to check whether the grounding cable for the arrester is in good contact with the grounding terminal and the enclosure of the switch.
- Connect the arrester by using an adapter cable (note that the external network cable is connected to the IN end, while the adapter cable connected to the switch is connected to the OUT end) and check whether the service module LED is normal.
- Use a nylon cable tie to bundle the power cords.
Figure 7-2 Figure 7-6 Installation of the Ethernet Port Arrester 
Caution
- The Ethernet port arrester is only for the 10/100 Mbps copper ports with an RJ-45 connector.
- The Ethernet port arrester is not delivered with the switch. Please purchase it based on actual requirements. The Ethernet port arrester user manual contains technical parameters and maintenance and installation instructions for the Ethernet port arrester. Carefully read this manual before installation.
Pay attention to the following situations during the installation to avoid influencing the performance of the Ethernet port arrester:
- Reversed installation direction of the arrester. Connect the external network cable to the “IN” end and connect the Ethernet port of the switch to the “OUT” end.
- Poor grounding of the arrester. The grounding cable of the arrester should be as short as possible to ensure that it is in good contact with the grounding terminal of the switch. Use a multimeter to confirm the contact condition after grounding.
- Incomplete arrester installation. If there is more than one port connected to the peer device on the switch, arresters need to be installed on all connection ports for the purpose of lightning protection.
Appendix C — Recommended Cabling for Installation
When RG-ES When the 116G-L switch is installed in a standard 19-inch rack, the connecting cables are bundled on the cable management bracket of the rack. The cables are routed above or below the switch based on the actual situation of the equipment room. All adapted connectors should be placed at the bottom of the rack in an orderly manner instead of outside the rack that is easy to touch. Power cords are routed beside the rack. Top cabling or bottom cabling is adopted according to the actual situation in the equipment room, such as the positions of the DC power distribution box, AC socket, or lightning protection box.
8.1 Requirement for the Minimum Bend Radius of an Ethernet Cable
- The bend radius of a fixed power cord, Ethernet cable, or flat cable should be over five times greater than their respective diameters. The bend radius of these cables that are often bent or plugged should be over seven times greater than their respective diameters.
- The bend radius of a fixed common coaxial cable should be over seven times greater than its diameter. The bend radius of the common coaxial cable that is often bent or plugged should be over 10 times greater than its diameter.
- The bend radius of a fixed high-speed cable (such as SFP+ cable) should be over five times greater than its diameter. The bend radius of the fixed high-speed cable that is often bent or plugged should be over 10 times greater than its diameter.
8.2 Requirement for the Minimum Bend Radius of an Optical Fiber
- The diameter of a fiber tray to hold fibers should be over 25 times greater than the diameter of the fiber..
- When an optical fiber is moved, the bend radius of the fiber should be over 20 times greater than the diameter of the fiber.
- During cabling of an optical fiber, the bend radius of the fiber should be over 10 times greater than the diameter of the fiber.
8.3 Precautions for Bundling Up Cables
- Before cables are bundled, mark labels and stick the labels to cables wherever appropriate.
- Cables should be neatly and properly bundled in the rack without twisting or bending. as shown in Figure 81:
Figure 8-1 Binding Cables
- Cables of different types (such as power cords, signal cables, and ground cables) should be separated in cabling and bundling. Mixed bundling is disallowed. When they are close to each other, you are advised to adopt crossover cabling. In the case of parallel cabling, maintain a minimum distance of 30 mm (1.18 in.) between power cords and signal cables.
- The cable management brackets and cabling troughs inside and outside the rack should be smooth without sharp corners.
- The metal hole traversed by cables should have a smooth and fully rounding surface or an insulated lining.
- Use cable ties to bundle up cables properly. Please do not connect two or more cable ties to bundle up cables.
- After bundling up cables with cable ties, cut off the remaining part. The cut should be smooth and trim without sharp corners. The cut should be smooth and trim, without sharp corners.
Figure 8-2 Binding Cables
- When cables need to be bent, please bundle them up Avoid fastening cable ties within the bend, as this may create stress on the cables and lead to potential wire breakage. , as shown in Figure 8-3.
Figure 8-3 Cable Bundling (3)
- Cables not to be assembled or remaining parts of cables should be folded and placed in a proper position of the rack or cable trough. The proper position refers to a location that will not interfere with device operation, nor cause any damage to the device or cables during debugging.
- Do not bind power cords to the guide rails of moving parts.
- The power cords connected to moving parts such as door grounding cables should be reserved with some excess after being assembled.This can avoid tension or stress on power cords. After the moving part is installed, the remaining cable part should not touch heat sources, sharp corners, or sharp edges. If heat sources cannot be avoided, high-temperature cables should be used.
- When screw threads are used to fasten cable terminals, the anchor or screw must be tightly fastened, and measures should be taken to retain the terminal. , as shown in Figure 8-4.
Figure 8-4 Cable Fastening
- Hard power cords should be fastened in the terminal connection area to prevent stress on terminal connection and cable.
- Do not use self-tapping screws to fasten terminals.
- Power cords of the same type and in the same cabling direction should be bundled up into cable bunches, with cables in cable bunches clean and straight.
- Bundle up cables using cable ties based on the following table.
Cable Bunch Diameter (Mm) Binding Spacing (Mm) 10 80~150 10~30 150~200 30 200~300 - Do not tie cables or bundles in a knot.
- For wiring terminal sockets (such as circuit breakers) with cord end terminals, the metal part of the cord end terminal should not be exposed outside the terminal socket when assembled.
Appendix D – Site Selection Suggestions
- The machine room should be at least 5 km (3.11 miles) away from heavy pollution sources, such as the smelter works, coal mine, and thermal power plant. The machine room should be at least 3.7 km (2.30 miles) away from medium pollution sources, such as the chemical factory, rubber factory, and electroplating factory. The machine room should be at least 2 km (1.24 miles) away from light pollution sources, such as the food factory and leather plant. If the pollution source is unavoidable, the machine room should be located on the windward side of the pollution source perennially with advanced protection.
- The machine room should be at least 3.7 km (2.30 miles) away from the sea or salt lake. Otherwise, the machine room must be sealed, with air conditioner installed for temperature control. Saline soil cannot be used for construction. Otherwise, you should select devices with advanced protection against severe environment.
- Do not build the machine room in the proximity of livestock farms. Otherwise, the machine room should be located on the windward side of the pollution source perennially. The previous livestock house or fertilizer warehouse cannot be used as the machine room.
- The machine room should be firm enough to withstand severe weather conditions such as windstorm and heavy rain as well as away from dust. If the dust is unavoidable, keep the door and window away from the pollution source.
- The machine room should be away from the residential area. Otherwise, the machine room should meet the construction standard in terms of noise.
- Make sure the air vent of the machine room is away from the sewage pipe, septic tank, and sewage treatment tank. Keep the machine room under positive pressure to prevent corrosive gas from entering the machine room to corrode components and circuit boards.
- Keep the machine room away from industrial boiler and heating boiler.
- The machine room should be on the second floor. Otherwise, the machine room floor should be 600 mm (23.62 in.) higher than the highest flood level ever recorded.
- Make sure there are no cracks or holes in the wall and floor. If there are cable entries in the wall or window, take proper sealing measures. Ensure that the wall is flat, wear-resistant, and dust-free, which should be up to the standard for flame retarding, soundproofing, heat absorption, dust reduction, and electromagnetic shielding.
- Keep the door and the window closed to make the machine room sealed.
- The steel door is recommended for soundproofing.
- Sulfur-containing materials are forbidden.
- Keep the air conditioner from blowing wind straight toward the device or blowing water drops from the window or air vent toward the device.
![]() Ruijie Networks Co., Ltd.
Ruijie Networks Co., Ltd.
Ruijie Networks Co., Ltd.
Address: No. 618, Jinshan Avenue, Cangshan District, Fuzhou City, Fujian Province, China
Building 19, Juyuanzhou Industrial Park, No. 618 Jinshan Road, Cangshan District, Fuzhou, Fujian, China
Documents / Resources
 |
Ruijie Networks RG-ES116G-L Mbps Unmanaged Non PoE Switch [pdf] Installation Guide RG-ES116G-L Mbps Unmanaged Non PoE Switch, RG-ES116G-L, Mbps Unmanaged Non PoE Switch, Non PoE Switch, PoE Switch, Switch |