
1. Introduction
This manual provides essential instructions for the safe and efficient operation, setup, and maintenance of your Janome 423S Sewing Machine. Please read this manual thoroughly before using the machine to ensure proper function and to prevent damage.
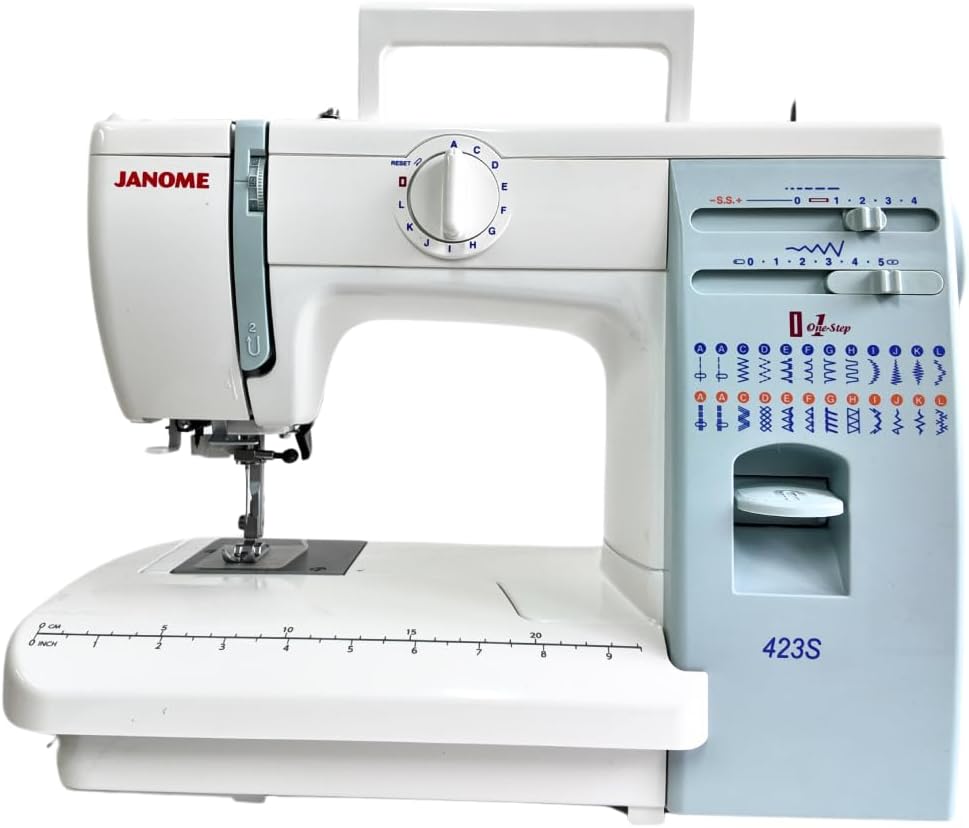
Figure 1: Front view of the Janome 423S Sewing Machine, showcasing its main controls and sewing area.
2. Safety Information
Always observe basic safety precautions when using electrical appliances to reduce the risk of fire, electric shock, or injury to persons.
- Ensure the machine is unplugged from the electrical outlet when not in use, when servicing, or when changing needles or other parts.
- Do not operate the machine with a damaged cord or plug. If the machine is not working properly, has been dropped, or damaged, contact qualified service personnel.
- Keep fingers away from all moving parts. Special care is required around the sewing machine needle.
- Use only accessories recommended by the manufacturer.
- Never drop or insert any object into any opening.
- Do not use outdoors.
3. Product Overview
The Janome 423S is a robust sewing machine designed for various sewing tasks. It features a metal body for durability and a range of built-in stitches for versatility.
Key Features:
- 24 Built-In Stitch Choices: Offers a variety of utility and decorative stitches.
- Automatic 1-Step Buttonhole: Simplifies the process of creating buttonholes.
- Variable Stitch Width & Length: Allows for customization of stitch appearance.
- Robust Metal Body and Hard Cover: Provides stability and protection for the machine.
- Drop Feed For Freehand Embroidery: Enables free-motion sewing and quilting.

Figure 2: Detailed view of the stitch selection dial and stitch length/width sliders, indicating the machine's 24 stitch options and adjustment capabilities.
4. Setup
4.1 Unpacking and Placement
- Carefully remove the machine from its packaging.
- Place the machine on a stable, flat surface.
- Ensure adequate lighting and space for comfortable operation.
4.2 Power Connection
Connect the power cord to the machine and then to a suitable electrical outlet. Ensure the power switch is in the 'OFF' position before connecting.
4.3 Included Accessories
Your Janome 423S comes with a set of standard accessories to assist with various sewing tasks.

Figure 3: Standard accessories provided with the Janome 423S, including bobbins, needles, and different presser feet for diverse sewing applications.
4.4 Winding the Bobbin
- Place an empty bobbin onto the bobbin winder spindle.
- Follow the threading path for bobbin winding, typically indicated by diagrams on the machine.
- Engage the bobbin winder and press the foot controller to start winding. Stop when the bobbin is full.

Figure 4: A hand demonstrating the removal or insertion of the bobbin case, located in the front-loading bobbin area of the machine.
4.5 Threading the Machine
- Raise the presser foot and needle to their highest positions.
- Place a spool of thread on the spool pin.
- Follow the numbered threading guides on the machine, ensuring the thread passes through all tension discs and the take-up lever.
- Thread the needle from front to back.
- Insert the wound bobbin into the bobbin case and then into the bobbin compartment, ensuring the thread is correctly routed.
- Bring the bobbin thread up through the needle plate opening.
5. Operating Instructions
5.1 Stitch Selection
Turn the stitch selection dial to choose one of the 24 available stitches. Refer to the stitch chart on the machine for visual guidance.

Figure 5: The stitch selection panel, displaying a range of utility and decorative stitches, each identified by a letter for easy selection.
5.2 Stitch Length and Width Adjustment
Adjust the stitch length and width using the corresponding sliders located on the front of the machine. These adjustments allow for fine-tuning of stitch appearance for different fabrics and sewing requirements.

Figure 6: The sliders for adjusting stitch length and width, providing control over the dimensions of the selected stitch.
5.3 Thread Tension Adjustment
The thread tension dial controls the balance between the upper and lower threads. Adjust as needed to achieve a balanced stitch. A balanced stitch shows equal amounts of upper and lower thread on both sides of the fabric.

Figure 7: The thread tension dial, used to regulate the tightness of the upper thread for optimal stitch formation.
5.4 Sewing Basics
- Place the fabric under the presser foot.
- Lower the presser foot lever.
- Gently press the foot controller to start sewing.
- Guide the fabric smoothly, allowing the feed dogs to move it. Do not pull or push the fabric forcefully.
5.5 Automatic 1-Step Buttonhole
Select the buttonhole stitch on the stitch selection dial. Attach the buttonhole foot and follow the machine's markings for precise buttonhole creation. The machine automatically adjusts to the size of the button placed in the buttonhole foot.
5.6 Drop Feed for Freehand Embroidery
To engage the drop feed mechanism, locate the drop feed lever (usually at the back or side of the free arm) and move it to the 'drop' position. This disengages the feed dogs, allowing you to move the fabric freely for freehand embroidery or quilting. Remember to raise the feed dogs for regular sewing.
6. Maintenance
Regular maintenance ensures the longevity and optimal performance of your sewing machine.
6.1 Cleaning
- Always unplug the machine before cleaning.
- Remove the needle plate and bobbin case.
- Use a small brush to remove lint and dust from the bobbin area and feed dogs.
- Wipe the exterior of the machine with a soft, dry cloth.
6.2 Needle Replacement
Replace the needle regularly, especially after sewing for extended periods or if it becomes bent or dull. Use the correct needle type and size for your fabric. Loosen the needle clamp screw, remove the old needle, insert the new needle with the flat side facing the back, and tighten the screw securely.
7. Troubleshooting
This section addresses common issues you might encounter with your Janome 423S.
| Problem | Possible Cause | Solution |
|---|---|---|
| Skipped Stitches | Incorrect needle, bent needle, improper threading. | Replace needle, re-thread machine, ensure correct needle insertion. |
| Thread Breakage | Incorrect tension, poor quality thread, burr on needle plate, improper threading. | Adjust tension, use quality thread, check for burrs, re-thread. |
| Fabric Not Feeding | Feed dogs lowered, presser foot not lowered. | Raise feed dogs, lower presser foot. |
| Machine Not Starting | Power cord not connected, power switch off, bobbin winder engaged. | Check power connections, turn on switch, disengage bobbin winder. |
8. Specifications
Detailed technical specifications for the Janome 423S Sewing Machine.
| Feature | Detail |
|---|---|
| Product Dimensions | 22.86 x 35.56 x 45.72 cm |
| Item Weight | 8 Kilograms |
| Number of Stitches | 24 Built-In |
| Buttonhole Type | Automatic 1-Step |
| Body Material | Metal |
| Color | White |
| Assembly Required | No |
| Batteries Required | No |
| Included Components | Machine |
| Model Number | 423S |
9. Warranty and Support
9.1 Warranty Information
The Janome 423S Sewing Machine comes with a manufacturer's warranty. Please refer to the warranty card included with your purchase for specific terms, conditions, and duration. Keep your proof of purchase for warranty claims.
9.2 Customer Support
For technical assistance, spare parts, or service inquiries, please contact your authorized Janome dealer or visit the official Janome website for support resources and contact information.


