Rollei Xtalk Intercom Headset

Before First Use
Intended Use
This product is intended exclusively for private use and is not suitable for commercial use. Only use the product as described in these operating instructions. Any other use is considered improper and may result in damage to property.
The manufacturer or dealer accepts no liability for damage caused by improper or incorrect use.
Explanation of Symbols
The following symbols are used in this manual, on the product, the accessories unit or on the packaging.
![]() Products marked with this symbol comply with all relevant community regulations of the European Economic Area.
Products marked with this symbol comply with all relevant community regulations of the European Economic Area.
![]() Products marked with this symbol are operated with direct current.
Products marked with this symbol are operated with direct current.
Safety Instructions
- Only connect the product to the power if the mains voltage of the input or power supply matches the specifications on the rating label on the product.
- Do not insert any objects into the product.
- Do not store any objects on the product.
- Do not drop the product or subject it to violent shocks.
- Protect the product from moisture. Do not touch it with wet / damp hands and do not immerse it in water.
- Do not use the product in the rain or in wet environments.
- Do not use or store the product in high or low temperatures or in enclosed spaces with direct sunlight. Do not use the product in ambient temperatures above 0° C or below 45 °C.
- Ensure sufficient ventilation during operation. Never cover the product.
- If the product is used in ambient temperatures that are too cold or too hot, it will switch off automatically.
- Keep the product and accessories away from open flames, hot surfaces and easily flammable materials.
- Do not expose the product to excessive heat from other heat sources.
- Do not use the product near flammable gases or liquids as this may cause explosions.
- Do not place this unit where it will come in contact with corrosive chemicals to avoid corrosion of the unit. Corrosion may cause the unit to fail.
- The product is not a toy. Keep the product, accessories and packaging materials away from children and pets to prevent accidents and suffocation.
- Caution! Danger for children and persons with limited physical, sensory or mental abilities (e.g. partially disabled persons, elderly persons with limited physical and mental abilities) or lack of experience and know-how (e.g. children from the age of three). The product may be used by persons with reduced physical, sensory or mental capabilities or lack of experience and know-how if they are supervised or have received instruction concerning use of the product in a safe way and understand the potential hazards arising from its use. Children must not play with the product. Do not allow children to clean or care for the product. Keep children under the age of eight away from the product and accessories.
- Do not use the product if it is visibly damaged.
- If the product or accessories are damaged, they must be replaced or repaired by the manufacturer, its customer service department or a similarly qualified person in order to prevent hazards.
- The product must not be opened and repairs must only be carried out by a specialist. Contact a specialist workshop for this purpose. Any liability and all warranty claims are excluded in the event of repairs by the user, improper connection or incorrect operation.
- Have the product checked by an authorized service center if a problem occurs. You are not allowed to disassemble the product in case of malfunction. Otherwise, your warranty will be voided.
- If you sell the product to another person, also pass this user manual on to that person.
- Use the product only for private use and not for commercial use.
Safety Instructions for Rechargeable Batteries
- Fully charge the battery, then disconnect the cable.
- If the product has not been used for a long period of time, charge the battery before using it again.
- To extend the battery life, you should charge the battery at least every three months.
- This product has a rechargeable battery that has a specific run time. If this has been used for a certain period of time, the performance of the battery will be reduced. This is normal.
- Do not disassemble, hit or puncture the battery, be careful not to short-circuit the battery.
- Do not expose the battery to places with high temperatures. Do not continue to use the battery if it leaks or expands.
- Always charge through the system. If the battery is replaced with an incorrect type, there is a risk of explosion.
- Keep the battery away from children and animals.
- Batteries can explode if exposed to an open fire. Never throw batteries into a fire.
- Dispose of used batteries in accordance with local regulations.
- Before disposing of the appliance, remove the battery and dispose of it separately.
- The batteries must be fully charged before the device is used for the first time.
- Keep the battery away from children and animals, open flames and liquids, and do not expose it to temperatures higher than 50 °C. In addition, observe the information on caring for the battery in these operating instructions.
What’s In The Box
Xtalk X5
- 5x headset
- 5x rechargeable batteries
- 3x charger
- 3x USB-C cable
- 5x over-ear ear pad
- 5x on-ear ear pad
- 5x microphone windscreen
- Number stickers
- 5x pouch
- Carrying case
- User manual

Xtalk X2
- 2x headset
- 2x rechargeable batteries
- Charger
- USB-C cable
- 2x over-ear ear pad
- 2x on-ear ear pad
- 2x microphone windscreen
- 2x pouch
- User manual

Xtalk X1
- Headset
- Rechargeable battery
- Charger
- USB-C cable
- Over-ear ear pad
- On-ear ear pad
- Microphone windscreen
- Pouch
- User manual

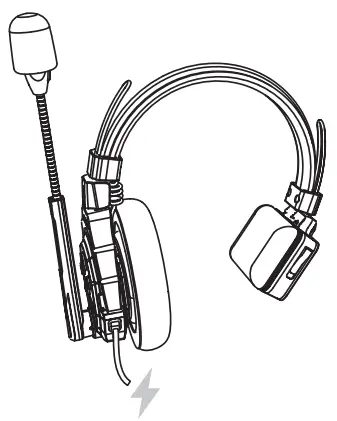
Product Overview
- Microphone
- Ear cushion
- Battery holder
- 3.5 mm jack connection
- On/off switch
- Status LED
- Head bracket
- A button
- Plus button
- B button
- Minus button
- USB-C connection

Operation
Mounting/Demounting Ear Pads
Over-Ear Ear Pads:
- Place the over-ear ear pad horizontally on the ear pad connection of the headset and turn it 90° to the right until you feel the notches engage to install the overear ear pad.
- Turn the over-ear ear pad 90° to the left until the notches release to remove the over-ear ear pad.
On-Ear Ear Pads:
- Slip the on-ear ear pad over the edges of the ear pad connection of the headset to install the on-ear ear pad.
- Detach the on-ear ear pad from the edges of the ear pad connection of the headset to remove the on-ear ear pad.
Operation
Inserting/Removing the Battery
- Press the battery compartment switch down and pull out the housing flap to insert or remove the battery

Charging the Battery
- Insert the battery into the charger and connect the charger to a suitable power source via the USB-C cable to charge the battery via the charger.
- Insert the battery into the headset and connect the headset to a suitable power source via the USB-C cable to charge the battery via the headset and use the headset at the same time.
Switching On/Off
- Slide the on/off switch upwards to switch the device on.
- Slide the on/off switch down to switch the device off.
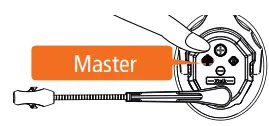
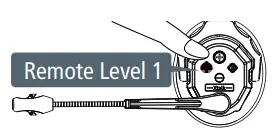
Define Master/Remote Headsets
Each headset can be defined as master headset, remote headset level 1 or remote headset level 2.
- For a group of up to 5 headsets in total, 1 master headset and up to 4 remote headsets level 1 can be defined.
- For a group of 6 to 13 headsets in total, 1 master headset, 4 remote headsets level 1 and up to 8 remote headsets level 2 can be defined.

- Press the A button for approx. 5 seconds until the beep sounds twice and the voice prompt “Master Mode” is played to define the headset as master headset.
- Press the A button for approx. 8 seconds until the beep sounds three times and the voice prompt “Level 1 Pairing” is played to define the headset as remote headset level 1.
- Press the A button for approx. 11 seconds until the beep sounds four times and the voice prompt “Level 2 Pairing” is played to define the headset as remote headset level 2.

- Press the plus button for approx. 3 seconds to play the voice prompt for the master/remote settings.
Pairing Master/Remote Headsets
Before pairing, each headset in a group must be defined as a master headset, remote headset level 1 or remote headset level 2 (see previous section).
Pairing Up to 5 Master/Remote Headsets
- Press the A button on the master headset and on the remote headsets level 1 for approx. 3 seconds until the beep sounds once and the voice prompt “Connecting and Pairing” is played to activate pairing mode. When the headsets are successfully paired, the voice prompt “Pairing Succeed” is played and the status LEDs light up green continuously.
- After pairing, switch the headsets off and then switch the master headset and then the remote headsets level 1 on again so that the headsets save the settings and perform the pairing automatically.
Pairing 6 to 13 Master/Remote Headsets
- Press the A button on the master headset and on the remote headsets level 1 for approx. 3 seconds until the beep sounds once and the voice prompt “Connecting and Pairing” is played to activate pairing mode. When the headsets are successfully paired, the voice prompt “Pairing Succeed” is played and the status LEDs light up green continuously.
- Press the A button on the remote headsets level 1 and on the remote headsets level 2 for approx. 3 seconds until the beep sounds once and the voice prompt “Connecting and Pairing” is played to activate pairing mode. When the headsets are successfully paired, the voice prompt “Pairing Succeed” is played and the status LEDs light up green continuously.
- After pairing, switch the headsets off and then first switch the master headset, then the remote headsets level 1 and then the remote headsets level 2 on again so that the headsets save the settings and perform the pairing automatically.
Setting the Volume
- Briefly press the plus or minus button until the beep sounds to increase or decrease the volume.
Noise Cancelling
- Briefly press the B button until the voice prompt “Noise Cancellation On/Off” is played to switch the noise cancellation on or off.
Muting/Unmuting
- Turn the microphone boom up or down until the beep sounds to activate or deactivate the mute function.

Dominance Mode
- Press and hold the B button to activate dominance mode and mute all remote headsets. The voice prompt “Dominant Mode On” is played. The remote headsets can continue to listen and the master headset can speak.
- Release the B button to exit dominant mode. The voice prompt “Exit Dominant Mode” is played.

Boost Mode
Boost mode can be used to set the radio channel of the headsets in order to avoid interference signals from other nearby devices operating at 2.4 GHz frequency. Boost mode 1 is set by default. If interference signals from other devices occur in boost mode 1, boost mode 2 is recommended. If interference signals from other devices occur in boost mode 2, boost mode 3 is recommended.
- Press the minus button on the master headset for approx. 3 seconds until the beep sounds and the voice prompt “Boost Mode 1/2/3” is played to set boost mode 1, 2 or 3.
Real-Time Monitoring
- Connect a desired device to the headset via the 3.5 mm jack connection to monitor the sound from the device.
Meaning of the Status LEDs
| Green light lights up continuously | Connection successful |
| Green light flashes slowly | No connection |
| Green/yellow light flashes alternately | Noise cancelling on |
| Red light flashes slowly | Low battery charge |
| Red light lights up continuously | Battery charging |
Technical Data
| Microphone type | Condenser microphone |
| Operating range | 350 m (LOS) |
| Maximum input sound pressure level | > 115 dBSPL |
| Output sound pressure level | 98+3 dBSPL (at 94 dBSPL ,1 KHz) |
| Speaker impedance | 32 Ω |
| Signal-to-noise ratio | ≥ 65 dB |
| RF sensitivity | < -90 dBm |
| Latency | Approx. 50 ms |
| Distortion | < 1 % |
| Transmission mode | Full duplex |
| Frequency band | 2.4 GHz |
| Frequency range | 150 Hz – 7 KHz |
| Maximum transmission power | 20 dBm |
| Power supply | Headset: Lithium-ion battery (3.7 V / 1,050 mAh / 3.885 Wh), input 5.0 V Charger: Input 5.0 V |
| Connections | Headset: USB-C connection, 3.5 mm jack connection Charger: USB-C connection |
| Charging time | Approx. 2.5 h |
| Operating time | Approx. 20 h |
| Operating temperature | 0 – 45 °C |
| Dimensions | 20 x 18 x 8 cm |
| Weight | Approx. 188 g |
| What’s in the box | X5: 5x headset, 5x rechargeable batteries, 3x charger, 3x USB-C cable, 5x over-ear ear pad, 5x on-ear ear pad, 5x microphone windscreen, number stickers, 5x pouch, carrying case, user manual X2: 2x headset, 2x rechargeable batteries, charger, USB-C cable, 2x over-ear ear pad, 2x on-ear ear pad, 2x microphone windscreen, 2x pouch, user manual X1: Headset, battery, charger, USB-C cable, over-ear ear pad, on-ear ear pad, microphone windscreen, pouch, user manual |
We reserve the right to make changes to technical data without prior notice.
Disposal
![]() Dispose of the packaging according to its type. Use the local possibilities for collecting paper, cardboard and other materials (applicable in the European Union and other European countries with systems for the separate collection of recyclable materials).
Dispose of the packaging according to its type. Use the local possibilities for collecting paper, cardboard and other materials (applicable in the European Union and other European countries with systems for the separate collection of recyclable materials).
![]() Devices that are marked with this symbol must not be disposed of with household waste! You are legally obliged to dispose of old devices separately from to dispose of household waste. Information on collection points that accept old appliances free of charge can be obtained from your local authority or town council.
Devices that are marked with this symbol must not be disposed of with household waste! You are legally obliged to dispose of old devices separately from to dispose of household waste. Information on collection points that accept old appliances free of charge can be obtained from your local authority or town council.
![]() Batteries and rechargeable accumulators must not be disposed of in household waste! As a consumer you are legally obliged to dispose of all batteries and accumulators, whether they contain harmful substances* or not, to be disposed of in an environmentally sound manner. Accumulators and batteries are therefore marked with the symbol shown opposite.
Batteries and rechargeable accumulators must not be disposed of in household waste! As a consumer you are legally obliged to dispose of all batteries and accumulators, whether they contain harmful substances* or not, to be disposed of in an environmentally sound manner. Accumulators and batteries are therefore marked with the symbol shown opposite.
For more information, contact your dealer or contact return and collection points in your community.
*marked with: Cd = Cadmium, Hg = Mercury, Pb = Lead.
EU Declaration of Conformity
Hereby, Rollei GmbH & Co.KG declares that the radio equipment type ”Rollei Xtalk“ complies with the directive 2014/53/EU.
The full text of the EU Declaration of Conformity is available at the following Internet address: http://www.rollei.com/egk/xtalk
Rollei GmbH & Co. KG
In de Tarpen 42
22848 Norderstedt
Germany
Customer Support
Rollei GmbH & Co. KG
In de Tarpen 42
D-22848 Norderstedt
Service Hotline:
+49 40 270750277
![]() @rollei_de
@rollei_de
![]() / rollei.foto.de
/ rollei.foto.de
Item No.:
Xtalk X5: 28668
Xtalk X2: 28670
Xtalk X1: 28672

Documents / Resources
 |
Rollei Xtalk Intercom Headset [pdf] Instruction Manual Xtalk, Xtalk Intercom Headset, Intercom Headset, Headset |


