![]() Apply to: Reolink Duo 2V PoE/Reolink Duo 3V PoE
Apply to: Reolink Duo 2V PoE/Reolink Duo 3V PoE
Operational Instruction
July 2024
Item No. : P737/P757
![]() @ReolinkTech
@ReolinkTech
What’s in the Box
 |
 |
 |
 |
| Camera | Waterproof Lid | Pack of Screws | 1M Ethernet Cable |
 |
 |
 |
|
| Mounting Template | Operational Instruction | Surveillance Sticker |
NOTE:
* Quantity of accessories varies with the camera model you purchase.
Camera Introduction
PoE Camera

| ③ Spotights ② Lens ① Built in Mic ④ Daylight Sensor |
⑤ Waterproof Lid ⑥ Network Cable ⑦ Power Port |
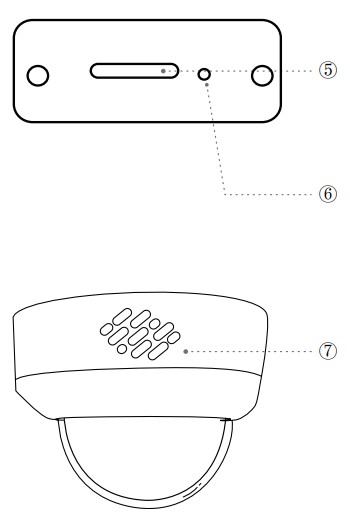 ⑤ microSD Card Slot
*Loosen the screws with a screwdriver (not included) to access the microSD card slot
⑥ Reset Button
* Press and hold the reset button for 5s with a pin to restore factory settings.
⑦ Speaker
Connection Diagram
Before initial setup, follow the steps below to connect your camera.
- Connect the camera to a LAN port on your router with an Ethernet cable.
- Use the power adapter to power on the camera.
NOTE: You can power the camera with a PoE switch, PoE injector, Reolink PoE NVR or a DC 12V power adapter(not included in the package).

Set up the Camera
Download and launch the Reolink App or Client software, and follow the onscreen instructions to finish initial setup.
- On Smartphone
Scan to download the Reolink App. https://reolink.com/wp-json/reo-v2/app/download
 - On PC
Download path of the Reolink Client: Go to Support > App & Client.
NOTE:
- If you are connecting the PoE camera to a Reolink PoE NVR, please set up the camera via the NVR interface.
Mount the Camera Installation Tips
- Do not face the camera towards any light sources.
- Do not remove the protective film from the dome cover until the installation is complete.
- Do not point the camera towards a glass window. Or, it may result in poor image quality because of the window glare by infrared LEDs,ambient lights or status lights.
- Do not place the camera in a shaded area and point it towards a welllit area. Or, it may result in poor image quality. To ensure the best image quality, the lighting condition for both the camera and the capture object shall be the same.
- To ensure better image quality, it’s recommended to clean the dome cover with a soft cloth from time to time.
- Make sure the power ports are not directly exposed to water or moisture and not blocked by dirt or other elements.
- With IP waterproof ratings, the camera can work properly under conditions like rain and snow. However, it doesn’t mean the camera can work underwater.
Install the Camera
Drill holes in accordance with the mounting hole template.
NOTE: Use the drywall anchors included in the package if needed.
 Screw the dome cover off the camera base with the hex key.
NOTE: Keep the protective film on the dome cover until the installation is complete.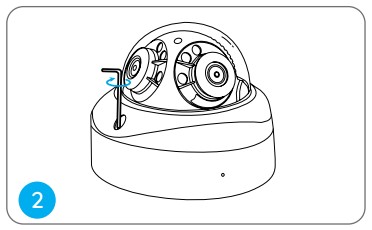 Screw the camera base to the ceiling.
 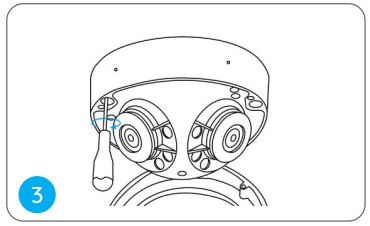 Adjust the camera’s viewing angle as needed.
 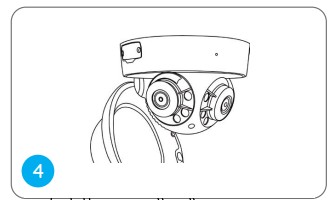 Attach the dome cover to the camera base by tightening the screws.
NOTE: Remove the protective film from the dome cover after the installation.
Troubleshooting
Camera is not Powering on
If your camera is not powering on, please try the following solutions:
- Make sure your camera is powered on properly. The PoE camera should be powered by a PoE switch/injector, a Reolink NVR or a 12V power adapter.
- If the camera is connected to a PoE device as listed above, connect it to another PoE port and check again.
- Try again with another Ethernet cable.
Picture is not Clear
If the picture from the camera is not clear, please try the following solutions:
- Check the camera dome cover for dirt, dust or spiderwebs, and clean the dome cover with a soft, clean cloth. The dust-absorber included in the package is recommended.
- Point the camera to a well-lit area, the lighting condition will affect the picture quality a lot.
- Upgrade the firmware of your camera to the latest version.
- Restore the camera to factory settings and check out again.
Specification
Operating Temperature: -10°C~+45°C
For more Specifcations,visit .
Legal Disclaimer
To the maximum extent permitted by applicable law, this document and the product described, with its hardware, software, firmware, and services, are delivered on an “as-is” and “as-available” basis, with all faults and without warranty of any kind. Reolink disclaims all warranties, express or implied, including but not limited to, warranties of merchantability, satisfactory quality, fitness for a particular purpose, accuracy, and non-infringement of third-party rights. In no event will Reolink, its directors, officers, employees, or agents be liable to you for any special, consequential, incidental or indirect damages, including but not limited to damages for loss of business profits, business interruption, or loss of data or documentation, in connection with the use of this product, even if Reolink has been advised of the possibility of such damages. To the extent permitted by applicable law, your use of the Reolink products and services is at your sole risk and you assume all risks associated with internet access. Reolink does not take any responsibilities for abnormal operation, privacy leakage or other damages resulting from cyber attacks, hacker attacks, virus inspections, or other internet security risks. However, Reolink will provide timely technical support if required. The laws and regulations related to this product vary by jurisdiction. Please check all relevant laws and regulations in your jurisdiction before using this product to ensure that your use conforms to the applicable law and regulation. During the use of the product, you must comply with relevant local laws and regulations. Reolink is not responsible for any illegal or improper use and its consequences. Reolink is not liable in the event that this product is used with illegitimate purposes, such as third-party rights infringement, medical treatment, safety equipment, or other situations where the product failure could lead to death or personal injury, or for weapons of mass destruction, chemical and biological weapons, nuclear explosion, and any unsafe nuclear energy uses or ant humanity purposes. In the event of any conflicts between this manual and the applicable law, the latter prevails.
Notification of Compliance
ISED Compliance Statements
This Class B digital apparatus complies with Canadian ICES-003.
![]() Simplifed EU Declaration of Conformity
Simplifed EU Declaration of Conformity
Reolink declares that this device is in compliance with the essential requirements and other relevant provisions of EMC Directive 2014/30/EU and LVD 2014/35/EU.
Correct Disposal of This Product
![]() This marking indicates that this product should not be disposed with other household wastes throughout the EU. To prevent possible harm to the environment or human health from uncontrolled waste disposal, recycle it responsibly to promote the sustainable reuse of material resources. To return your used device, please use the return and collection systems or contact the retailer where the product was purchased. They can take this product for environmentally safe recycling.
This marking indicates that this product should not be disposed with other household wastes throughout the EU. To prevent possible harm to the environment or human health from uncontrolled waste disposal, recycle it responsibly to promote the sustainable reuse of material resources. To return your used device, please use the return and collection systems or contact the retailer where the product was purchased. They can take this product for environmentally safe recycling.
Limited Warranty
This product comes with a 2-year limited warranty that is valid only if purchased from Reolink Official Store or a Reolink authorized reseller. Learn more: .
NOTE: We hope that you enjoy the new purchase. But if you are not satisfied with the product and plan to return, we strongly suggest that you reset the camera to factory default settings and take out the inserted SD card before returning.
Terms and Privacy
Use of the product is subject to your agreement to the Terms of Service and Privacy Policy at
Terms of Service
By using the Product Software that is embedded on the Reolink product, you agree to the terms & conditions between you and Reolink. Learn more:
Technical Support
If you need any technical help, please visit our official support site and contact our support team before returning the products,
REOLINK INNOVATION LIMITED
FLAT/RM 705 7/F FA YUEN COMMERCIAL BUILDING 75-77 FA YUEN STREET MONG KOK KL HONG KONG
![]() WARNING
WARNING
This product can expose you to the chemical lead, which is known to the state of California to cause cancer. For more information, go to www.P65Warnings.ca.gov
![]()
Documents / Resources
 |
Reolink P737 Smart 4K 8MP PoE Camera [pdf] Instruction Manual P737, P757, P737 Smart 4K 8MP PoE Camera, P737, Smart 4K 8MP PoE Camera, 4K 8MP PoE Camera, PoE Camera, Camera |