newline STV Series Intelligent Display

INTRODUCTION
- The company is committed to product updates and technical improvements.
- The technical parameters and specifications are subject to change without prior notice.
- The pictures in this manual are for reference only.
- Welcome to the world of NEWLINE.
- Thank you for choosing the NEWLINE SlV+ series Intelligent Display. Please use this document to get the most out of your screen.
FCC
This device complies with part 15 of the FCC Rules. Operation is subject to the following two conditions:
- This device may not cause harmful interference,
- this device must accept any interference received, including interference that may cause undesired operation.
NOTE: This equipment has been tested and found to comply with the limits for a Class B digital device, under part 15 of the FCC Rules. These limits are designed to provide reasonable protection against harmful interference in a residential installation. This equipment generates, uses and can radiate radio frequency energy and, if not installed and used by the instructions, may cause harmful interference to radio communications. However, there is no guarantee that interference will not occur in a particular installation. Suppose this equipment does cause harmful interference to radio or television reception, which can be determined by turning the equipment off and on. In that case, the user is encouraged to try to correct the interference by one or more of the following measures:
- Reorient or relocate the receiving antenna.
- Increase the separation between the equipment and the receiver.
- Connect the equipment to an outlet on a circuit different from that to which the receiver is connected.
- Consult the dealer or an experienced radio/TV technician for help.
NOTE: Any changes or modifications to this unit not expressly approved by the party responsible for compliance could void the user’s authority to operate the equipment.
![]() The symbol of the crossed-out wheeled bin indicates this product should not be placed in municipal waste.
The symbol of the crossed-out wheeled bin indicates this product should not be placed in municipal waste.
Instead, dispose of waste equipment by handing it over to a designated collection point for the recycling of electrical and electronic equipment.
Symbol Conventions
Symbols are used in this document to indicate operations that need particular attention.
The symbols are defined as follows:


- Keep the product away from the radio
 The product complies with the international EMI standard to prevent radio interference.
- However, interference may still exist and cause noise in the radio. If noise occurs in the radio, try the following solutions.
- Adjust the direction of the radio antenna to avoid the interference from the product.
- Keep the radio away from the product.
- If the screen glass is broken or falls off.
- Keep all personnel 10 feet away from the screen to ensure safety.
- Do not perform any installation or disassembly while the screen glass is broken or has fallen off.
- Use the battery correctly
- Galvanic corrosion, electric leakage, and even fire may be caused by improper battery usage.
- It is recommended to use the designated type of battery and install the battery by the correct electrodes (positive and negative).
- Do not install and use a new battery with a used one.
- Take out the battery if the remote control is not used for a long period.
- Do not expose the battery to overheated environments, such as sunlight and or heat sources.
- Dispose of the used battery based on your local regulations.
- Do not damage the power cable
- Do not damage, change, twist, bend, or forcibly drag the power cable.
- Do not put weights (such as the product itself) on the power cable.
- Do not forcibly drag the cable when you pull out the power plug. If the power cable is damaged, please contact the local distributor to repair or replace it.
- The power cable in the accessory box is for this product only. Do not use it on other products.
Additional advice:
- Use the product in an environment with comfortable lighting. It is harmful to your eyes to watch in a too bright or too dark environment.
- Relax your eyes watching for some time.
- Keep sufficient distance from the product to protect your eyes and prevent eyestrain.
- Adjust the volume to an appropriate level, especially at night.
- Use amplifier equipment as the audio input source with caution. If you must use amplifier equipment, the input power should not exceed the maximum of speaker power.
- Otherwise, the speaker can become overpowered and damaged.
Parts and Functions
Front View
RearView
- STV-4324-PLUS/STV-5524-PLUS/STV-6524-PLUS
- STV-7524-PLUS/STV-8524-PLUS/STV-9824-PLUS
STV-11524-PLUS
- Indicator Light
- Power Button
- Rear Ports
- Power Supply Plug
- Note The product images shown are for illustration purposes only and may not be an exact representation of the product.
Ports
Rear Ports
 CAUTION While HDMI offers support for cables of various lengths, the maximum cable length that iNewline recommends for optimal performance is 3 meters (10 feet) for HDMI and 1.8 meters (around 6 feet) for a Display Port.
- Using cable longer than the recommended length may cause data loss and a negative impact on display quality.

- Note Please do not connect a 2.4G wireless mouse and USB 3.0 devices simultaneously, on the left back side of the display, to avoid interference.
Remote Control
- CAUTION Carefully read the following instructions before using the remote control to avoid possible faults.
- Do not drop or damage the remote control.
- Do not spill water or other liquids on the remote control.
- Do not place the remote control on a wet object.
- Do not place the remote control directly under sunlight or near a heat source.


Installation Guide
Safety Precautions
- Installation Environment

- Installation Direction

Installation Precautions
Weight of the display:
- 43 inch: 14.11b/6.4kg
- 65 inch: 35.9 1b/16.3kg
- 85 inch: 63. 7 1b/28.9kg
- 115 inch: 207 .9 1b/94.3kg
- 55 inch: 23.8 1b/10.8kg
- 75 inch: 50.1 lb/22. 7kg
- 98 inch: 129.9 1b/58.9kg
- When using a mobile stand, ensure that the weight of the machine is less than the loading capacity of the mobile stand.
- When using the wall-mount bracket, ensure that the wall can support the weight of the machine.
- We recommend that the wall surface be reinforced and have a loading capacity 4 times of the weight of the machine. Consult a professional installer for wall-mount installation.
- Note The company does not undertake relevant legal responsibility for any problems caused by improper operation if the third-party mobile stan
- d, or wall-mount bracket is beyond the scope of the machine.
- Do not install the machine where it might be hit by a door.
Vertical installation
- When installing, try to keep the machine vertical.
- Excessive tilt angle may cause the screen glass to fall off or the machine to collapse.
- Note For any problem, please contact our support desk. Our company is not responsible for any damage or losses incurred by users if the users fail to follow the instructions.

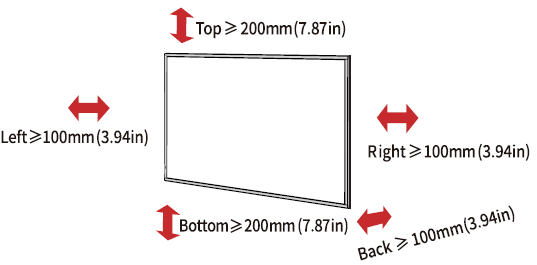
Ventilation
- Ensure adequate ventilation and/or air conditioning environment.
- We recommend keeping certain distances from the side of the machine to the wall or panels.
- Ventilation requirements are shown in the following figure.
Installation
- The dimensions of the four bracket mounting holes on the back panel are VESA MIS-F compliant. Dimensions of the mounting holes on the back panel are shown in the following figure.
- STV-4324-PLUS: 300 x 300 mm/11.81 x 11.81in;
- STV-5524-PLUS: 300 x 300 mm/11.81 x 11.81in;
- STV-6524-PLUS: 400 x 300 mm/15.75 x 11.81in;
- STV-7524-PLUS: 400 x 300 mm/15.75 x 11.81in;
- STV-8524-PLUS: 500 x 400 mm/19.68 x 15.75in;
- STV-9824-PLUS: 800 x 200 x 200 mm/31.50 x 7.87 x 7.87in;
- STV-11524-PLUS: (533+1000+533) x 200 x 500 mm/ (21.77+39.37+21.77) x 7.87 x 19.68in;


- Note Consult a professional installer to install the machine.
- To install a 115-inch machine, the handle needs to be installed first, the installation method is shown in the following figure:
- Open the packaging and remove the foam adhesive until it is placed as shown inthe picture.

- Remove the left and right screws 1 (4 pcs) and install the lifting handle 2 (4 pcs):

- Open the packaging and remove the foam adhesive until it is placed as shown inthe picture.
Turning On Off
Power On
- Step 1: Plug the power supply into the power outlet fully and plug the power connector into the side of the machine. Ensure the power is in the range of 100 V to 240 V with a frequency at 50 Hz/60 Hz ‡ 5%.
- Note The power outlet should be installed near the machine and shall be easily accessible.
- Step 2: Press the “Power” button on the bottom of
 the remote control.
Power Off
- Step 1: Press the “Power” button on the bottom or press on the remote control, and the power indicator will turn red.
- Step 2: If you are not going to use the display for an extended period of time, we recommend you to unplug the power cord.
Operating
Menu Page
- On the Home page, press the menu button
 on the remote control to view the menu page. The menu items include Picture and Sound.
 - Press
 on the remote control to select a menu item, and press OK to complete the menu switching and option setting in the menu. If you don’t want the menu page, press
 to exit the menu page.
Contact Support
- Please scan below QR code below for the complete User Manual.
- Or visit our website www.newline-interactive.com for more information.
- Contact Us for Support
- Please directly contact the support team within your region.
- USA
- Hotline: +1 8334699520
- Email: support@newline-interactive.com
- EMEA
- Hotline: +34 91 804 31 79 / +34 680 677 828
- Email: support_eu@newline-interactive.com
- APAC
- Hotline: +886 3 550 4768
- Email: info_ap@newline-interactive.com
- INDIA
- Hotline: 18004190309
- Email: info.in@newline-interactive.com

Documents / Resources
 |
newline STV Series Intelligent Display [pdf] User Manual 43, 115, STV Series Intelligent Display, STV Series, Intelligent Display, Display |