
1. Вовед
This manual provides essential information for the installation, operation, and maintenance of your ASUS Prime A520M-K motherboard. The ASUS Prime A520M-K is a Micro-ATX motherboard designed for AMD AM4 socket processors, supporting 3rd Gen AMD Ryzen processors. It features DDR4 memory support, PCIe expansion, and multiple display outputs for a reliable computing experience.
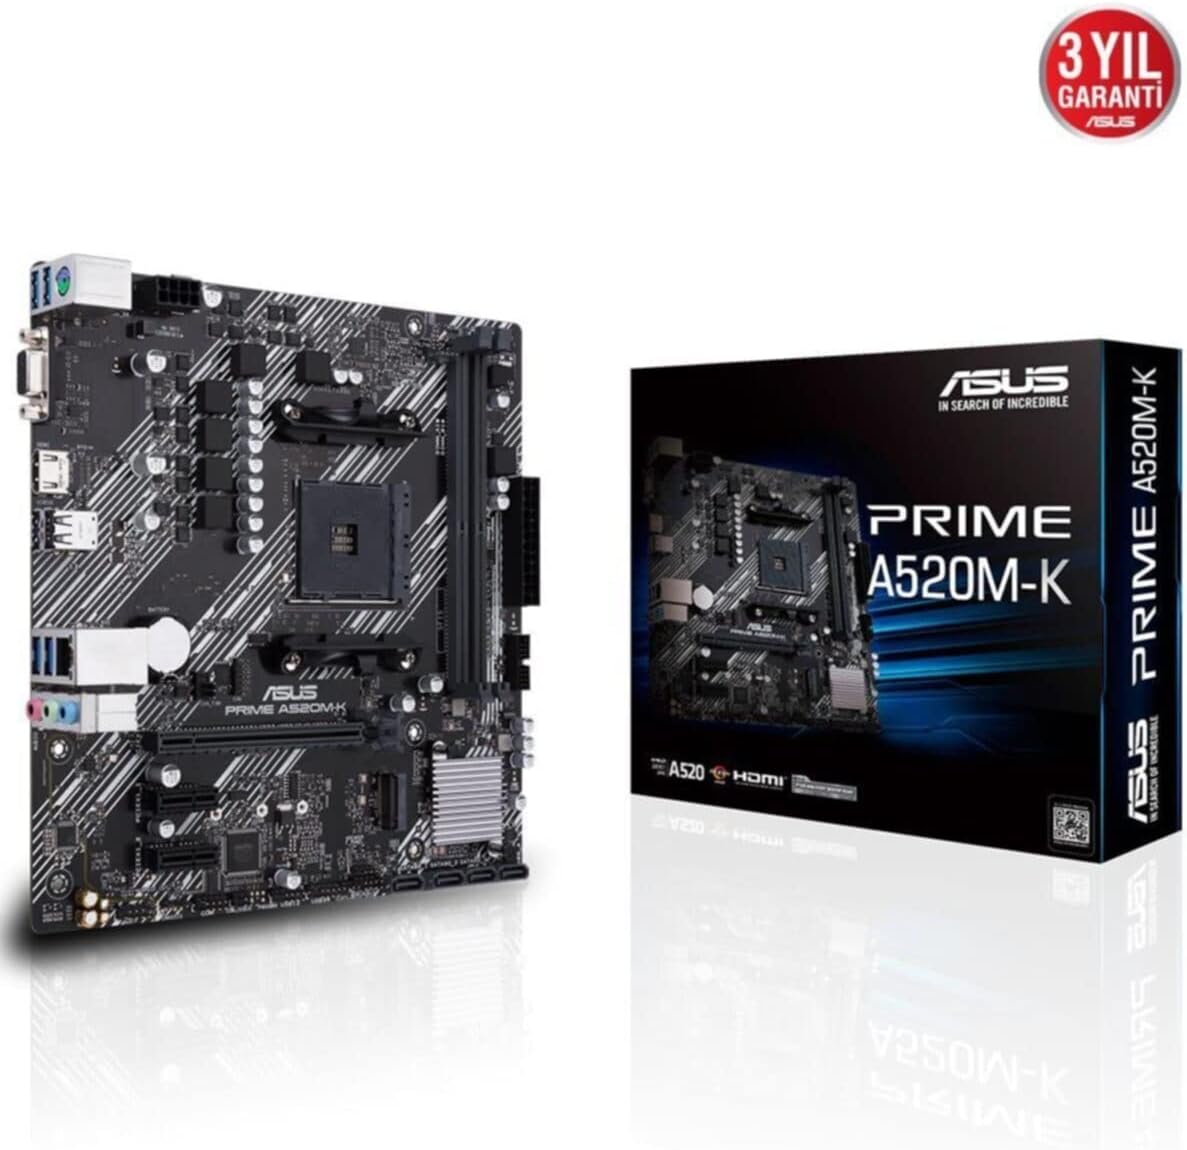
Figure 1: ASUS Prime A520M-K Motherboard and Retail Box.
2. Поставување и инсталација
Careful installation is crucial for optimal performance. Ensure your system components are compatible with the ASUS Prime A520M-K motherboard.
2.1. Инсталација на процесорот
The motherboard features an AMD AM4 socket. Align your AMD AM4 processor with the socket, ensuring the triangular markers on the CPU and socket match. Gently place the CPU into the socket without applying force, then secure it with the retention lever.
2.2. Инсталација на меморија
The ASUS Prime A520M-K supports up to 64GB of DDR4 RAM across two DIMM slots. Insert DDR4 memory modules into the slots, ensuring they are properly seated until the clips on both ends lock into place.
2.3. Картички за проширување
Utilize the PCIe expansion slots for graphics cards or other expansion cards. Align the card with the slot and press firmly until it is fully seated. Secure the card with a screw to the chassis.
2.4. Уреди за складирање
Connect SATA storage devices (HDDs/SSDs) to the available SATA 6Gb/s ports using SATA data cables. Ensure power cables from your power supply are also connected to these devices.
2.5. Приклучоци за напојување
Поврзете го 24-пинскиот ATX главен конектор за напојување и 8-пинскиот ATX 12V конектор за напојување од вашето напојување со соодветните порти на матичната плоча.
2.6. Конектори на предниот панел
Connect your chassis's front panel cables (power button, reset button, USB ports, audio jacks, LED indicators) to the designated headers on the motherboard. Refer to the motherboard diagram for precise locations.
2.7. Заден влезно/излезен панел
The rear I/O panel includes various ports for peripherals:
- D-SUB (VGA) Port: For connecting to older monitors.
- HDMI порта: For connecting to modern displays.
- USB 2.0 порти: За поврзување на периферни уреди како што се тастатури и глувци.
- LAN порта: За мрежно поврзување.
- Аудио приклучоци: За звучници, слушалки и микрофони.

Figure 2: Rear I/O panel with D-SUB, HDMI, USB, LAN, and audio ports.
Видео 1: Производот завршиview of the ASUS Prime A520M-K Motherboard, demonstrating key features and connectivity options for easy installation.
3. Упатства за работа
Откако ќе ги инсталирате и поврзете сите компоненти, можете да го вклучите системот.
3.1. Прва чизма
Upon the first boot, the system may enter the BIOS/UEFI setup utility. This allows you to configure system settings, boot order, and monitor hardware status. Press the designated key (usually Дел or F2) during startup to access the BIOS.
3.2. Инсталација на оперативен систем
Install your preferred operating system (e.g., Windows) from a bootable USB drive or DVD. Follow the on-screen instructions provided by the operating system installer.
3.3. Инсталација на драјвери
After installing the operating system, install the necessary drivers for the motherboard's chipset, audio, LAN, and any other integrated components. These drivers are typically provided on a support DVD or can be downloaded from the ASUS official webсајт.
4. Одржување
Редовното одржување помага да се обезбеди долготрајност и стабилно работење на вашата матична плоча.
- Отстранување прашина: Периодично чистете ја прашината од матичната плоча и компонентите со компримиран воздух. Пред чистење, проверете дали системот е исклучен од струја и исклучен од струја.
- Ажурирања на BIOS/UEFI: Keep your BIOS/UEFI firmware updated to benefit from performance improvements, bug fixes, and support for new hardware. Download updates only from the official ASUS webсајт.
- Управување со кабли: Осигурајте се дека сите кабли се уредно поставени и обезбедени за да се спречи попречување на протокот на воздух и случајни прекини.
- CMOS батерија: The motherboard uses a small lithium-ion battery (CR2032) to retain BIOS settings and system time. If your system consistently loses time or BIOS settings, this battery may need replacement.
5 Смена на проблеми
Доколку наидете на проблеми, погледнете ги следниве вообичаени чекори за решавање проблеми:
- Без моќност: Check all power connections, including the 24-pin and 8-pin connectors to the motherboard, and ensure the power supply is switched on.
- Нема приказ: Verify that your monitor is connected to the correct display output (D-SUB or HDMI) on the motherboard or dedicated graphics card. Reseat the graphics card and RAM modules.
- Нестабилност на системот/Паднувања: This can be caused by incompatible RAM, overheating, or outdated drivers. Check RAM compatibility, ensure proper cooling, and update all drivers.
- Грешки во поштенскиот код: If your motherboard has diagnostic LEDs or a POST code display, consult the ASUS website or full manual for the meaning of specific codes.
- Ресетирање на BIOS-от: To reset BIOS settings to default, locate the CLRTC (Clear CMOS) jumper on the motherboard and follow the instructions in the full manual, or remove the CMOS battery for a few minutes.
6. Спецификации
Detailed technical specifications for the ASUS Prime A520M-K motherboard:
| Карактеристика | Спецификација |
|---|---|
| Бренд | ASUS |
| Серии | PRIME A520M-K |
| Број на модел | 90MB1500-M0EAY0 |
| Сокет на процесорот | Приклучок AM4 |
| Компатибилни процесори | AMD AM4 сокет од трета генерација AMD Ryzen |
| Тип на чипсет | A520 AMD |
| Технологија на RAM меморија | DDR4 SDRAM |
| Мемориски слотови | 2 x DIMM |
| Max Memory Supported | 64 GB |
| Брзина на мемориски часовник | 2133 MHz (база) |
| Број на USB 2.0 порти | 2 (Заден влез/излез) |
| Видео излез | D-SUB, HDMI |
| Форма фактор | Микро ATX |
| Димензии на производот (ДxШxВ) | 8.9 x 8.7 x 0.79 инчи |
| Тежина на ставката | 1.19 фунти |
| Боја | Црното |
| Платформа | Windows |
| Датум прв на располагање | 18 август 2020 година |
7. Гаранција и поддршка
The ASUS Prime A520M-K motherboard typically comes with a manufacturer's warranty. Please refer to the warranty card included with your product or visit the official ASUS support website for detailed warranty terms and conditions. For technical assistance, driver downloads, and further support, please visit the Поддршка на ASUS webсајт.

Figure 3: ASUS Prime A520M-K Motherboard, indicating a 3-year warranty.