
Bios BBYCA10300783
BIOS Weather Indoor/Outdoor Wireless Thermometer & Hygrometer
Model: 312BC (BBYCA10300783)
Бренд: Биографии
Вовед
This manual provides detailed instructions for the setup, operation, and maintenance of your BIOS Weather Indoor/Outdoor Wireless Thermometer & Hygrometer. Please read this manual thoroughly before using the device to ensure proper function and longevity.
The BIOS Weather Indoor/Outdoor Wireless Thermometer & Hygrometer is designed to provide accurate readings of indoor temperature and humidity, as well as outdoor temperature. It features wireless connectivity for the outdoor sensor, a moon phase display, and the capability to connect with up to three sensors (additional sensors sold separately).
- Wireless range up to 30 meters (100 feet) from the outdoor sensor.
- Indoor monitor includes a hygrometer sensor for RH percentage readings (20% to 95%).
- Displays temperature from up to 3 sensors (Model No. 312TX, sold separately).
- Tracks relative indoor humidity and moon phase.
Содржина на пакетот
По отварањето на пакувањето, проверете дали сите компоненти се присутни и во добра состојба:
- 1 x Main Display Unit (Indoor Monitor)
- 1 x Безжичен надворешен сензор
- 1 x Упатство за употреба (овој документ)

Image: The main display unit (left) and the wireless outdoor sensor (right). The main unit shows indoor temperature, humidity, moon phase, time, and outdoor temperature. The outdoor sensor displays its current temperature.
Водич за поставување
1. Инсталација на батерија
Both the main display unit and the wireless outdoor sensor require batteries (not included).
- Open the battery compartment on the back of both the main display unit and the outdoor sensor.
- Insert the required batteries (e.g., AA or AAA, refer to the battery compartment markings for correct type and polarity).
- Добро затворете ги преградите за батерии.
Забелешка:
- It is recommended to insert batteries into the outdoor sensor first, then the main display unit, to facilitate immediate pairing.
- Use high-quality alkaline batteries for optimal performance, especially in cold weather for the outdoor sensor.
2. Поставување на сензорот
Proper placement of both units is crucial for accurate readings and reliable wireless communication.
- Главна единица за прикажување: Place indoors, away from direct sunlight, heat sources, or drafts that could affect temperature and humidity readings. Ensure it is within 30 meters (100 feet) of the outdoor sensor.
- Безжичен сензор за отворено:
- Mount in a shaded area to avoid direct sunlight, which can cause artificially high temperature readings.
- Protect from direct rain and snow. An overhang or a weather-resistant enclosure is ideal.
- Avoid placing near large metal objects, electrical appliances, or thick walls that could interfere with the wireless signal.
- Ensure it is within the 30-meter (100-foot) wireless range of the main unit.
3. Почетно спарување
The main display unit and outdoor sensor should automatically pair upon battery installation. If pairing does not occur:
- Осигурајте се дека двата уреди имаат свежи батерии.
- Bring the outdoor sensor closer to the main display unit.
- Press the "CH" (Channel) button on the main display unit to cycle through channels or initiate a search for the sensor.
- If issues persist, remove batteries from both units, wait a few minutes, and reinsert them, starting with the outdoor sensor.
Упатства за работа
1. Прикажи надview
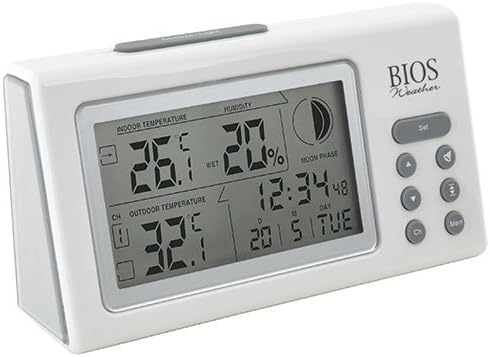
Слика: Под агол view of the main display unit, highlighting the various segments for indoor temperature, humidity, moon phase, time, and outdoor temperature.
The main display unit provides the following information:
- Внатрешна температура: Displays the current temperature inside the room where the main unit is located.
- Влажност: Shows the relative indoor humidity percentage.
- Надворешна температура: Displays the temperature from the connected wireless outdoor sensor.
- Време и датум: Тековно време и датум.
- Фаза на Месечината: An icon indicating the current moon phase.
- Индикатор за канали: Shows which outdoor sensor channel is currently displayed (if multiple sensors are used).
2. Функции на копчињата
The main display unit features several buttons for configuration and viewвнесување податоци:
| Копче | Функција |
|---|---|
| ПОСТАВЕТЕ | Enters setup mode for time, date, and other settings. Press to confirm settings. |
| ▲ / ▼ (Up/Down) | Adjusts values during setup. Cycles through channels for outdoor sensors. |
| CH (канал) | Switches between outdoor sensor channels (1, 2, 3) or initiates a search for sensors. |
| MEM (меморија) | Displays maximum and minimum temperature/humidity readings. Press again to clear. |
3. Поставување време и датум
- Притиснете и задржете го ПОСТАВЕТЕ копчето додека не почне да трепка приказот за времето.
- Користете го ▲ or ▼ копчиња за прилагодување на часот.
- Притиснете ПОСТАВЕТЕ to confirm and move to the next setting (minutes, year, month, day).
- Повторете ги чекорите 2 и 3 додека не се конфигурираат сите поставки.
- Притиснете ПОСТАВЕТЕ one last time to exit setup mode.
4. Viewing Max/Min Readings
Притиснете го МЕМ копчето за да view the maximum recorded indoor temperature, humidity, and outdoor temperature. Press МЕМ повторно да view the minimum readings. To clear the memory, press and hold the МЕМ button while the max/min readings are displayed.
Одржување
1. Чистење
To clean the display unit and outdoor sensor, use a soft, damp cloth. Do not use abrasive cleaners, solvents, or harsh chemicals, as these may damage the plastic casing или електронски компоненти.
2. Замена на батеријата
When the battery indicator appears on the display, it is time to replace the batteries in the respective unit (main unit or outdoor sensor). Always replace all batteries in a unit at the same time with new, high-quality batteries of the correct type.
Важно:
- Отстранете ги старите батерии одговорно во согласност со локалните прописи.
- Доколку уредот не се користи подолг период, извадете ги батериите за да спречите истекување и оштетување.
Решавање проблеми
If you experience issues with your BIOS Weather Thermometer & Hygrometer, please refer to the following common problems and solutions:
| Проблем | Можна причина / решение |
|---|---|
| Не се прикажува отчитување на надворешната температура или „---“. |
|
| Неточни мерења на температура/влажност. |
|
| Екранот е затемнет или празен. |
|
| Времето/датумот се неточни. |
|
Спецификации на производот

Image: The main display unit with indicated dimensions: 21.59 cm (length), 7.62 cm (width), and 19.05 cm (height).
| Карактеристика | Детал |
|---|---|
| Број на модел | BBYCA10300783 (312BC) |
| Тип | Indoor/Outdoor Thermometer and Hygrometer |
| Материјал | Пластика |
| Боја | Бело |
| Димензии (Главна единица) | Висина: 19.05 см, ширина: 7.62 см, длабочина: 21.59 см |
| Тежина | 0.30 кг |
| Опсег | До 30 метри (100 стапки) |
| Опсег на влажност во затворен простор | 20% до 95% RH |
| Sensor Capability | Supports up to 3 outdoor sensors (additional sensors Model No. 312TX, sold separately) |
| Посебни карактеристики | Wireless connectivity, Multi-Sensor support, Humidity Tracking, Moon Phase Display |
| Извор на енергија | Напојува со батерија |
Информации за гаранцијата
This BIOS Weather product comes with a 1-годишна гаранција за делови од датумот на купување. Оваа гаранција ги покрива дефектите во материјалите и изработката при нормална употреба. Не ги покрива штетите што произлегуваат од злоупотреба, несреќа, неовластена модификација или неправилна инсталација.
Ве молиме чувајте го вашиот доказ за купување за барањата за гаранција.
Поддршка за корисници
If you have any questions, require technical assistance, or need to make a warranty claim, please contact Bios customer support. For more information and resources, you may also visit the official Bios store on Amazon:
Visit the Bios Store on Amazon
Please have your product model number (BBYCA10300783) and purchase date ready when contacting support.
Ask a question about this manual
Ask about setup, troubleshooting, compatibility, parts, safety, or missing instructions. Manuals+ will review the question and use this page’s manual context to help answer it.