![]() QUICK START GUIDE
QUICK START GUIDE
Download the APP for instructions and tutorials


Scan the QR code to view tutorials and download the app
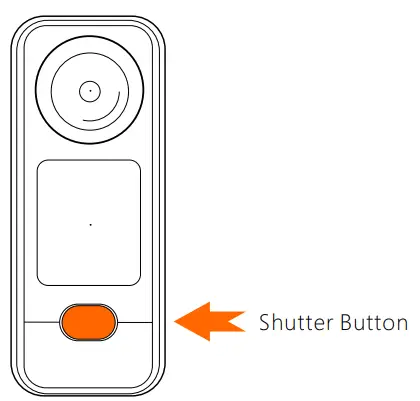
Getting to know the parts

Charging the camera

Insert TF card

Please insert the TF card with the gold finger toward the lens side.
Power on / Power off.
Tap to turn on
Press and hold for 3 seconds to turn off

Wi-Fi ON/OFF
In standby, tap the Wi-Fi button to turnon Wi-Fi, Tap the Wi-Fi button again to turn off Wi-Fi.

Wi-Fi can also be turned on and off in the settings menu
Once the Wi-Fi is on, scan the QR code with the minidv App to connect to the camera.

You can also manually Þnd the camera Wi-Fi hotspot with SSID minidv_****, The password is 12345678 to connect to the camera manually.
This button is a multi-function button and also has the following button functions
Playback
Pause
OK
Back
Touchscreen operation

- Resolution/frame rate
- WiFi status
- Mode
- Playback
- Remaining shootable time
- Microphone state
- State of charge
- Memor y card status
- Parameter settings
- Date Time
- In standby, swipe down from the top of the screen to access mode switching for VIDEO, TIME-LAPSE, SLOW-MO, and PHOTO.

- Swipe left or right to select the appropriate shooting mode, then tap to enter and slide down to back to standby.

 VIDEO
VIDEO
In video standby, swipe from the right to the left of the screen to enter the video parameter settings.

 TIME-LAPSE
In TIME-LAPSE standby, swipe from the right to the left of the screen to enter the TIME-LAPSE parameter settings.

 Swipe left or right to select a parameter, slide down from top to bottom to exit the parameter setting
 SLO-MO
In SLO-MO standby, swipe from the right to the left of the screen to enter the SLO-MO parameter settings.

 PHOTO
PHOTO
In PHOTO standby, swipe from the right to the left of the screen to enter the PHOTO parameter settings.
 Swipe left or right to select a parameter, slide down from top to bottom to exit the parameter setting
 Playback
In camera standby, swipe from the left to the right of the screen to enter the playback screen.

- File Delete/Lock
In playback mode, select the Þle you want to delete or lock, press and hold the screen for 3 seconds, the “Delete and Lock” window will pop up, if you want to exit. If you want to exit, just swipe down or press the button at the bottom of the screen.

- Setup
In camera standby, swipe up from the bottom of the screen to enter the camera settings screen.


Click to Format 
Click to turn the microphone off or on 
Click to turn WiFi on or off 
Click to go to more settings 
Click to go to volume control 
Click to go to presets 
Click to go to Image Reversal 
Click to enter parameter settings
Connecting the APP
- Turn on the M3 camera.
- Turn on the M3 camera’s Wi-Fi
- Turn on your phone’s Wi-Fi.
- Open minidv App and click “Device”, scan the QR code or manually Þnd the SSID of the camera to connect the camera.

Connect to a computer

- U-Disk Mode.
- PC CAM.
- Charging.
FCC Warning Statement: Changes or modifications to this unit not expressly approved by the party responsible for compliance could void the user’s authority to operate the equipment. This equipment has been tested and found to comply with the limits for a Class B digital device, pursuant to Part 15 of the FCC Rules. These limits are designed to provide reasonable protection against harmful interference in a residential installation. This equipment generates, uses and can radiate radio frequency energy and, if not installed and used in accordance with the instructions, may cause harmful interference to radio communications.
However, there is no guarantee that interference will not occur in a particular installation. If this equipment does cause harmful interference to radio or television reception, which can be determined by turning the equipment off and on, the user is encouraged to try to correct the interference by one or more of the following measures:
- Reorient or relocate the receiving antenna.
- Increase the separation between the equipment and receiver.
- Connect the equipment into an outlet on a circuit different from that to which the receiver is connected.
- Consult the dealer or an experienced radio/TV technician for help.
This device complies with Part 15 of the FCC Rules. Operation is subject to the following two conditions: (1) this device may not cause harmful interference, and (2) this device must accept any interference received, including interference that may cause undesired operation.
FCC Radiation Exposure Statement
The device has been evaluated to meet general RF exposure requirement. The device can be used in portable exposure condition without restriction.
Documents / Resources
 |
MINIDV M3 Mini Dash Camera [pdf] User Guide 2AIGT-GM3, 2AIGTGM3, gm3, M3 Mini Dash Camera, M3 Dash Camera, Mini Dash Camera, M3, Dash Camera |