CASIO BG-1000 Digital Watch User Manual
Module: 1565
Introduction and Important Information
Please familiarize yourself with this information first.
Battery ?
The battery installed at the factory may discharge during storage and in the store. If you notice signs of battery depletion (dim indicator), replace the battery at your CASIO dealer or distributor.
Water Resistance ?
These watches can withstand water penetration under static pressure indicated on the case back (50, 100, or 200 meters), as well as seawater at the indicated depth. However, dynamic pressure generated during underwater activities is greater than static pressure. Refer to the table below for details.
| Class | Case Construction | Splash/Rain ?️ | Bathing, Washing, etc. ? | Scuba Diving, etc. ? | Diving & Other |
|---|---|---|---|---|---|
| I | Water resistant to 50m | No | No | No | No |
| II | Water resistant to 100m | Yes | No | No | No |
| III | Water resistant to 200m | Yes | Yes | No | No |
| IV | Water resistant to 300m | Yes | Yes | Yes | Yes |
Notes:
- I: These watches are not waterproof; avoid any moisture ingress.
- II: Do not pull out the crown [⚙️] while the watch is wet.
- III: Do not press buttons [], [], [] or pull out the crown [⚙️] underwater.
- IV: Buttons [], [], [] can be pressed underwater, but do not press recessed buttons or pull out the crown [⚙️]. If seawater gets on the watch, rinse it with fresh water and dry thoroughly.
- V: Can be used for diving (excluding depths requiring helium-oxygen gas mixtures).
- Do not pull out the crown [⚙️] underwater.
- Some water-resistant watches come with leather straps. Do not wear such models while swimming or in any other situation involving immersion of the strap in water.
Precautions for Watch Operation ⚠️
- Do not attempt to open the case or remove the back cover.
- The water and dust-proof gasket should be replaced every 2-3 years.
- If water or condensation gets inside the watch, take it to your CASIO dealer or distributor immediately for repair.
- Do not expose the watch to excessively high temperatures.
- Although the watch has a shock-resistant mechanism, avoid strong impacts or dropping it on hard surfaces.
- Do not overtighten the strap. A finger should fit underneath it.
- To clean the watch and strap, use a soft cloth, dry or dampened with a soapy solution. Do not use volatile chemical solvents (such as gasoline, solvents, cleaning aerosols, etc.).
- Always store the watch in a dry place when not in use.
General Instructions
- Do not expose the watch to aggressive chemicals such as gasoline, cleaning agents, aerosols. Chemical reactions with such agents can cause damage to the gasket, case, and polish.
- Some watch bands have their characteristics printed on them. Be careful not to erase them when cleaning such bands.
- For watches with plastic bands:
- You may notice a whitish powdery residue on the band. This substance is harmless to your skin or clothing and can be removed by wiping the band with a cloth.
- If moisture is left on a plastic band, or if the watch is kept in a humid environment, the band may warp, crack, or break. To preserve the plastic band, wipe off dirt or moisture with a soft cloth as soon as possible.
- For watches with fluorescent bands and cases:
- Prolonged exposure to direct sunlight ☀️ can cause the fluorescence color to fade.
- Prolonged contact with moisture ? can cause the fluorescence color to fade. Wipe off moisture from the surface as soon as possible.
- Prolonged contact with other moist surfaces can cause the fluorescence color to fade. Wipe off moisture from the fluorescent surface as soon as possible and avoid further contact.
- Strong friction of a surface with a fluorescent print against another surface can cause the print to transfer to the other surface.
CASIO COMPUTER CO., LTD is not responsible for third-party claims that may arise from the use of this watch.
Press the [] button to change modes.
If the display content changes continuously, demonstrating your watch's capabilities, refer to the "Auto Display Function" section for information on how to stop it.
Current Time Mode ⏰
Press the [] button in any mode to illuminate the display ? for 3 seconds. The backlight uses electroluminescent (EL) elements, whose power decreases over time. The watch emits an audible beep when the backlight is on; this is normal. Backlight is difficult to see in direct sunlight. The backlight automatically turns off during an alarm.
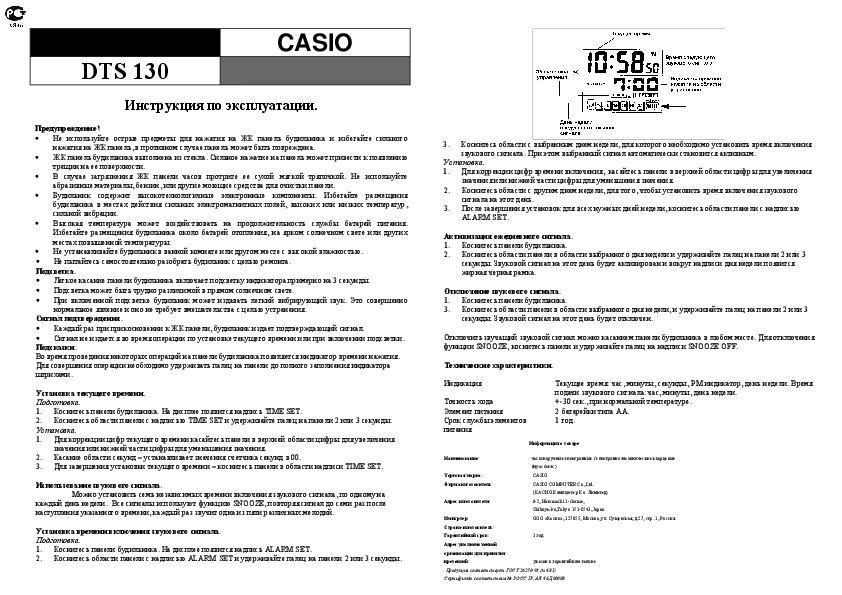
Press the [] button in Current Time Mode to switch between 12-hour and 24-hour formats. In 12-hour format, the 'G' indicator appears next to the day of the week. In 24-hour format, a graph shows the time for the current date.
Time Graph Function ?
There are three different time graph display formats that change automatically based on the current alarm setting and time.
Alarm Not Set for Current Date
A reminder image appears, and the hour value flashes on the time graph, indicating the set alarm time. The time graph shows how much time is left until the alarm sounds.
Less Than One Hour Until Alarm
One hour before the set alarm time, a beep sounds, and the graph format changes: month and day are replaced by a countdown of minutes and seconds until the set time.
Setting Digital Time and Date
1. Press [] in Current Time Mode. The seconds digits will flash, allowing adjustment.
2. Press [] to move the flashing digits to the next setting (Seconds → Hours → Minutes → Date → Year → Month).
3. While the seconds digits are flashing, press [] to reset them to "00". If the seconds are between "30" and "59", the minutes will increment by 1. If between "00" and "29", minutes remain unchanged.
4. While other digits are flashing, press [] to increase or [] to decrease the value. Holding the buttons allows for faster adjustment.
5. When the animated graphic is flashing, you can select one of the following images. The selected image will appear each time you activate the backlight in Current Time Mode.
- Random selection of items 2, 3, or 4.
- DANCE
- DJ
- LOVE
6. After setting the time and date, press [] to return to Current Time Mode. The day of the week is set automatically based on the date. The date can be set from January 1, 1995, to December 31, 2039. If no button is pressed for several minutes while digits are flashing, the flashing stops, and the watch returns to Current Time Mode.
Phonebook Mode ?
This mode is used for setting alarms, hourly chimes, and the alarm.
Phonebook Mode Precautions ⚠️
All data entered into the phonebook may be erased in the following situations. It is recommended to keep copies of important data:
- Watch malfunction or repair.
- Battery failure or replacement.
CASIO is not liable for data loss or damage resulting from these events.
The Phonebook Mode allows you to store up to 20 entries of names, phone numbers, mobile numbers, or pager numbers. You can retrieve information by scrolling through the display.
The number of unused entries appears each time you enter Phonebook Mode.
- You can enter 8 characters for names and 12 digits for phone/mobile numbers.
The data displayed when exiting Phonebook Mode will appear first when re-entering the mode.
Entering Data in Phonebook Mode
1. In Phonebook Mode, press [] and [] simultaneously to create a new entry. A new entry is a blank line without a name or phone number. If the phonebook is empty, a blank line appears upon entry.
2. Press and hold [] until the cursor flashes in the text area. Use [] and [] to select characters. The sequence is: [Space] → A-Z → 0-9.
3. Press [] to move the cursor to the right. Repeat steps 2 and 3 to enter the full name. You can enter up to 8 characters for the name.
4. After entering the name, press [] to move the cursor to the phone number area. Use [] or [] to select the required digit for the flashing cursor. Holding the button allows faster scrolling. The sequence is: [Dash] → 0-9 → [Space].
5. Press [] to move to the next digit. Repeat steps 6 and 7 until the phone number is complete. You can enter up to 12 digits for the phone number.
6. After entering the phone number, press [] to move to the mobile phone number area. An indicator on the screen accompanies the mobile number. The entry procedure is similar to a regular phone number. If you do not wish to enter a mobile number, proceed to step 9.
7. After entering data, press [] to save and return to Phonebook Mode. The display will show "SORT" for a few seconds, indicating data sorting. Once sorting is complete, the original Phonebook Mode appears without a cursor.
Text displayed on the screen can be up to 5 characters long at a time; longer messages scroll from right to left.
Reading Phonebook Data
In Phonebook Mode, press [] to scroll forward and [] to scroll backward. Holding these buttons scrolls data faster.
Editing Data in Phonebook Mode
1. In Phonebook Mode, scroll to find the entry you wish to edit.
2. Press []; the cursor will appear in the text area.
3. Use [] to move the cursor to the character you want to change. Edit the selected character (refer to "Entering Data in Phonebook Mode" for details).
4. After editing, press [] to save and return to Phonebook Mode.
Deleting Data in Phonebook Mode
1. In Phonebook Mode, scroll to find the entry you wish to delete.
2. Press []; the cursor will appear in the text area.
3. Press [] and [] simultaneously to delete the entry. The cursor will appear in the text area.
4. Enter data or press [] to return to Phonebook Mode.
Alarm Mode ?
This mode allows you to set up to five independent alarms with custom times, dates, and reminder images. It also controls the hourly chime.
Alarm Mode Indicator
The alarm mode indicator appears on the display when an alarm or hourly chime is active.
Alarm Types
This watch offers various alarm types:
- Time Only: Alarm sounds daily at the set time.
- Time, Month: Alarm sounds daily within the set month at the set time.
- Time, Day: Alarm sounds monthly on the set day at the set time.
- Time, Month, Day: Alarm sounds annually on the set date at the set time.
- Time, Day of Week: Alarm sounds weekly on the set day of the week at the set time.
- Time, Month, Day of Week: Alarm sounds weekly within the set month on the set day of the week at the set time.
- Time, Date, Day of Week: Alarm sounds when the set day of the week falls on the set date.
- Time, Month, Date, Day of Week: Alarm sounds when the set day of the week falls on the set date within the set month. (This alarm may sound only once every few years.)
The alarm sound continues for 20 seconds. The hourly chime sounds at the start of each hour.
Setting an Alarm
1. In Alarm Mode, press [] to select the alarm type.
2. After selecting the type, press []. The hour digits will flash, ready for setting. The alarm is automatically enabled at this point.
3. Press [] to cycle through the digits to be set: Hours → Minutes → Month → Day → Day of Week.
4. Use [] to increase and [] to decrease the flashing digit. Holding the buttons allows faster adjustment.
- For alarm types not requiring a month, set "-" in the month field.
- For alarm types not requiring a date, set "--" in the date field.
- For alarm types not requiring a day of the week, set "---" in the day of the week field.
The time format (12-hour or 24-hour) follows your current time setting. In 12-hour format, note that AM is indicated by "A" and PM by "P".
5. To set a reminder image, press [] or [] to cycle through the images until you find the desired one. The selected image will appear on the screen during the alarm sound, helping you recall the purpose of the alarm.
6. After completing data entry, press [] to return to Alarm Mode.
Stopping an Alarm Sound ✋
Press any button [], [], [], [] to stop the alarm sound. The corresponding image will remain on the screen for 20 seconds.
Enabling and Disabling Alarms and Hourly Chime
1. In Alarm Mode, press [] to select between Alarm and Hourly Chime.
2. Press [] to enable or disable the selected signal.
Indicators for active alarms or hourly chimes will remain on the display in any mode.
Checking an Alarm
Press [] in Alarm Mode to trigger the alarm sound.
Stopwatch Mode ⏱️
This mode allows you to measure elapsed time, split times, and the first two finishers.
The measurement range is limited to 23 hours, 59 minutes, 59.99 seconds.
- Elapsed Time Measurement: Press [] (Start), then [] (Stop). Press [] (Reset) to return to zero.
- Split Time Measurement: Press [] (Start), then [] (Split) to record split times. Press [] (Stop) to end. Press [] (Reset) to return to zero. Press [] (Repeat Start) to resume timing after a split. Press [] (Cancel Split) to cancel split timing.
- Split Time and Finish Time Recording (1st and 2nd Place): Press [] (Start). Press [] (Split) to record the first finisher's time. Press [] (Stop) to end. Press [] (Reset) to return to zero. The display shows the first finisher's time. Press [] again to show the second finisher's time.
Note: The stopwatch operates with 1/100-second accuracy.
Auto Display Function ?
The Auto Display Function continuously cycles through your watch's features. You cannot use other functions while it is active.
To Activate Auto Display
Press and hold [] for two or three seconds in any mode.
To Deactivate Auto Display
Press and hold [] for two or three seconds. The watch will return to Current Time Mode.
Note: Auto Display cannot be used while setting any value (when digits are flashing).
Specifications
- Accuracy: +/- 15 seconds per month at normal temperature.
- Current Time: Hour, minute, second, AM/PM indicator, month, date, day of the week.
- Timekeeping System: 12-hour or 24-hour format switching.
- Calendar System: Auto-calendar, programmed from 1995 to 2039.
- Phonebook Mode: Memory for up to 20 entries (8 characters for name, 12 digits for phone number/mobile/pager). Auto-sorting feature.
- Alarm Modes: 5 types of alarms with reminder images, setting for hours, minutes, month, day, day of week; hourly chime.
- Stopwatch Mode: Measurement accuracy: 1/100 second. Measurement range: 23 hours, 59 minutes, 59.99 seconds. Measurement modes: Total time, split time, first two finishers.
- Backlight: Electroluminescent (EL) backlight.
- Battery: CR1616 type. Estimated life: Approximately 2 years (assuming alarm sounds for 20 seconds/day and backlight is used for 3 seconds/day).
- Battery life is reduced under heavier usage:
- 9 seconds/day backlight: 15 months.
- 18 seconds/day backlight: 10 months.
Product Information
Name: Electronic / Electro-mechanical Quartz Wristwatches (Men's/Women's)
Brand: CASIO
Manufacturer: CASIO COMPUTER Co.,Ltd. (CASIO Computer Co., Limited)
Manufacturer Address: 6-2, Hon-machi 1-chome, Shibuya-ku, Tokyo 151-8543, Japan
Importer: OOO "Kasio", 127055, Moscow, ul. Suchevskaya, d.27, str. 1, Russia
Country of Origin: Japan
Warranty Period: 1 year
Address for Authorized Organization for Claims: Specified in the warranty card.
Product Compliance: Complies with GOST 26270-98 (clause 4.35)
Certificate of Conformity No.: ROSS JP. АЯ 46.Д00003