Instructions for Xinfeite models including: CCRF01, CCRF01 Ceiling Fan Remote Control, Ceiling Fan Remote Control, Remote Control, Control
Shenzhen Xinfeite Information Technology Co., Ltd CCRF01 2BGTH-CCRF01 2BGTHCCRF01 ccrf01
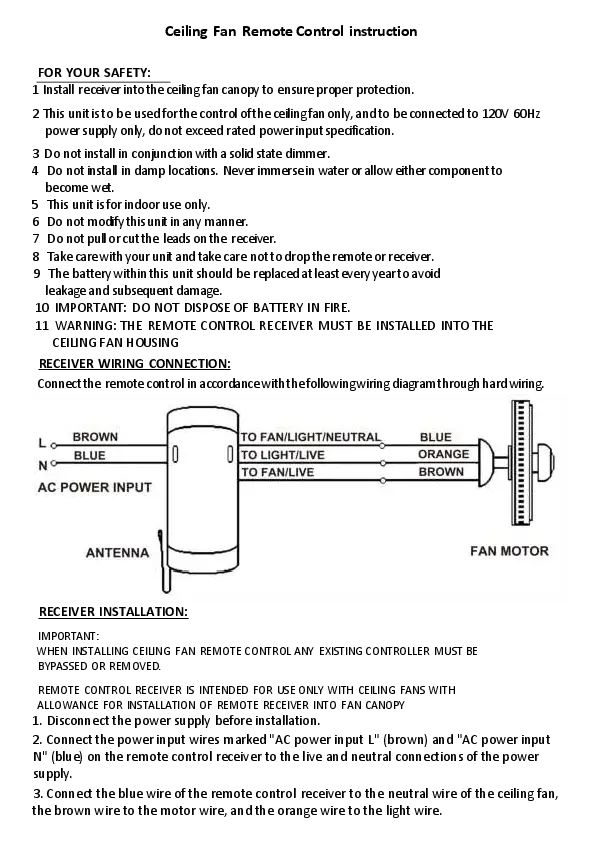
Ceiling Fan Remote Control instruction
FOR YOUR SAFETY: 1 Install receiver into the ceiling fan canopy to ensure proper protection. 2 This unit is to be used for the control ofthe ceiling fan only, and to be connected to 120V 60Hz
power supply only, do not exceed rated power input specification. 3 Do not install in conjunctionwith a solid state dimmer. 4 Do not install in damp locations. Never immerse in water or allow either component to
become wet. 5 This unit is for indoor use only. 6 Do not modify this unit in any manner. 7 Do not pull or cut the leads on the receiver. 8 Take carewithyour unit and take care not to drop the remote or receiver. 9 The battery within this unit should be replaced at leasteveryyear to avoid
leakage and subsequent damage. 10 IMPORTANT: DO NOT DISPOSE OF BATTERY IN FIRE. 11 WARNING: THE REMOTE CONTROL RECEIVER MUST BE INSTALLED INTO THE
CEILING FAN HOUSING RECEIVER WIRING CONNECTION: Connect the remote control in accordancewiththe followingwiring diagramthrough hardwiring.
RECEIVER INSTALLATION:
IMPORTANT: WHEN INSTALLING CEILING FAN REMOTE CONTROL ANY EXISTING CONTROLLER MUST BE BYPASSED OR REMOVED. REMOTE CONTROL RECEIVER IS INTENDED FOR USE ONLY WITH CEILING FANS WITH ALLOWANCE FOR INSTALLATION OF REMOTE RECEIVER INTO FAN CANOPY
1. Disconnect the power supply before installation. 2. Connect the power input wires marked "AC power input L" (brown) and "AC power input N" (blue) on the remote control receiver to the live and neutral connections of the power supply. 3. Connect the blue wire of the remote control receiver to the neutral wire of the ceiling fan, the brown wire to the motor wire, and the orange wire to the light wire.

4.After the fan receiver is powered on, the receiver and remote control will be automatically paired, and the remote control function can be used normally. If the remote control cannot be used properly, please follow the following steps: Keep pressing the "fan on/off"button on the remote control for more than 3 seconds to pair the remote control with the receiver. After successful pairing, the fan light will flash twice as a reminder signal. After re-pairing, the functionality of the original remote control will be disabled. 5. Insert the receiver into the suspension bracket.Then you can lift the fan cover to hide the receiver and bracket.Note: The receiver must be installed in the fan cover as shown in the figure. The receiver is not designed to operate in any other way.

The following are the parameters and function descriptions of the fan controller:

Input voltage

Receiver device

Effective Remote control distance
Adaptive motor parameters

Battery specifications

Safety protection

AC 120V±10% 50/60Hz;
>18M

Remote control communication frequency
static power consumption

433 MHz 0.5W

AC 120V±10% 50/60Hz; 200W(Max)

Adaptive lamp panel parameters

160W (Max), adjustable light intensity (brightness adjustment Range:1%~100%),dimming method: stepless dimming

AAA

Receiver housing fire rating UL 94-VO

When the total power exceeds 900AV, the non-recoverable fuse will be disconnected. Temperature protection device; when the temperature is too high, the power supply will be automatically disconnected, and when the
temperature drops, the power supply will be automatically turned on.

pairing method

After the fan receiver is powered on, the receiver and remote control will be automatically paired, and the remote control function can be used normally. If the remote control cannot be used properly, please follow the following steps: Keep pressing the "fan on/off"button on the remote control for more than 3 seconds to pair the remote control with the receiver. After successful pairing, the fan light will flash twice as a reminder signal. After re-pairing, the functionality of the original remote control will be disabled.

Speed regulation mode
Environment of use

Capacitance speed regulation: HI)3 gear (high speed) MED)2 gear (medium speed) LOW)1 gear (low speed gear)
Environment temperature: 0~45, humidity: 10%~90%

Fan Motor

on/off

Just press this key to turn on/off the fan motor function.

button

remote control

Light on/off a) Just press this button to turn on/off the light.

button

Light delayed

b) keep pressing this key for 2 seconds, the light will be turned off after 30 seconds.

off button

Lamp brightness increase key
Lamp brightness decrease key

Keep pressing the key this key to increase the brightness with stepless dimming. And shortly press this key to increase the brightness with graded dimming.
Keep pressing this key to reduce the brightness with stepless dimming.
And shortly press this key to reduce the brightness with graded dimming.

Fan timing key

Each time you press this key, the fan will
correspond to the specified timing time, which is 1, 2, 4, and 8 hours in cycles.

Select the gear
Key for fan speed

Capacitance speed regulation: High speed gear HI)3 gear, Med speed gear MED)2 gear, Low speed gear LOW)1 gear,

The remote control display screen will display the corresponding function of the button you press. For saving the electricity, the remote control display screen will be turned off automatically after 30 seconds without any operations.When you press any button on the remote control,the display screen will be automatically activated and display the corresponding function.

This device complies with part 15 of the FCC Rules. Operation is subject to the following two conditions: (1) this device may not cause harmful interference, and (2) this device must accept any interference received, including interference that may cause undesired operation. Any changes or modifications not expressly approved by the party responsible for compliance could void the user's authority to operate the equipment. NOTE: This equipment has been tested and found to comply with the limits for a Class B digital device, pursuant to Part 15 of the FCC Rules. These limits are designed to provide reasonable protection against harmful interference in a residential installation. This equipment generates, uses and can radiate radio frequency energy and, if not installed and used in accordance with the instructions, may cause harmful interference to radio communications. However, there is no guarantee that interference will not occur in a particular installation. If this equipment does cause harmful interference to radio or television reception, which can be determined by turning the equipment off and on, the user is encouraged to try to correct the interference by one or more of the following measures: -- Reorient or relocate the receiving antenna. -- Increase the separation between the equipment and receiver. -- Connect the equipment into an outlet on a circuit different from that to which the receiver is connected. -- Consult the dealer or an experienced radio/TV technician for help. The device has been evaluated to meet general RF exposure requirement. The device can be used in portable exposure condition without restriction
Adobe Acrobat Pro DC (64-bit) 22.1.20085