seatrac Tracking and Data Modems
![]()
Overview
For tracking the position of ROV’s, AUV’s, divers and other subsea assets, SeaTrac uses acoustic beacons such as the X150, X110 and X010 devices. Periodically, new versions of the firmware these beacons run is released to improve performance and add new features. Firmware is delivered in a file ending with the FWX file extension and is programmed into the beacon via the RS232 serial port form a Windows PC running the SeaTrac Programmer software utility.
This document describes how to upgrade the beacons to run the latest firmware release.
When upgrading firmware, it is critical that all beacons are upgrading to the same release level before use. Trying to use beacons running different versions of the firmware may lead to unpredictable behaviour or communications failing!
As several versions of firmware are available for different beacon types, it is strongly recommended that users follow the procedure discussed below in this document…
Upgrading Firmware
Preparation
Before starting the firmware upgrade, visit the Blueprint Subsea website and download the latest version of the SeaTrac PinPoint Installer as software tools from the support pages at… https://www.blueprintsubsea.com/seatrac/support
In addition to the PinPoint application, this will also install the software tool required by this procedure – and the can be found in the “SeaTrac PinPoint / Tools” folder in the Windows Start Menu…
- SeaTracProgrammer – This program is used to install new firmware into the SeaTrac Beacons using the “.fwx” firmware files provided with this document.
Programming New Firmware
For beacons to function and communicate correctly, each SeaTrac beacon should be programmed to the firmware release using the following procedure…
- If you haven’t already done so, connect the SeaTrac beacon to the serial port of a PC (or use the USBto- Serial converter supplied with the SeaTrac system).
- Power up the SeaTrac beacon and run the SeaTracProgrammer program (either from the Start Menu, or by executing “SeaTracProgrammer.exe”).
- In the application window, click the drop-down list to choose the COM port the beacon is connected to (1), then choose a baud rate of 115200 from the second drop down list (2). Finally click “CONNECT” to connect to the SeaTrac beacon (3)…
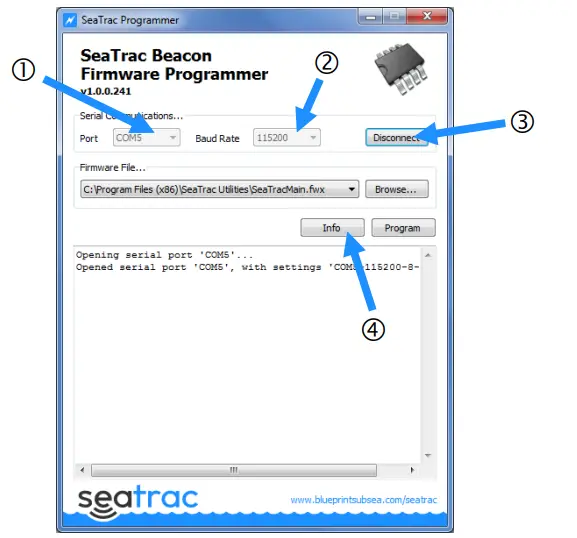
- Having opened the serial connection, check the SeaTrac Beacon is connected and get is hardware information by clicking the “INFO” button (4).
- If the beacon isn’t connected properly, you will see something similar to
- Device identifying…
- Timed out waiting for device to reply.
- Aborted.
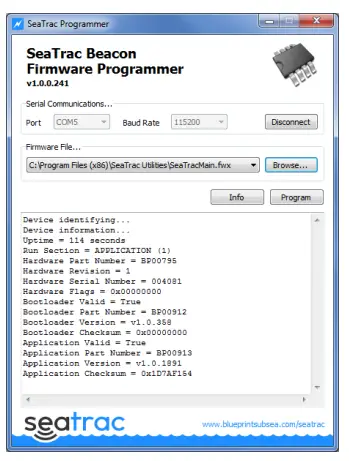
- However, if the serial communication settings are correct, you will see information similar to…
- Device identifying…
- Device information…
- Uptime = 4238 seconds
- Run Section = APPLICATION (1)
- Hardware Part Number = BP00795
- Hardware Revision = 6
- Hardware Serial Number = 001234
- Hardware Flags = 0x00000000
- Bootloader Valid = True
- Bootloader Part Number = BP00912
- Bootloader Version = v1.6.436
- Bootloader Checksum = 0x00000000
- Application Valid = True
- Application Part Number = BP00913
- Application Version = v1.11.2152
- Application Checksum = 0x1D7AF154
- From this information, make a note of the Hardware Revision and Application Version (highlighted above in red), as you will need this to determine the firmware file you should program.
- Click the “BROWSE” button, and in the Open File window navigate to where the appropriate firmware file (with the FWX file extension) is located (5)…
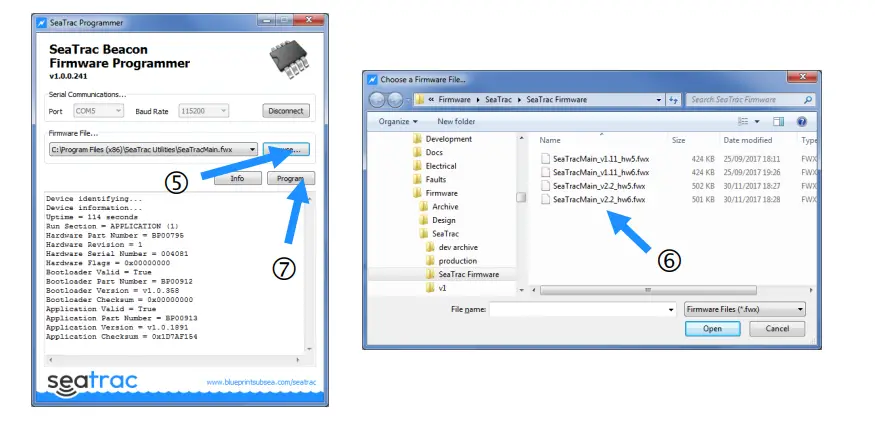
- In the “Choose a Firmware File” window, select the appropriate firmware file (6) for the Hardware Revision of your SeaTac beacon (see red text above), for example…
- SeaTracMain_v2.2_hw6.fwx – Firmware for Hardware Revision 6 beacons.
- SeaTracMain_v2.2_hw5.fwx – Firmware for Hardware Revision 1 to 5 beacons.
The larger the version number, the more current the firmware release – above v2.2 is never more than v1.11 and so should be used. click “OPEN” to choose the firmware file and close the Open File window.
- Finally, click on the “PROGRAM” button (7) to start programming the firmware. A graphical bar and text display will show the progress of the procedure, which can take a couple of minutes to complete.
Sometimes, on the first click of the PROGRAM button an error may be shown, if this occurs try clicking the button again and programming should start. - When programming completes, the SeaTac beacon will reboot after a few seconds. Click the “INFO” button again and check that the Application Version has changed to the new firmware release…
- Application Part Number = BP00913
- Application Version = v2.2.2191
- Close the SeaTracProgrammer software, this completes the programming process. The beacon should now be ready for use with the PinPoint software. Repeat the above for each beacon to be used.
Troubleshooting
This section covers the most common causes of failure when attempting to upgrade the firmware in a SeaTrac Beacon.
If you have tried the actions mentioned below, please contact us at the details shown in the Technical Support section of this document.
The SeaTrac Programmer software will not communicate with the Beacon.
- Check the Beacon has power – the status indicator on the base of the Beacon housing should be flashing green.
- Sometimes several serial ports are created if you are using an RS232-to-USB converter, in addition to any physical serial ports on the computer.
- Check the correct serial port is specified in the programmer, and if necessary use the Windows Device Manager1 to see which serial ports are available.
- Check the Baud Rate setting is correct. By default, this should be 115200, although users can adjust the beacon setting using software such as “SeaTrac Tools”.
- Try several other Baud Rate settings or follow the “Resetting to Defaults” procedure below to restore the factory settings of 115200.
The SeaTrac Beacon seems unresponsive and the Status LED isn’t flashing.
- If cycling the power to the Beacon does not fix this problem, it is likely that the firmware has become corrupt either during a previous attempt at programming or due to other circumstances.
- Follow the “Bootloader Mode” procedure described below, to prevent the current firmware from starting and force the Beacon to only accept programming commands.
When clicking the “Program” Button, a “Device initialisation not possible…” message is displayed.
- During the Initialisation step of the programming process the target part number, revision, memory area and length of the new firmware are sent to the Beacon.
- If the beacon determines that from these parameters it cannot accept the firmware, it will return a “Device initialisation not possible” message in the program log window and abort programming.
- Check you have the most current and correct firmware for the Beacon hardware or contact Technical
Support if you cannot resolve the problem.
The Program Update sequence starts but fails during the program Transfer step
- The new firmware is transferred into the Beacons temporary memory as a series of data blocks, each one sent as a command over the serial link.
- If other activity occurs on the serial port, it may corrupt these messages and cause programming to fail.
- Use the SeaTrac Tools software to turn off the automatic generation of Status messages and remove the Beacon from water to ensure that no acoustic activity triggers the generation of serial output messages and try programming again.
- If programming still fails, ensure that a screened serial communications cable is used, and both the Beacon and PC are located away from any sources of electrical interference that may be corrupting the data messages.
Resetting to Defaults
If you are having trouble connecting the programmer to the beacon, and you are sure the Beacon has power and is connected to the correct serial port, it may be that you have changed the Beacon’s serial communication baud rate (speed) setting.
This setting is stored within the Beacons permanent memory, and can be reset to the factory default value of 115200 baud by the following procedure…
Please note that resetting the Beacon to default will loose all user settings and calibration data. Please refer to the Beacon’s user manuals for details on how to reset and recalibrate the hardware.
To reset the Beacon to factory defaults…
- Turn on the power to the Beacon and check it has booted into the main application – the status LED on the base of the Beacon housing should be flashing Green.
- Hold the “reset magnet” over the magnetic sensor at the base of the Beacon (see Beacon user manual for details).
- As the magnet is moved into place, the Green status LED should start quickly flashing Red to show the presence of the magnet.
- Hold the magnet in place for 5 seconds until the status LED stops flashing, and become permanently illuminated red. At this point the defaults have been applied.
- Cycle the power to the beacon to ensure the new communications and some of the calibration settings are re-applied to hardware.
Bootloader mode
On power-up the Beacon will start its Bootloader application firmware, initialise hardware then start the main application firmware running.
However, if power was interrupted during the ‘update’ stage of the programming procedure, or another issue has caused this firmware to become corrupt, then the main application may fail to cause the beacon to freeze and become unresponsive.
Activating ‘Bootloader Mode’, prevents the Bootloader firmware from starting the main application, and as the Bootloader application is stored in a separate part of memory to the main firmware, it is unlikely it will have been corrupted.
To activate Bootloader mode…
- Turn off the power to the beacon,
- Hold the “reset magnet” (south pole) over the magnetic sensor at the base of the Beacon (see Beacon user manual for details).
- Power up the beacon keeping the magnet in place. The Beacon’s status LED should stay flashing red.
- After a couple of seconds the magnet can be removed, and the Beacon status LED should flash red at a slower rate to show Bootloader Mode has been activated.
Once activated, Bootloader mode only provides support for reprogramming the application firmware.
To leave Bootloader mode, remove the magnet and cycle the power to the beacon. The Status LED should flash Green to show the main application has started.
In Bootloader mode, the serial port data rate is fixed at 115200 baud and cannot be altered by the user.
If you have been experiencing problems connecting the programmer software to the beacon. Try reconnecting using the above setting once Bootloader mode is active and see if this resolves the issue.
Bootloader mode only activates a small subset of the Beacon’s hardware – enough to provide serial communications, and status indication. Consequently, only the Status and Programming serial command set is implemented, so developers and system integrators using higher-level functions will find these no longer work while the beacon is in Bootloader mode.
If you are having trouble activating Bootloader mode using the method described above, an alternative method is available that involves making hardware changes – contact the SeaTrac technical support team for further details on this procedure.
Product Support
Website
For the latest software and firmware updates, as well as production information, manuals and datasheets, visit www.blueprintsubsea.com
We welcome any feedback you may have about our product, from bug reports to ideas for new features or hardware to support – please use the contact details on the website (or shown below) to get in touch.
Technical Support
If your product is not operating properly, please consult the ‘Troubleshooting’ section of this manual and further information on the support section of the website to see if the problem can be easily remedied.
However, if you need further support, you can contact us via your distributor or directly at…
- Web www.blueprintsubsea.com (for access to on-line resources and technical support)
- Email support@blueprintsubsea.com
- Telephone +44 (0)1539 531536 (9:00am to 5:00pm, Monday to Friday, UK Time)
For all the above please provide the following information to help us with your technical support request…
- Part and Serial Numbers of the system components. These are located on the labels of each item, and are in the form “BPxxxxx.xxxxxx”.
- Version numbers of any software and firmware you are using.
- The operating system name, version, type (32 bit or 64 bit) and service pack upgrade your computer is using.
- Brand and model of your computer (processor type and memory configuration is also useful if known).
- Name of the distributor where the system was purchased from.
If you need to return your product for servicing or repair, please…
- Contact us (using the details above) for returns information and shipping details.
- Pack your sonar back in the original packaging (or another suitable container), and include written documentation including your contact details (including contact phone number), a description of the problem and any symptoms occurring.
- If your product is still under warranty, please include a copy of your receipt (showing proof and date of purchase).
- To protect our staff, please ensure the product has been suitably decontaminated and cleaned prior to return such that it is safe to handle.
- Please return the product back to Blueprint Subsea, using an insured courier and delivery confirmation.
Documents / Resources
 |
seatrac Tracking and Data Modems [pdf] User Manual Tracking and Data Modems, Tracking, Data Modems, Modems |


