finaltec FT-G Electronic U-Tube G-Meter Multi Function Acceleration Simple Display

“Electronic U-tube” Instruction Manual
Thank you for purchasing this simple multi-function acceleration display device “Electronic U-tube (G meter)”.This instruction manual explains precautions and handling procedures for using this product correctly and safely. Please read it carefully before using. This product is intended for automotive development and braking evaluation, so please follow the instructions of a person who is familiar with this product.
When storing, avoid high temperature, high humidity and direct sunlight. Doing so may cause deformation of the main unit or leakage of battery fluid .Never drop the main unit. The case and screen are damaged, and the built-in G sensor breaks down. In the unlikely event that something is wrong, stop using the product and contact us.
- For vehicle braking evaluation, “+” indicates deceleration, “-” indicates acceleration, and left-right acceleration indicates “-” when turning right to avoid confusion.
- Specifications and appearance are subject to change without notice for improvement.
Confirmation before use
Check that there are no missing items, appearance, or abnormalities in the set.
- Electronic U-tube (G meter) body x 1 unit
- Universal joint suction cup x 1
- Cigar plug power cord x 1
- Batteries, rechargeable batteries and chargers, input signal cables, etc. are not included. Please prepare them separately.
Assembling and preparing
Assembling and preparing to start
- Screw the threaded part of the universal joint sucker into the mounting hole (mount plate) on the back of the electronic U-tube (G meter), and tighten it securely.
- If the tightening is loose, it may cause the body to shake.
- Please note that if the universal joint suction cup is attached by itself, the balance will be poor and it will easily fall over.
- Insert 4 AA batteries. (See specs for battery type)
If you do not use batteries, use the included cigar plug cord and plug it into the DC-IN port.- When using AA batteries, do not insert them in the wrong direction.
- Insert the battery with the “battery removal ribbon” facing down.
- When using a cigar plug cord, if the cigar plug is loosened due to vibration while driving and the input voltage is cut off, the G meter will stop working. To prevent shutdown, insert AA batteries to automatically switch the power supply and continue to start.
Caution! Be sure to read and comply with “8. Startup”
Attachment procedure
- Turn the universal joint suction cup upward about 45 degrees and lightly tighten the thumb screw. Be careful not to put it upright as it will fall over! Clean the attachment points such as the windshield and the adsorption surface of the suction cup, adhere the adsorption surface to the glass, rotate the flap lever to lock it and check that it does not come off.
- Slightly loosen the universal joint thumbscrews while holding the main body, and firmly tighten the thumbscrews while holding the main body and supporting it at any position.
Caution!
- If you drop the main unit, the screen will be cracked or damaged, and the internal G sensor will be broken or damaged, so please do not drop it.
- If there is dirt, etc., the suction cup may come off and cause an accident or injury such as falling. Due to deterioration of the suction cup due to long-term use, the suction power will decrease, so please check it every time before driving. If the suction cup is damaged or deteriorated, replace the suction cup.
Do not attach to the following locations
- Do not install in a place exposed to hot air from a vehicle, as this may cause fire, deformation, or malfunction.
- Installation in locations subject to vibration or where the mounting surface is rough may come off during driving and cause an accident or injury. When driving on a road surface where vibration occurs, such as Belgian roads and uneven roads, it may come off during driving and cause an accident or injury.
- If installed in a damp or dusty place, it may come off while driving, causing an accident or injury. (Refer to “Program & Operation Manual”)
Startup
Startup and zero point adjustment
- When the “Power” switch is turned on, the program will begin to load. Wait for a while until the loading is completed and “Program 1” screen appears.
- Touch the “CAL” button to move to calibration.
- Set the selector switch position to the calibration position. Slightly loosen the universal joint lock screw, change angle of main body so that the needle is in the center while looking at meter, tighten the lock screw to fix it, and return to “program 1” with the “BACK” button.
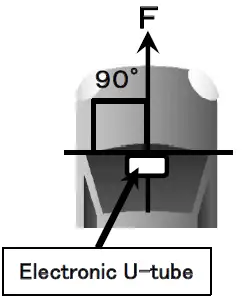
- Please make sure that the screen of the main unit is 90 degrees to the direction of travel of the vehicle.
- If you turn it to the driver’s side so that it is easy to see, the internal G sensor will not give the correct value.
Removal procedure
When removing, do not loosen the universal joint lock screw, turn the suction cup flap lever to release the suction, pinch the ears of the suction cup with your fingers and pull to remove the suction.
※ If you loosen the universal joint lock screw and then remove the suction cup, the universal joint will suddenly drop and you may get your fingers caught.
※ Please do not put your fingernails, metal, etc. into the part of suction cup will hurt and the main body may fall.
Operation
(Refer to “Program & Operation Manual” for details)
- When the G-meter finishes starting up, the “Program 1” screen appears. If you want to use a different program, you can touch the “HOME” button and switch to the program that matches your exam evaluation. Switch the selector switch to position number that matches the selected program.
- Each program has a ‘CAL’ button to calibrate each time.
- If the touch screen does not respond or is difficult to touch, such as when your fingertips are dry, use an electrostatic touch pen.
An electrostatic touch pen is not included, please use a commercially available product.
Caution!
- The 0 point position should be checked and adjusted each time a car is level. Please operate with the car stopped.
- Do not touch the screen with hard or sharp objects such as metal!
To store
Do not leave it in a hot place such as in the summer or in a constant temperature room, do not leave it in a car, and be sure to remove the battery after use.
Proofreading
When using or once every few months, please tilt the main body and check that the maximum value of each XYZ axis ± 1g is displayed as a numerical confirmation of the g level.
Please be sure to check if you have dropped it or if you feel a problem. If the numbers are significantly out of order, you will need to send them to us for proofreading. (paid)
Others
- Micro USB terminal on the back of the main unit is for rewriting the internal program. Do not connect unless necessary.
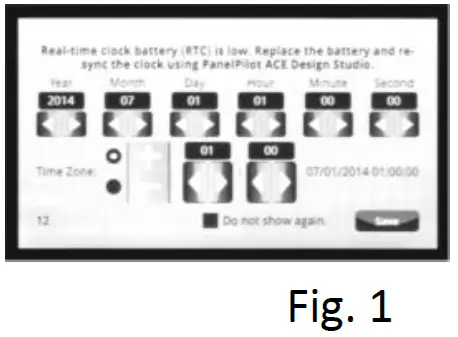
- If the screen in Fig. 1 appears at startup, the internal battery for keeping time is low.
- If you have not rewritten the program to use dates, etc.,you can use it without any problems, and after 30 seconds the normal screen will return, but you can use it immediately by touching “SAVE”. If it is displayed every time you start up and it is bothersome, please send it to us for battery replacement. (paid)
About boot
It is important!
- Under normal conditions, the screen flashes for a moment about 2 seconds after the power switch is turned on, and after 3 seconds the “NOW LOADING” screen appears.
- If the screen does not appear after a few seconds, the battery is exhausted or the mA capacity of the battery is too small to start. In this case, the battery may be overloaded and short-circuited, resulting in heat generation, so immediately turn off the power and replace the battery.
Safety notice
- WARNING: RISK OF DEATH, SERIOUS INJURY, INJURY, OR PROPERTY
- DAMAGE. In order to prevent personal injury and property damage, be sure to follow the instructions to avoid improper use.
- Wear protective equipment
Wear a helmet and gloves to protect yourself as there is a risk of falling if you use it under severe test evaluation. - Use specified power supply
Do not use Non-brand batteries as they may leak, rupture or malfunction. It is not compatible with 24V vehicles. Never use a DC power input of 16V or higher. - Use outside the product specifications
Any use other than acceleration or temperature measurement may cause an accident or injury.
Do not use a voltage or signal input that is outside the specifications, as it may cause malfunction, damage, or fire. - Used for driving on public roads
Do not use it as it may cause accidents, injuries or serious damage. - Screen operation while driving
Be sure to stop the car in a safe place and operate it as it may cause an accident or injury. - Installation in locations that interfere with driving or pose a danger to passengers
Avoid installing near the steering wheel or in a position that obstructs your vision, as it may cause accidents or injuries. - Installation in a position that interferes with airbag operation
In the unlikely event that the airbag is activated and the product is blown away, it may hit a person or cause a serious accident. - Disassembly or modification
Do not disassemble or modify the product as it may cause an accident, fire, electric shock or malfunction. - If you feel something is wrong
Doing so may cause an accident or injury. If you feel any abnormality, please contact us.
Specification |
|
| Name | “Electronic U-tube” G-Meter (Multi-function acceleration simple display) |
| Model number | FT-G |
| Weight | 505g(no battery) |
| Operating temperature | 0 to 40℃ |
| Size | 158×95×48(Does not include protrusions, handles, or universal joint suction cups) |
| Display | 4.3in TFT 262kColor 480x272px |
| Touch function | capacitive touch screen |
| Measuring range | -1.00g to +1.00g (minimum unit0.004) |
| Acceleration accuracy | ±2% F.S. |
| Temperature sensor input | Thermocouple miniature connector (female) 4ch |
| Temperature sensor type | K-type thermocouple |
| Temp measurement range | 0℃ to 1000℃ |
| Temperature accuracy | ±1.5% F.S. ※Note 1 |
| Input | Analog signal 4ch (5ch when switching switch is used) DC 0-5V |
| Input terminal | SMA-J |
| Power supply | AA battery (1.2 to 3.7V usable), DC port 5 to 16V (automatic switching) |
|
Continuous use time (*Operation time may be shorter due to measurement in a stationary state) |
Approximately 2 to 3 hours for four 1.5V alkaline batteries |
| 1.2V/1900mAh Ni-MH rechargeable battery: about 4 hours | |
| 1.2V/2500mAh Ni-MH rechargeable battery:about 5 hours | |
| AA type special rechargeable battery can be used (voltage 1.5 to 3.7V/1battery), maximum about 3.5 hours | |
| Accessories | Universal joint suction cup, cigar plug power cord 1.5m (fuse 3A) |
| Patent number | Applying |
Note1
Accuracy (Gain Error): ± 1.5% (Based on AD8495 precision thermocouple amplifier with cold junction compensation.)
The K-type thermocouple has a class that indicates the class according to the accuracy, and the temperature measurement accuracy varies depending on the class used, so the measured temperature is based on the error of the thermocouple and the error of the thermocouple amplifier.
Reference
- Class 1 (0.4 grade) -40°C to less than 375°C ±1.5°C
- Class 2 (0.75 grade) -40°C to less than 333°C ±2.5°C
- Class 3 (1.5 grade) -167°C to less than 40°C ±2.5°C
Others
- Please prepare a signal input cable (such as an SMA-BNC conversion cable) separately.
- If the suction cup deteriorates, please purchase “RAM MOUNT RAP-224-1U” separately.

- RAM Twist-Lock Suction Cup Base RAP-224-1U
- Suction Cup Diameter: 84mm(3.3inch)
- Body material: plastic/rubber
- Base Material: Aluminum/Rubber
- Maximum load: 1 kg or less
Rewriting the program
You can install rewriting software (English version) on your computer to create new programs that match the test evaluation, edit them, etc. Please note that if you rewrite the G-meter built-in program to another program, it will not be restored.
If you want to restore it to its original state, please send it to us, and we will rewrite the program at the time of shipment and restore it. (※Paid)
Warranty period
- During the warranty period for spontaneous failure under normal use, we will repair the product free of charge for one year after shipment.
- The shipping date is managed by the serial number.
- Repairs may be charged even during the warranty period depending on the content of the failure such as dropping.
- Repairs outside the warranty period will be charged.
Inquiry
If you have any questions or concerns regarding this product, please contact us at the contact information below. Finaltec Co., Ltd.
- 3-22-10, Toshincho, Toyota-shi, Aichi-ken 471-0045,Japan
- TEL: 0565-34-0228
- FAX: 0565-34-0319
- URL : https://www.finaltec.jp
Version 022.92
Frequently Asked Questions
- Q: What should I do if the main unit is dropped?
- A: Dropping the main unit can cause screen damage or G sensor breakdown. Please avoid dropping it to maintain product integrity.
- Q: How do I prevent the suction cup from coming off during driving?
- A: Ensure proper cleaning of attachment points, firm tightening of thumbscrews, and regular inspection of the suction cup for any signs of damage or deterioration.
Documents / Resources
 |
finaltec FT-G Electronic U-Tube G-Meter Multi Function Acceleration Simple Display [pdf] Instruction Manual FT-G, FT-G Electronic U-Tube G-Meter Multi Function Acceleration Simple Display, Electronic U-Tube G-Meter Multi Function Acceleration Simple Display, U-Tube G-Meter Multi Function Acceleration Simple Display, Multi Function Acceleration Simple Display, Acceleration Simple Display, Display |


