![]() C236T
C236T
Smart Plug-in
Thermostat Timer
User Manual (US/EU/UK/AU/FR/JP Plug Optional)
C236T Smart Plug in Thermostat Timer
![]()
Warm tips
- To quickly jump to a specific chapter page, click on the relevant text on the contents page.
- You can also use the thumbnail or document outline in the top left corner to quickly find a specific page.
 https://inkbird.com/pages/c236t-manual
Please keep this manual properly for reference. You can also scan the QR code to visit our official website for product usage videos. For any usage issues, please feel free to contact us at support@inkbird.com.
![]() Note: When the thermostat is shut off and then restored, it still work under the operating state according to previous setting value.
Note: When the thermostat is shut off and then restored, it still work under the operating state according to previous setting value.
Overview
INKBIRD C236T Smart Plug-in Thermostat Timer supports multiple operation modes—temperature control mode, timer control mode and timer with temperature control mode, and can be widely used for intelligent temperature control in heating, cultivation, seedling, wooden shed and home living, etc.
Technical Specifications
| Brand | INKBIRD | |
| Model Number | C236T | |
| Input | 100~240Vac 50/60Hz MAX 16A | |
| Output | 100~240Vac 50/60Hz MAX 16A | |
| Temperature Control Range | -40℉~212℉/-40℃~100℃ | |
| Temperature Display Accuracy | 0.1℉/℃ | |
| Timer Setting Range | 00:01~99:59 | |
| Operating Environmental Temperature | room temperature | |
| Storage Environment | Temperature | 32~140℉/0~60℃ |
| Humidity | 20~80%RH (non-condensing) | |
Product Diagram
- LCD with white backlight
- Buttons
( )
) - Output
(US/EU/UK/AU/FR/JP plug) - Probe
(Length: 2m, IP67 waterproof) - Input
(US/EU/UK/AU/FR/JP plug)


4.1 Operational Buttons Definitions
| BUTTONS | FUNCTIONS |
 |
Shortly press to choose from ON/OFF, temperature mode, timer mode and timer with temperature control mode. |
 |
(1) In temperature control mode, short press to set the START and STOP temperature; long press for 2 seconds to set the general parameters; (2) In modes P01 to P08, short press to start/restart the timer; press and hold for 2 seconds to set the temperature and timer; (3) Press and hold it then power on the AC source, the thermostat will restore factory settings. |
 |
(1) Increase parameter; press and hold for quick adjustment; (2) Press and hold it for 2 seconds to reset Wi-Fi, and the WIFI signal “ |
 |
Decrease parameter; press and hold for quick adjustment. |
 |
Press and hold both buttons for 3 seconds to turn on/off the child lock when the thermostat is working. |
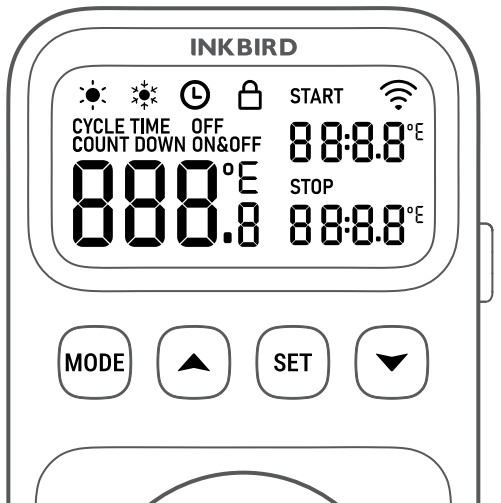
4.2 LCD Definitions
| CHARACTERS | FUNCTIONS |
 |
Heating /Cooling Temperature Control Mode: Set START temperature and STOP temperature; when the START temperature is higher than the STOP temperature, the plugged device runs in cooling mode, and when the START temperature is lower than the STOP temperature, it runs in heating mode. The thermostat will automatically switch between heating and cooling mode, and then control the plugged device to work as programmed.. |
 |
Cycle Time Mode: The plugged device works during the START time countdown, and stops working during the STOP time countdown. It will keep working in cycles. |
 |
Countdown ON Mode: Power on the plugged device at the end of the countdown. |
 |
Countdown OFF Mode: Power off the plugged device at the end of the countdown. |
 |
Countdown ON&OFF Mode: Power on the plugged device at the end of the START time countdown, and power off the plugged device permanently at the end of the STOP time countdown. |
 |
Cycle Time with Temperature Control Mode: Power on the plugged device during the START time countdown based on the temperature settings, and then power off during the STOP time countdown. It will keep working in cycles. |
 |
Countdown ON with Temperature Control Mode: Power on the plugged device based on the temperature settings at the end of the countdown. |
 |
Countdown OFF with Temperature Control Mode: Power off the plugged device based on the temperature settings at the end of the countdown. |
 |
Countdown ON&OFF with Temperature Control Mode: Power on the plugged device based on the temperature settings at the end of the START time countdown, and then power off the plugged device based on the temperature settings permanently at the end of the STOP time countdown. |
 |
|
 |
Temperature unit: C (Celsius) or F (Fahrenheit). |
 |
AH flashes when the buzzer sounds. Default: 100℃ Range: -40.0℃-100.0℃/-40.0℉-212.0℉ |
 |
AL flashes when the buzzer sounds. Default: -40℃ Range: -40.0℃-100.0℃/-40.0℉-212.0℉ |
 |
Refrigeration delay. Default: 00:00 Range: 00:00~00:10 |
 |
Temperature calibration. Default: 0.0 Range: -4.9℃~4.9℃/-8.8℉~8.8℉ |
 |
Backlight on/off. Default: OFF |
 |
Buzzer on/off. Default: ON |
Operation Instructions
5.1 APP Connection
 https://inkbird.com/pages/app-download
Search for the INKBIRD app on the App Store or Google Play, or you can scan the QR code below to download and install it. Thereafter, open the app, complete the registration and login, and then follow the app’s instructions to connect the device.
NOTES:
- Your iOS devices must be running iOS 12.0 or above to download the app smoothly.
- Your android devices must be running android 7.1 or above to download the app smoothly.
- The device supports a 2.4GHz Wi-Fi router only.
- APP Location Permission Requirement: We need to obtain your location information to discover and add nearby devices. INKBIRD promises to keep your location information strictly confidential. And your location information will only be used for the location function of the App and will not be collected, used, or disclosed to any third party. Your privacy is very important to us. We will abide by relevant laws and regulations and take reasonable security measures to protect your information security.
5.2 Registration
Step 1: Registering an account is necessary before using the INKBIRD app for the first time.
Step 2: Open the app, select your Country/Region, and a verification code will be sent to you.
Step 3: Enter the verification code to confirm your identity, and the registration is complete.
5.3 How to connect
Open the INKBIRD app and click “+” on the top right corner to add a device. Then follow the app instructions to complete the connection. Make sure that the device is placed as close as possible to the smartphone and router during the connection process.
Congratulations! You can use your smartphone to operate this device!
Cleaning and Maintenance
- This product is a strong electrical product, not waterproof, and not suitable for cleaning. If it is necessary to clean it, it must be disconnected from the power supply and can only be cleaned by wiping it with a dry cloth.
- When not in use, this product should be stored in a safe and dry place; damp environments will cause components to age more quickly due to moisture, reducing their life expectancy.
Important Notes/Warnings
- KEEP CHILDREN AWAY.
- USE INDOORS ONLY TO REDUCE THE RISK OF ELECTRIC SHOCK.
- DO NOT CONNECT TO OTHER RELOCATABLE POWER SOURCES OR EXTENSION CORDS.
- USE IN A DRY PLACE ONLY.
- DO NOT PLACE NEAR WATER TO REDUCE THE RISK OF ELECTRIC SHOCK.
- DO NOT EXPOSE TO HIGH TEMPERATURES.
- THE HOUSING OF THE TEMPERATURE PROBE IS MADE OF STAINLESS STEEL MATERIALS. WIPE IT CLEAN IF THERE ARE ANY STAINS ON IT (TAKING CARE TO DISCONNECT THE POWER SUPPLY) TO AVOID AFFECTING THE ACCURACY OR RESPONSE TIME OF THE PROBE.
- DO NOT CONNECT IT TO A PRODUCT THAT IS NOT RATED FOR ITS VOLTAGE, WHICH MAY CAUSE FIRE HAZARDS.
Troubleshooting Guide
| Issues | Possible Solutions |
| No output of heating or cooling | 1. Check that the power socket is live. 2. Perform a power test: Connect the device into the AC socket, briefly press the press twice to select OFF, which means the output is off. If you are still unable to resolve your issue by following the operational steps above, please contact our customer support team. |
| Incorrect probe readings | 1. Check that both the probe and probe cord are intact. 2. Wipe the probe and probe cord, dry the whole unit with a hairdryer and see if the probe reads temperatures correctly. |
FCC Requirement
Changes or modifications not expressly approved by the party responsible for compliance could void the user’s authority to operate the equipment. This device complies with Part 15 of the FCC Rules. Operation is subject to the following two conditions:
- this device may not cause harmful interference, and
- this device must accept any interference received, including interference that may cause undesired operation.
Note: This equipment has been tested and found to comply with the limits for a Class B digital device, pursuant to Part 15 of the FCC Rules. These limits are designed to provide reasonable protection against harmful interference in a residential installation. This equipment generates, uses, and can radiate radio frequency energy, and if not installed and used in accordance with the instructions, may cause harmful interference to radio communications. However, there is no guarantee that interference will not occur in a particular installation. If this equipment does cause harmful interference to radio or television reception, which can be determined by turning the equipment off and on, the user is encouraged to try to correct the interference by one or more of the following measures:
– Reorient or relocate the receiving antenna.
– Increase the separation between the equipment and receiver.
– Connect the equipment into an outlet on a circuit different from that to which the receiver is connected.
– Consult the dealer or an experienced radio/TV technician for help.
This equipment complies with FCC radiation exposure limits set forth for an uncontrolled environment. This equipment should be installed and operated with a minimum distance of 20cm between the radiator & your body. This transmitter must not be co-located or operating in conjunction with any other antenna or transmitter.
Customer Service
This item carries a 2-year warranty against defects in either components or workmanship. During this period, products that prove to be defective will, at the discretion of INKBIRD, be either repaired or replaced without charge. For any problems in use, please feel free to contact us at support@inkbird.com. We will do our best to help you.
Shenzhen Inkbird Technology Co.,Ltd.
support@inkbird.com
Consignor: Shenzhen Inkbird Technology Co., Ltd.
Office Address: Room 1803, Guowei Building, No.68 Guowei Road, Xianhu Community, Liantang, Luohu District, Shenzhen, China
Manufacturer: Shenzhen Inkbird Technology Co., Ltd.
Factory Address: 6th Floor, Building 713, Pengji Liantang Industrial Area, No.2 Pengxing Road, Luohu District, Shenzhen, China
 MADE IN CHINA
DESIGNED BY INKBIRD
Documents / Resources
 |
INKBIRD C236T Smart Plug in Thermostat Timer [pdf] User Manual C236T, C236T Smart Plug in Thermostat Timer, C236T, Smart Plug in Thermostat Timer, Plug in Thermostat Timer, Thermostat Timer, Timer |