Switch Device Compact Multi Communication Enabled Iot Device
Product Specifications:
- Product Name: EWS Switch Device
- Communication: Multi-communication enabled IoT Device
- Compatible with: Most environmental sensor types
- Input Types: 4-20mA, Modbus RS485, SDI12, Pulse, Relay Out
- Transmission Types: Iridium Satellite or 4G LTE
- Battery Type: Rechargeable or Non-rechargeable
Product Usage Instructions:
1. Identifying Your Device:
Your EWS Switch Device can be identified based on its
transmission type (Iridium Satellite or 4G LTE) and battery type
(rechargeable or non-rechargeable).
2. Wiring and Sensor Inputs:
The EWS Switch Device has two sensor input leads labeled S1 and
S2. S1 and S2 have different sensor protocol inputs. See the pinout
tables for details on the sensor leads.
3. Getting Started:
- Press the button once to wake up the device.
- Press the button twice to activate Bluetooth.
Waking Up the Device:
To wake up your device from Transportation Mode, press the
button once.
Activating Bluetooth:
To activate Bluetooth, press the button twice. The LED
indicators should blink Blue and Green, indicating readiness for
pairing with the EWS Lynx mobile configuration App.
Transportation Mode:
If you need to put the device back into Transportation Mode,
press and hold the button for 10 seconds. Once released, the LEDs
will blink fast red then stop, indicating successful entry into
Transportation Mode.
4. EWS Lynx Mobile App:
The EWS Lynx App is available on IOS and Android App stores. It
is used for configuring your device and checking sensor
connections. Ensure Bluetooth is active on both your mobile phone
and the device before opening the app for automatic connection.
FAQ:
Q: How do I know if my EWS Switch Device is rechargeable or
non-rechargeable?
A: Rechargeable devices are identified by their blue color and
flat lid profile, while non-rechargeable devices are green with a
slightly raised lid profile.
Q: What sensor inputs does the EWS Switch Device support?
A: The device supports inputs for 4-20mA, Modbus RS485, SDI12,
Pulse, and Relay Out.
EWS Quick-Start
Switch Device.
Your EWS Switch Device
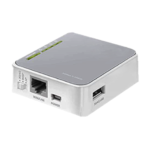
Your EWS Switch is a powerful yet compact multi-communication enabled IoT Device designed specifically for remote environmental monitoring applications. Your EWS Switch Device is compatible with most environmental sensor types and has inputs for 4-20mA, Modbus RS485, SDI12 and Pulse as well as a relay out.
Your Device will be either Iridium Satellite or 4G LTE transmission type and either rechargeable or non-rechargeable battery type depending on what you have ordered.
Iridium transmission type can be visually identified by the presence of a sticker indicating Iridium with the Device IMEI number on the side of the Switch opposite the push button. Switch Devices that are 4G LTE transmission type have a sticker indicating Cellular with the Device IMEI number on the side.
Switch Devices that are rechargeable battery type can be visually identified by the colour blue, and having a flat lid profile. Switch Devices that are non-rechargeable battery type can be identified by the colour green and having a slightly raised lid profile.
Rechargeable Switch Device
Non-rechargeable Switch Device
Iridium Satellite transmission type
4GLTE transmission type
Iridium Satellite transmission type
4GLTE transmission type
Wiring and Sensor inputs.
The EWS Switch Device has two sensor input leads labelled S1 and S2 and one power input lead (power input on rechargeable Device type only). S1 and S2 input leads differ in sensor protocol inputs and are split as indicated below in the pinout tables.
The two sensor leads S1 and S2 are terminated with standard female 5-Pin M12 connector plugs. The power input lead (on the rechargeable Device type) is terminated with a standard male end 3-Pin M8 connector plug.
Sensor 1 (S1)
Sensor 2 (S2)
PIN PIN 1 PIN 2 PIN 3 PIN 4 PIN 5
Function Modbus 485 A+ Modbus 485 BPower 12V+ GND 4-20mA/Pulse1
Sensor 1
3
4
5
Plug Diagram
2
1
PIN PIN 1 PIN 2 PIN 3 PIN 4 PIN 5
Function 4-20mA/Pulse1 SDI12 Power 12V+ GND Relay Out
Sensor 2
3
4
5
Plug Diagram
2
1
Getting started.
1
Press button once to wake up the Device
2
Press button twice to activate Bluetooth
Your EWS Switch Device comes delivered in Transportation Mode to conserve battery life until installation. To wake up your Device, simply press button once.
To activate Bluetooth, press twice your Device LED’s should be blinking Blue and Green indicating it is ready to be paired with EWS Lynx mobile configuration App.
If you wish to place the Device back into Transportation Mode, simply press and hold button for 10 seconds, once button is released, LED’s will blink fast red then stop, indicating Device has successfully re-entered Transportation Mode. The Device will cease all functions until taken out of this mode – this is used for transport or when Devices are in storage and not being used.
EWS Lynx Mobile App.
The EWS Lynx App is the freely available on both IOS and Android App stores. The App is an easy on-site tool for configuring your Device and checking for successful sensor connection. Ensure mobile phone Bluetooth is on and Device Bluetooth is active, open the App and your Device will connect automatically.
LED’s show solid blue when Lynx App is connected to Bluetooth
The EWS Lynx Mobile App is available to download from:
Basic Configuration and Sensor Check.
! It is important to note that EWS Switch Devices generally come pre-configured out of the box for plug and play pairing with sensors as requested on purchase – so minimal programming should be required. Check with EWS or EWS distribution partner first before altering programming.
App will indicate when device is connected
When connected to the EWS Lynx App the icon should show solid blue. You are now ready to configure Device and check sensors.
Device tab is where you can find all general Device information such as hardware version, firmware version, IMEI number, Devices internal battery voltage as well as custom station ID field and site notes. This is also where device reboot and enter shipping mode buttons are found.
Sensor Check and Measurement Interval.
To check sensors are connected and reading correctly:
1
Navigate to Sensors tab.
2
Press Read All Channels button. Device will cycle through all configured channels.
3
Check readings are as expected.
To change channel configuration or measurement interval navigate into each channel and change as required.
! Troubleshooting.
If readings show Error Troubleshoot first by checking sensor wiring, referring to the pinout information at the beginning of this guide. If incorrect wiring is ruled out as the cause of error readings, further configuration and programming checks will need to be carried out to ensure device has been setup correctly for the sensor being used.
Powering your EWS Switch Device.
If you have received your EWS Switch Device with no batteries included, you can source the Device specific batteries at your local battery specialist store. Simply remove the Device lid and insert batteries ensuring they go in at the correct orientation.
EWS Switch Rechargeable Type
EWS Switch Non-Rechargeable Type
Specified Battery (or equivalent)
· 2 x Samsung INR18650-30Q Li-ion Lithium 3000mAh 3.7V HIGH DRAIN 15Ah Discharge Rate Rechargeable Battery – (Flat Top)
Specified Battery (or equivalent)
· 1 x Fanso ER34615M D size 3.6V 14000Ah Lithium Thionyl Chloride Battery Spiral Wound Type
! Warning.
Incorrectly orientated batteries can permanently damage the Device.
Contact us
EWS Monitoring.
Australia: Perth I Sydney Americas Sales enquires: sales@ewsaustralia.com Support enquires: support@ewsaustralia.com Other: info@ewsaustralia.com
www.ewsmonitoring.com
Documents / Resources
 |
ews Switch Device Compact Multi Communication Enabled Iot Device [pdf] User Guide Switch Device Compact Multi Communication Enabled Iot Device, Compact Multi Communication Enabled Iot Device, Multi Communication Enabled Iot Device, Enabled Iot Device, Iot Device |