AOC CU34G2XP LCD Monitor
User Manual

Safety
National Conventions
The following subsections describe national conventions used in this document.
The following subsections describe national conventions used in this document.
Notes, Cautions, and Warnings
Throughout this guide, blocks of text may be accompanied by an icon and printed in bold type or in italic type. These blocks are notes, cautions, and warnings, and they are used as follows:
Throughout this guide, blocks of text may be accompanied by an icon and printed in bold type or in italic type. These blocks are notes, cautions, and warnings, and they are used as follows:
NOTE: A NOTE indicates important information that helps you make better use of your computer system.
CAUTION: A CAUTION indicates either potential damage to hardware or loss of data and tells you how to avoid the problem.
WARNING: A WARNING indicates the potential for bodily harm and tells you how to avoid the problem. Some warnings may appear in alternate formats and may be unaccompanied by an icon. In such cases, the specific presentation of the warning is mandated by regulatory authority.
Power
This plug will fit only into a grounded power outlet as a safety feature. If your outlet does not accommodate the three-wire plug, have an electrician install the correct outlet, or use an adapter to ground the appliance safely. Do not defeat the safety purpose of the grounded plug.
protect the monitor from damage due to power surges.
Installation
injure a person and cause serious damage to this product. Use only a cart, stand, tripod, bracket, or table
recommended by the manufacturer or sold with this product. Follow the manufacturer’s instructions when
installing the product and use mounting accessories recommended by the manufacturer. A product and
cart combination should be moved with care.
or electric shock. Never spill liquids on the monitor.
hence overheating may cause a fire or damage to the monitor.
See below the recommended ventilation areas around the monitor when the monitor is installed on the wall
or on the stand:
or on the stand:
Installed with stand

Cleaning

Other
and contact a Service Center.
Setup
Contents in Box

*Not all signal cables (HDMI/DP cables) will be provided for all countries and regions. Please check with the local dealer or AOC branch office for confirmation.
Stand & Base Setup
Please setup or remove the base following the steps as below.
Please place the monitor on a soft and flat surface to prevent the scratch.
Please place the monitor on a soft and flat surface to prevent the scratch.
Setup:

Remove:

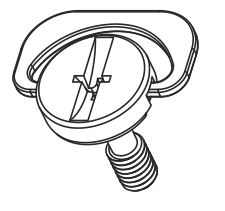
Specification for base screw: M6*13 mm (effective thread 5.5 mm)
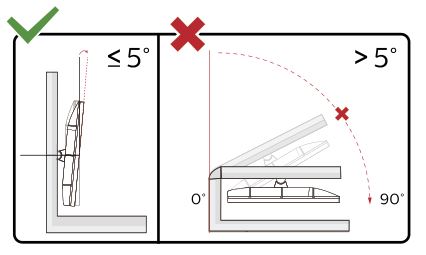
Adjusting Viewing Angle
To achieve the best viewing experience, it is recommended that the user can make sure they are able to look at their whole face on the screen, then adjust the monitor’s angle based on personal preference.
Hold the stand so you will not topple the monitor when you change the monitor’s angle.
You are able to adjust the monitor as below:
Hold the stand so you will not topple the monitor when you change the monitor’s angle.
You are able to adjust the monitor as below:

Do not touch the LCD screen when you change the angle. Touching the LCD screen may cause damage.
WARNING:
- To avoid potential screen damage, such as panel peeling, ensure that the monitor does not tilt downward by more than -5 degrees.
- Do not press the screen while adjusting the angle of the monitor. Grasp only the bezel.
Connecting the Monitor
Cable Connections In Back of Monitor:

- USB 3.2 Gen 1×2
- USB3.2 Gen1+Quick Chargingx1
- USB 3.2 Gen 1×1
- USB-PC upstream
- HDMIx2
- DisplayPortx2
- Earphone out
- Power
Connect to PC
- Connect the power cord to the back of the display firmly.
- Turn off your computer and unplug its power cable.
- Connect the display signal cable to the video connector on the back of your computer.
- Plug the power cord of your computer and your display into a nearby outlet.
- Turn on your computer and display.
If your monitor displays an image, installation is complete. If it does not display an image,please refer to
Troubleshoot.
To protect equipment, always turn off the PC and LCD monitor before connecting.
Wall Mounting
Preparing to Install An Optional Wall Mounting Arm.

This monitor can be attached to a wall mounting arm you purchase separately. Disconnect power before this procedure. Follow these steps:
- Remove the base.
- Follow the manufacturer’s instructions to assemble the wall mounting arm.
- Place the wall mounting arm onto the back of the monitor. Line up the holes of the arm with the holes in the back of the monitor.
- Insert the 4 screws into the holes and tighten.
- Reconnect the cables. Refer to the user’s manual that came with the optional wall mounting arm for instructions on attaching it to the wall.

Specification of wall hanger screws:M4*(10+X)mm, ( X=Thickness of Wall mount bracket )

* Display design may differ from those illustrated.
WARNING:
- To avoid potential screen damage, such as panel peeling, ensure that the monitor does not tilt downward by more than -5 degrees.
- Do not press the screen while adjusting the angle of the monitor. Grasp only the bezel.
AMD FreeSync Premium function
- AMD FreeSync Premium function is works with DP/HDMI
- Compatible Graphics Card: Recommend list is as the below, also could be checked by visiting www.AMD.com
Graphics Cards
- Radeon™ RX Vega series
- Radeon™ RX 500 series
- Radeon™ RX 400 series
- Radeon™ R9/R7 300 series (R9 370/X, R7 370/X, R7 265 except)
- Radeon™ Pro Duo (2016)
- Radeon™ R9 Nano series
- Radeon™ R9 Fury series
- Radeon™ R9/R7 200 series (R9 270/X, R9 280/X except
Processors
- AMD Ryzen™ 7 2700U
- AMD Ryzen™ 5 2500U
- AMD Ryzen™ 5 2400G
- AMD Ryzen™ 3 2300U
- AMD Ryzen™ 3 2200G
- AMD PRO A12-9800
- AMD PRO A12-9800E
- AMD PRO A10-9700
- AMD PRO A10-9700E
- AMD PRO A8-9600
- AMD PRO A6-9500
- AMD PRO A6-9500E
- AMD PRO A12-8870
- AMD PRO A12-8870E
- AMD PRO A10-8770
- AMD PRO A10-8770E
- AMD PRO A10-8750B
- AMD PRO A8-8650B
- AMD PRO A6-8570
- AMD PRO A6-8570E
- AMD PRO A4-8350B
- AMD A10-7890K
- AMD A10-7870K
- AMD A10-7850K
- AMD A10-7800
- AMD A10-7700K
- AMD A8-7670K
- AMD A8-7650K
- AMD A8-7600
- AMD A6-7400K
Adjusting
Hotkeys

Source/Exit
When the OSD is closed, press Source/Exit button will be Source hot key function.
When the OSD is closed, press Source/Exit button will be Source hot key function.
Game Mode/<
When there is no OSD, press ”<” key to open game mode function, then press ”<” or “>” key to select game
mode (FPS, RTS, Racing, Gamer 1, Gamer 2 or Gamer 3) basing on the different game types.
When there is no OSD, press ”<” key to open game mode function, then press ”<” or “>” key to select game
mode (FPS, RTS, Racing, Gamer 1, Gamer 2 or Gamer 3) basing on the different game types.
Dial Point/>
When there is no OSD, press Dial Point button to active Dial Point menu, and then press “<” or “>” to set Dial
Point on or off.
When there is no OSD, press Dial Point button to active Dial Point menu, and then press “<” or “>” to set Dial
Point on or off.
Menu/Enter
Press to display the OSD or confirm the selection.
Press to display the OSD or confirm the selection.
Power
Turn on/off the monitor.
Turn on/off the monitor.
OSD Setting
Basic and simple instruction on the control keys.

Notes:
- If the product has only one signal input, the item of “Input Select” is unable to be adjusted the adjust option is disabled.
- If the product screen size is 4:3 or input signal resolution is native resolution, the item of “Image Ratio” is disabled.
- One of DCR, Color Boost and Picture Boost functions is activated, the other two function s are turned off accordingly.
Luminance

Note:
The function MBR and Overdrive Boost are available only when AMD FreeSync Premium is off and the vertical frequency is up to 75 Hz.
The function MBR and Overdrive Boost are available only when AMD FreeSync Premium is off and the vertical frequency is up to 75 Hz.
Color Setup

Picture Boost

Note:
Adjust the brightness, contrast, and position of the Bright Frame for better viewing experience
Adjust the brightness, contrast, and position of the Bright Frame for better viewing experience
OSD Setup

Notes:
If the DP video content supports DP1.2, please select DP1.2 for DP Capability; otherwise, please select DP1.1.
If the DP video content supports DP1.2, please select DP1.2 for DP Capability; otherwise, please select DP1.1.
PIP Setting

Game Setting

Extra

Exit

LED Indicator

Troubleshoot

Specification
General Specification

Preset Display Modes

Pin Assignments

20-Pin Color Display Signal Cable

Plug and Play
Plug & Play DDC2B Feature
This monitor is equipped with VESA DDC2B capabilities according to the VESA DDC STANDARD. It allows
the monitor to inform the host system of its identity and, depending on the level of DDC used, communicate additional information about its display capabilities.
the monitor to inform the host system of its identity and, depending on the level of DDC used, communicate additional information about its display capabilities.
The DDC2B is a bi-directional data channel based on the I2C protocol. The host can request EDID information over the DDC2B channel.
Documents / Resources
 |
AOC CU34G2XP LCD Monitor [pdf] User Manual CU34G2XP LCD Monitor, CU34G2XP, LCD Monitor, Monitor |