![]()
 INSTRUCTION MANUAL
3.1.2 Channel Soundbar with Wireless Subwoofer
TH-E754B
INTRODUCTION
- Thank you for buying our product.
• Please read through these operating instructions, so you will know how to operate your equipment properly. After you finished reading the instructions manual, put it away in a safe place for future reference.
IMPORTANT SAFETY INSTRUCTIONS
![]() CAUTION: TO REDUCE THE RISK OF ELECTRIC SHOCK, DO NOT REMOVE COVER (OR BACK). NO USER-SERVICEABLE PARTS INSIDE. REFER SERVICING TO QUALIFIED SERVICE PERSONNEL
CAUTION: TO REDUCE THE RISK OF ELECTRIC SHOCK, DO NOT REMOVE COVER (OR BACK). NO USER-SERVICEABLE PARTS INSIDE. REFER SERVICING TO QUALIFIED SERVICE PERSONNEL
![]() The lightning flash with arrowhead symbol, within an equilateral triangle, is intended to alert the user to the presence of uninsulated “dangerous voltage” within the product’s enclosure that may be of sufficient magnitude as to constitute a risk of electric shock to persons.
The lightning flash with arrowhead symbol, within an equilateral triangle, is intended to alert the user to the presence of uninsulated “dangerous voltage” within the product’s enclosure that may be of sufficient magnitude as to constitute a risk of electric shock to persons.
![]() The exclamation point within an equilateral triangle is intended to aler t the user to the presence of important operating and maintenance (servicing) instructions in the literature accompanying the appliance.
The exclamation point within an equilateral triangle is intended to aler t the user to the presence of important operating and maintenance (servicing) instructions in the literature accompanying the appliance.
Safety
- Read these instructions – All the safety and operating instructions should be read before this product is operated.
- Keep these instructions – The safety and operating instructions should be retained for future reference.
- Heed all warnings – All warnings on the appliance and in the operating instructions should be adhered to.
- Follow all instructions – All operating and usage instructions should be followed.
- Do not use this apparatus near water – The appliance should not be used near water or moisture – for example, in a wet basement or near a swimming pool and the like.
- Clean only with a dry cloth.
- Do not block any ventilation openings. Install in accordance with the manufacturer’s instructions.
- Do not install near any heat sources such as radiators, heaters, stoves, or other apparatus (including amplifiers) that produce heat.
- Do not defeat the safety purpose of the polarized or grounding plug. A polarized plug has two blades with one wider than the other. A grounding plug has two blades and a third grounding prong. The wide blade orthe third prong is provided for your safety. If the provided plug does not fit into your outlet, consult an electrician for replacement of the obsolete outlet.
- Protect the power cord from being walked on or pinched particularly at plugs, convenience receptacles, and the point where they exit from the apparatus.
- Only use attachments/accessories specified by the manufacturer.
 Use only with the cart, stand, tripod, bracket or table specified by the manufacturer, or sold with the apparatus. When a cart or rack is used, use caution when moving the cart/apparatus combination to avoid injury from tip-over.
 - Unplug the apparatus during lightning storms or when unused for long periods of time.
- Refer all servicing to qualified personnel. Servicing is required when the apparatus has been damaged in any way, such as power supply cord or plug is damaged, liquid has been spilled or objects have fallen into the apparatus, the unit has been exposed to rain or moisture, does not operate normally, or has been dropped.
 This equipment is a Class II or double insulated electrical appliance. It has been designed in such a way that it does not require a safety connection to electrical earth.
- The apparatus shall not be exposed to dripping or splashing. No objects filled with liquids, such as vases, shall be placed on the apparatus.
- Minimum distance around the apparatus for sufficient ventilation is 5cm.
- The ventilation should not be impeded by covering the ventilation openings with items, such as newspapers,table-cloths, curtains, etc.
- No naked flame sources, such as lighted candles, should be placed on the apparatus.
- Batteries should be recycled or disposed of as per state and local guidelines.
- The use of apparatus in moderate climates.
Caution
- Use of controls or adjustments or performance of procedures other than those described herein, may result in hazardous radiation exposure or other unsafe operation.
- To reduce the risk of fire or electric shock, do not expose this apparatus to rain or moisture. The apparatus must not be exposed to dripping or splashing and objects filled with liquids, such as vases, must not be placed on apparatus.
- The mains plug/appliance coupler is used as the disconnect device, the disconnect device must remain readily operable.
- Danger of explosion if battery is incorrectly replaced. Replace only with the same or equivalent type.
Warning
- The battery (batteries or battery pack) shall not be exposed to excessive heat such as sunshine, fire or the like.
- Before operating this system, check the voltage of this system to see if it is identical to the voltage of your local power supply.
- Do not place this unit close to strong magnetic fields.
- Do not place this unit on the amplifier or receiver.
- If any solid object or liquid falls into the system, unplug the system and have it checked by qualified personnel before operating it any further.
- Do not attempt to clean the unit with chemical solvents as this may damage the finish. Use a clean, dry or slightly damp cloth.
- When removing the power plug from the wall outlet, always pull directly on the plug, never yank on the cord.
- Changes or modifications to this unit not expressly approved by the party responsible for compliance will void the user’s authority to operate the equipment.
- The rating label is pasted on the bottom or back of the equipment.
Battery usage CAUTION
To prevent battery leakage which may result in bodily injury, property damage, or damage to the apparatus:
– Install all batteries correctly, ![]() and
and ![]() as marked on the apparatus.
as marked on the apparatus.
– Do not mix old and new batteries.
– Do not mix alkaline, standard (Carbon-Zinc) or rechargeable (Ni-Cd, Ni- MH, etc.) batteries.
– Remove batteries when the unit is not used for a long time.
WHAT’S IN THE BOX
 NOTE: Images, illustrations and drawings shown on this User Manual are for reference only, actual product may vary in appearance. Power cord quantity and plug type vary by regions.
IDENTIFYING THE PARTS
SOUNDBAR
-
 (ON/OFF) button
Switch the Soundbar between ON and Standby mode.  (SOURCE) button
Select the play function. (VOLUME) buttons
Increase/decrease the volume level.- Remote Control
Sensor Receive signal from the remote control. - Display Window
Show the current status. - USB Socket
Insert the USB device to play music. - AUX Socket
Connect to an external audio device. - OPTICAL Socket
Use to connect to the OPTICAL OUT socket on an external device. - COAXIAL Socket
Use to connect to the COAXIAL OUT socket on an external device. - HDMI OUT (TV eARC/ARC) Socket
The port for connecting a TV. The port supports the eARC/ARC HDMI feature, which allows the soundbar to play audio that originates on the connected TV. - HDMI IN (1/2) Sockets
Two HDMI ports for connecting HDMI source devices, such as a DVD player, Blu-ray Disc™ player, or gaming console. Note that only one HDMI input is usable at a time. - AC~ Socket
Use to connect to power cable.
WIRELESS SUBWOOFER

- AC~ Socket
Connect to power supply. - PAIR button
Press activate the pairing function between the Soundbar and the subwoofer. - PAIR Indicator
Light stops blinking once the subwoofer is paired with the soundbar.
REMOTE CONTROL

| Switch the Soundbar between ON and STANDBY mode. | |
| Select the Bluetooth mode. | |
| AUX | Select the AUX mode. |
| USB | Select the USB mode. |
| HDMI eARC | Select the HDMI ARC mode. |
| OPT / COA | Select the OPTCIAL or COAXIAL mode. |
| HDMI 1/2 | Select the HDMI 1 or HDMI 2 mode. |
| Skip to previous/next track. | |
| Play/pause/resume playback. | |
| TREBLE |
Adjust treble level. |
| BASS |
Adjust bass level. |
| Increase/decrease the volume level. | |
| Mute or resume the sound. | |
| EQ | Select Equalizer (EQ) Effect. |
| DIMMER | Adjust display brightness. |
| AV SYNC |
Set the Audio Delay. |
| VERTICAL SURROUND | Adjust the surround ON/OFF. |
NOTE: Press and hold ![]() to activate the pairing function in Bluetooth mode or disconnect the existing paired Bluetooth device.
to activate the pairing function in Bluetooth mode or disconnect the existing paired Bluetooth device.
Prepare the Remote Control
The provided remote control allows the Soundbar to be operated from a distance.
- Even if the remote control is operated within the effective range 6m (19,7 feet), remote control operation may be impossible if there are any obstacles between the Soundbar and the remote control.
- If the remote control is operated near other products which generate infrared rays, or if other remote control devices using infrared rays are used near the Soundbar, it may operate incorrectly. Conversely, the other products may operate incorrectly.
Replace the Remote Control Battery
- Press and slide the back cover to open the battery compartment of the remote control.
- Insert two AAA size batteries (included). Make sure the
 and
and  ends of the batteries match the and ends indicated in the battery compartment.
 - Close the battery compartment cover.
Precautions Concerning Batteries
- Be sure to insert the batteries with correct positive and negative polarities.
- Use batteries of the same type. Never use different types of batteries together.
- Either rechargeable or non-rechargeable batteries can be used. Refer to the precautions on their labels.
- Be aware of your fingernails when removing the battery cover and the battery.
- Do not drop the remote control.
- Do not allow anything to impact the remote control.
- Do not spill water or any liquid on the remote control.
- Do not place the remote control on a wet object.
- Do not place the remote control under direct sunlight or near sources of excessive heat.
- Remove the battery from the remote control when not in use for a long period of time, as corrosion or battery leakage may occur and result in physical injury, and/or property damage, and/or fire.
- Do not use any batteries other than those specified.
- Do not mix new batteries with old ones.
- Never recharge a battery unless it is confirmed to be a rechargeable type.
PLACEMENT AND MOUNTING
Placement
Option A
If your TV is placed on a table, you can place the Soundbar on the table directly in front of the TV stand, centered with the TV screen.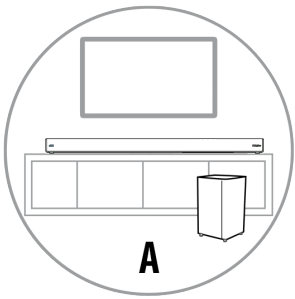 Option B
If your TV is attached to a wall, you can mount the Soundbar on the wall directly below the TV screen. Wall Mounting (if using Option B)
- Installation must be carried out by qualified personnel only. Incorrect assembly can result in severe personal injury and property damage (if you intend to install this product yourself, you must check for installations such as electrical wiring and plumbing that may be buried inside the wall). It is the installer’s responsibility to verify that the wall will safely support the total load of the Soundbar and wall brackets.
- Additional tools (not included) are required for the installation.
- Do not overtighten screws.
- Keep this instruction manual for future reference.
- Use an electronic stud finder to check the wall type before drilling and mounting.
WARNING
- To prevent injury, this apparatus must be securely attached to the floor/wall in accordance with the installation instructions.
- Suggested wall mounting height: ≤ 1,5 meters.
- Drill 2 parallel holes (Ø 5 – 8 mm eachaccording to wall type) in the wall. The distance between the holes should be 962 mm.
- Firmly fix 1 dowel into each hole in the wall if necessary. Leave a 3 mm gap between the wall and the screw’s head.
- Remove the screws at the back of the soundbar. Install the wall mounting brackets into the back of the soundbar make sure the small notch for the mounting hole is facing up.
- Lift the soundbar over the heads of the screws and slot into place.

GENERAL OPERATION
CONNECT POWER
Risk of product damage! Ensure that the power supply voltage corresponds to the voltage printed on the back or the underside of the Soundbar.
Before connecting the AC power cord, ensure you have completed all other connections. Soundbar
Connect the mains cable to the AC~ socket of the Soundbar and then into a mains socket.
Subwoofer
Connect the mains cable to the AC~ socket of the Subwoofer and then into a mains socket.
NOTE: If there is no power, ensure the power cord and plug are fully inserted and the power is turned on.
PAIR UP WITH THE SUBWOOFER
Automatic pairing
The subwoofer and soundbar will automatically pair when both units are plugged into the mains sockets and turned on. No cable is needed for connecting the two units.
Determine the status based on the wireless Subwoofer indicator:
- Fast blink > Subwoofer in pairing mode
- Constant on > Connected / Pairing successful
- Slow blink > Connection / Pairing Failed
NOTE: Do not press the PAIR button on the rear of the subwoofer, except for manual pairing. If the automatic pairing fails, pair the subwoofer with the Soundbar manually.
Manual pairing
- Ensure that all the cables are well connected and the Soundbar is in Standby mode.
- Press and hold the PAIR button on the rear of the subwoofer for a few seconds. The subwoofer will enter the pairing mode and the Pair Indicator will blink quickly.
- Press the button on the Soundbar or on the remote control to switch the Soundbar on. Press and hold the
 (MUTE) button on the remote control to enter the pairing mode.
 - After the wireless connection succeeded, the Pair Indicator will light up.
- If the Pair indicator blinks, the wireless connection has failed. Unplug the cable of the subwoofer and then reconnect the main cable after 4 minutes. Repeat step 1 ~ 4.
NOTE: If the wireless connection fails again, check if there is conflict or strong interference (for example, interference from an electronic device) around your location. Remove these conflicts or strong interferences and repeat the above procedures. The subwoofer should be within 6 m (19,7 feet) of the soundbar in an open area.
If the Soundbar is not connected with the subwoofer and it is in On mode, the POWER Indicator will flash. Follow step 1 ~ 4 above to pair the subwoofer to the Soundbar.
STANDBY/ON
When you first connect the Soundbar to the mains socket, the Soundbar will be in Standby mode.
- Press the button on the Soundbar or on the remote control to switch the Soundbar ON.
- Press the button again to switch the Soundbar back to STANDBY mode.
- Disconnect the mains plug from the mains socket if you want to switch the Soundbar OFF completely.
Automatic Power Off Function
The Soundbar automatically turns to Standby mode after about 15 minutes if the TV or the external unit is disconnected, switched off or the volume is too close to mute.
- Please turn the Soundbar off completely to save energy when not in use.
SELECT MODES
Press the / (SOURCE) button on the Soundbar or the AUX, , OPT/COA, HDMI 1/2, HDMI eARC and USB buttons on the remote control to select the desired mode. The selected mode will show on the display.
ADJUST THE BASS/TREBLE LEVEL
Press the BASS +/- buttons on the remote control to adjust bass level.
Press the TREBLE +/- buttons on the remote control to adjust treble level.
TURN THE SURROUND SOUND ON/OFF
Press the VERTICAL/SURROUND button on the remote control to turn on the surround sound. Press this button again to turn off the surround sound.
SELECT EQUALIZER (EQ) EFFECT
Press the EQ button repeatedly on the remote control to select your desired preset equalizer effects (VOICE / SPORT / MOVIE / MUSIC).
ADJUST THE VOLUME
Press the +/- (VOLUME) buttons on the Soundbar or on the remote control to adjust the volume.
If you wish to turn the sound off, press the![]() (MUTE) button on the remote control. Press the
(MUTE) button on the remote control. Press the ![]() (MUTE) button again or press the +/- (VOLUME) buttons on the Soundbar or on the remote controlto resume normal listening.
(MUTE) button again or press the +/- (VOLUME) buttons on the Soundbar or on the remote controlto resume normal listening.
ADJUST THE BRIGHTNESS
Press the DIMMER button repeatedly on the remote control to select brightness level.
AV SYNC (SET THE AUDIO DELAY)
Video image processing, is sometimes longer than the time required to process the audio signal.
This is called “delayed.” The AV SYNC feature is designed to remedy this delay. Press the AV SYNC+/- buttons on the remote control to adjust the delay time.
NOTE: The audio delay setting is only possible for digital audio (HDMI / OPTICAL / COAXIAL). In AUX / BT / USB ode, the AV SYNC feature is not supported.
CONNECTIONS
HDMI CONNECTION
Some 4K HDR TVs require the HDMI input or picture settings to be set for HDR content reception.
For further setup details on HDR display, please refer to the instruction manual of your TV.
eARC / ARC (Enhance Audio Return Channel)
The eARC / ARC (Enhance Audio Return Channel) function allows you to send audio from your ARC-compliant TV to your soundbar through a single HDMI connection. To enjoy the ARC function, please ensure your TV is both HDMI-CEC and ARC compliant and set up accordingly. When correctly set up, you can use your TV remote control to adjust the volume output (VOLUME +/- and MUTE) of the soundbar.
 Connect the HDMI cable from unit‘s HDMI OUT (TV eARC/ARC) socket to the HDMI (ARC) socket on your ARC compliant TV.
NOTE: Your TV must support the HDMI-CEC and ARC function. HDMI-CEC and ARC must be set to On.
The setting method of HDMI-CEC and ARC may differ depending on the TV. For details about ARC function, please refer to the owner’s manual. ARC only works with devices that are HDMI ARC capable as well as with an HDMI 1.4 cable (and higher).
Standard HDMI
If your TV is not HDMI ARC-compliant, connect your soundbar to the TV through a standard HDMI connection. Use an HDMI cable to connect the soundbar‘s HDMI OUT (TV eARC/ARC) socket to the TV’s HDMI IN socket.
Use an HDMI cable to connect the soundbar‘s HDMI IN (1 or 2) socket to your external devices (e.g. games consoles, DVD players and Blu-ray).
USE THE OPTICAL SOCKET Connect an OPTICAL cable to the TV’s OPTICAL OUT socket and the OPTICAL socket on the Soundbar.
USE THE COAXIAL SOCKET You also can use the COAXIAL cable to connect the TV‘s COAXIAL OUT socket and COAXIAL socket on the Soundbar.
USE THE AUX SOCKET Use a 3,5mm to 3,5mm audio cable to connect the TV’s or external audio device headphone socket to the AUX socket on the Soundbar.
Use a RCA to 3,5mm audio cable to connect the TV’s audio output sockets to the AUX socket on the Soundbar.
AUX /OPTICAL /COAXIAL/HDMI OPERATION
- Ensure that the Soundbar is connected to the TV or audio device.
- Press the (SOURCE) button repeatedly on the Soundbar or press the AUX, OPT/COA,HDMI 1/2, HDMI eARC buttons on the remote control to select the desired mode. The selected mode will show on the display.
- Press the +/- (VOLUME) button to adjust the volume to your desired level.
NOTE: The Soundbar may not be able to decode all digital audio formats from the input source. In this case, the Soundbar will mute. This is NOT a defect. Ensure that the audio setting of the input source (e.g. TV, game console, DVD player, etc.) is set to PCM or Dolby Digital (Refer to the user manual of the input source device for its audio setting details) with HDMI 1 / HDMI 2 / HDMI ARC / OPTICAL / COAXIAL input. When selecting a different audio format, the Soundbar will display the following as follows:
Dolby Digital, Dolby TrueHD, Dolby Digital Plus – ![]()
Dolby Atmos – Dolby TrueHD, Dolby Atmos – Dolby Digital Plus – ![]()
BLUETOOTH® OPERATION
Pairing the Soundbar with a Bluetooth® device to listen to music.
First time pairing
- Press the (SOURCE) button repeatedly on the Soundbar or press the button on the remote control to select Bluetooth® mode. The display will show
 .
. - Activate your Bluetooth® device and select the search mode.
- Select “TH-E754B” in the pairing list. After the audio prompt, the system is successfully connected, the display will show
 .
.
Pairing a new device
- If you want to connect your soundbar with another Bluetooth device, press and hold the
 button on the remote control to disconnect the currently connected Bluetooth device.
 - Follow step 2-3 in “First time pairing“ above to pair a new Bluetooth® device.
Listen to Music from Bluetooth® device
If your Bluetooth® device supports A2DP, play music via your device.
If your Bluetooth® device supports AVRCP, use the supplied remote control to control play.
- To increase/decrease the volume, press (VOLUME) button.
- To pause/resume playback, press button.
- To skip to a track, press
 button.
To disconnect the Bluetooth® function,you can:
- Switch to another source on the Soundbar;
- Disable the function from your Bluetooth® device.
NOTE: The operational range between the Soundbar and the device is approximately 8 metres. Before connecting a Bluetooth® device to the Soundbar, ensure you know the device’s capabilities. Compatibility with all Bluetooth® devices is not guaranteed. Any obstacle between the device and the Soundbar can reduce operational range.
Keep this player away from other electronic devices that may cause interference. The player will also be disconnected when your device is moved beyond the operational range.
USB OPERATION
By connecting a USB mass storage device (e.g. USB flash drive) to this unit, you can enjoy the device’s stored music through the Soundbar.
- Press the (SOURCE) button on the Soundbar or press the USB button on the remote control to select USB mode.
- Press button to pause/resume playback.
- To skip to a track, press button.
NOTE: The player supports the USB music file format of MP3 only. The Soundbar can support USB devices with up to 32 GB of memory. The Soundbar may not be compatible with all USB devices, this is not an indication of a problem with the unit.
DOLBY ATMOS®
Dolby Atmos® gives you immersive listening experience by delivering sound in three dimensional space, and all the richness, clarity, and power of Dolby sound. For more information, please visit dolby.com/technologies/dolby-atmos
For using Dolby Atmos®
- Dolby Atmos® is available only in HDMI mode. For the details of the connection, please refer to “HDMI Connection”.
- To use Dolby Atmos® in HDMI1, HDMI2 and HDMI ARC/eARC mode, your TV has to support Dolby Atmos®.
- Make sure that “No Encoding“ is selected for bitstream in the audio output of the connected external device (e.g. Blu-ray DVD player, TV etc.).
NOTE: The full Dolby Atmos experience is only available when the soundbar is connected to the source via a HDMI 2.0 cable. The soundbar will still function when connected via other methods (such as a Digital Optical cable) but these are unable to support all of the Dolby features. Given this, our recommendation is to connect via HDMI, in order to ensure full Dolby support.
TROUBLESHOOTING
To keep the warranty valid, never try to repair the system yourself. If you encounter problems when using this unit, check the following points before requesting service.
| Problem | Solution |
| No power | • Ensure that the AC cord of the apparatus is properly connected. • Ensure that there is power at the AC outlet. • Press |
| Remote control does not work | • Before you press any playback control button, first select the correct source. • Reduce the distance between the remote control and the Soundbar. • Insert the battery with its polarities • Replace the battery. • Aim the remote control directly at the sensor on the front of the Soundbar. |
| No sound | • Make sure that the Soundbar is not muted. Press • Press • Unplug both the soundbar and the subwoofer from the mains socket, then plug them again. Switch on the soundbar. • Ensure the audio setting of the input source (e.g. TV, game console, DVD player, etc.) is set to PCM or Dolby Digital mode while using digital (e.g. HDMI, OPTICAL, COAXIAL) connection. • The subwoofer is out of range, please move the subwoofer closer to the soundbar. Make sure the subwoofer is within 5 m of the soundbar (the closer the better). • The soundbar may have lost connection with the subwoofer. Re-pair the units by following the steps on the section “Pair up with the Subwoofer”. • The Soundbar may not be able to decode all digital audio formats from the input source. In this case, the Soundbar will mute. This is NOT a defect. |
| TV has display problem while viewing HDR content from HDMI source | • Some 4K HDR TVs require the HDMI input or picture settings to be set for HDR content reception. For further setup details on HDR display, please refer to the instruction manual of your TV. |
| I can’t find the Bluetooth name of this unit on my Bluetooth device for Bluetooth pairing | • Ensure the Bluetooth function is activated on your Bluetooth® device. • Re-pair the Soundbar with your Bluetooth® device. • The Soundbar has a Bluetooth® function that can receive a signal within 8 metres. Keep a distance within 8 metres between the Soundbar and your Bluetooth® device. |
| The Soundbar turns off | • When the Soundbar’s external input signal level is too low, the Soundbar will be automatically turn off after 15 minutes. Please increase the volume level of your external device. |
| Can’t achieve outstanding Dolby Atmos® effects | • For non-HDMI connections (such as use of USB, Bluetooth, OPTICAL or AUDIO IN), limited height Surround effects are generated. See the section of Dolby Atmos® about how to achieve best Dolby Atmos® effects. |
SPECIFICATIONS
| Soundbar | |
| Power Supply | 100-240 V~ 50/60 Hz |
| Power Consumption | 50 W < 0,5 W (StandBy) |
| USB | 5 V / 500 mA Hi-Speed USB (2.0) / FAT32 / FAT16 32G (max), Supported files MP3 |
| Dimension (WxHxD) | 1000 x 67 x 105 mm |
| Net weight | 3,5 kg |
| Audio input sensitivity | 700 mV |
| Frequency Response | 120 Hz – 20 KHz |
| Wireless Specification | |
| Bluetooth version / profiles Bluetooth frequency range Bluetooth Max. transmitting power |
V 5.3 (A2DP, AVRCP) 2400 MHz ~ 2483,5 MHz ≤ 5 dBm |
| 5,8G Wireless frequency range 5,8G Max. transmitting power |
5729 MHz ~ 5819 MHz ≤ 6 dBm |
| Modulation Type | GFSK, π/4 DQPSK |
| Subwoofer | |
| Power Supply | 100-240 V~ 50/60 Hz |
| Power Consumption | 30 W < 0,5 W (StandBy) |
| Dimension (WxHxD) | 240 x 420 x 240 mm |
| Net weight | 5,5 kg |
| Frequency Response | 40 Hz – 120 Hz |
| Amplifier (RMS Output power) | |
| L/R / Speaker | 2 x 50 W |
| Upper Speaker | 2 x 30 W |
| Center Speaker | 40 W |
| Subwoofer | 160 W |
| Remote Control | |
| Distance/Angle | 6 m (19,7 feet) / 30° |
| Battery type | AAA (2 x 1,5 V) |
WE RESERVE THE RIGHT TO CHANGE TECHNICAL SPECIFICATIONS.
MAINTENANCE / CLEANING
- Ensure the unit is fully unplugged from the mains socket before cleaning.
- Never use any harsh or strong solvents to clean the device since these may damage the surface of the device. Dry, soft cloth is appropriate, however, if the device is extremely dirty, it may be wiped off with a slightly moist cloth. Make sure the device is dried off after cleaning.
- When you are necessary to ship the device, store it in its original package. Save the package for this purpose.
![]() WARNING: DO NOT USE THIS PRODUCT NEAR WATER, IN WET AREAS TO AVOID FIRE OR INJURY OF ELECTRIC CURRENT. ALWAYS TURN OFF THE PRODUCT WHEN YOU DON’T USE IT OR BEFORE A REVISION. THERE AREN’T ANY PARTS IN THIS APPLIANCE WHICH ARE REPARABLE BY CONSUMER. ALWAYS APPEAL TO A QUALIFIED AUTHORIZED SERVICE. THE PRODUCT IS UNDER A DANGEROUS TENSION.
WARNING: DO NOT USE THIS PRODUCT NEAR WATER, IN WET AREAS TO AVOID FIRE OR INJURY OF ELECTRIC CURRENT. ALWAYS TURN OFF THE PRODUCT WHEN YOU DON’T USE IT OR BEFORE A REVISION. THERE AREN’T ANY PARTS IN THIS APPLIANCE WHICH ARE REPARABLE BY CONSUMER. ALWAYS APPEAL TO A QUALIFIED AUTHORIZED SERVICE. THE PRODUCT IS UNDER A DANGEROUS TENSION.
![]() TO AVOID DANGER OF SUFFOCATION, KEEP THE PLASTIC BAG AWAY FROM BABIES AND CHILDREN. DO NOT USE THIS BAG IN CRIBS, BEDS, CARRIAGES OR PLAYPENS. THIS BAG IS NOT A TOY.
TO AVOID DANGER OF SUFFOCATION, KEEP THE PLASTIC BAG AWAY FROM BABIES AND CHILDREN. DO NOT USE THIS BAG IN CRIBS, BEDS, CARRIAGES OR PLAYPENS. THIS BAG IS NOT A TOY.
Disposal of old Electrical & Electronic Equipment (Applicable in the European Union and other European countries with separate collection systems)
![]() This symbol on the product or on its packaging indicates that this product shall not be treated as household waste. Instead it shall be handed over to the applicable collection point for the recycling of electrical and electronic equipment. By ensuring this product is disposed of correctly, you will help prevent potential negative consequences for the environment and human health, which could otherwise be caused by inappropriate waste handling of this product. The recycling of materials will help to conserve natural resources.
This symbol on the product or on its packaging indicates that this product shall not be treated as household waste. Instead it shall be handed over to the applicable collection point for the recycling of electrical and electronic equipment. By ensuring this product is disposed of correctly, you will help prevent potential negative consequences for the environment and human health, which could otherwise be caused by inappropriate waste handling of this product. The recycling of materials will help to conserve natural resources.
For more detailed information about recycling of this product, please contact your local Civic Office, your household waste disposal service or the shop where you purchased the product.
Hereby, ETA a.s. declares that the radio equipment type TH-E754B is in compliance with Directive 2014/53/EU. The full text of the EU declaration of conformity is available at the following internet address: www.JVCAUDIO.cz/doc
LICENCE NOTIFICATION
![]() The Bluetooth® word mark and logos are registered trademarks owned by Bluetooth SIG, Inc. and any use of such marks by Zhong Shan City Richsound Electronic Industrial Ltd. is under license.
The Bluetooth® word mark and logos are registered trademarks owned by Bluetooth SIG, Inc. and any use of such marks by Zhong Shan City Richsound Electronic Industrial Ltd. is under license.
Other trademarks and trade names are those of their respective owners.
![]() The terms HDMI, HDMI High-Definition Multimedia Interface, HDMI trade dress and the HDMI Logos are trademarks or registered trademarks of HDMI Licensing Administrator, Inc.
The terms HDMI, HDMI High-Definition Multimedia Interface, HDMI trade dress and the HDMI Logos are trademarks or registered trademarks of HDMI Licensing Administrator, Inc.
![]() Dolby, Dolby Atmos, and the double-D symbol are registered trademarks of Dolby Laboratories Licensing Corporation. Manufactured under license from Dolby Laboratories. Confidential unpublished works. Copyright © 2012-2024 Dolby Laboratories. All rights reserved.
Dolby, Dolby Atmos, and the double-D symbol are registered trademarks of Dolby Laboratories Licensing Corporation. Manufactured under license from Dolby Laboratories. Confidential unpublished works. Copyright © 2012-2024 Dolby Laboratories. All rights reserved.
This product is manufactured and distributed exclusively by ETA a.s.serviced and warranted by its designated partner.
“JVC” is the trademark of JVCKENWOOD Corporation, used by such company under license.![]()
Documents / Resources
 |
JVC TH-E754B 3.1.2 Channel Soundbar with Wireless Subwoofer [pdf] Instruction Manual TH-E754B 3.1.2 Channel Soundbar with Wireless Subwoofer, TH-E754B, 3.1.2 Channel Soundbar with Wireless Subwoofer, Channel Soundbar with Wireless Subwoofer, Soundbar with Wireless Subwoofer, Wireless Subwoofer, Subwoofer |