![]()
THREE60
Conference Table

Includes Add-Ons: S1 | S2 | S3
General Installation Guide
S1: Sitting Height
Overview
THREE60 Conference Table
![]() Quantities are for a 48” x 216” table, parts may vary depending on project, but install steps will remain same.
Quantities are for a 48” x 216” table, parts may vary depending on project, but install steps will remain same.
Parts List
| Code | Qty. | Description | |
| GCNAB | 2 | Angled Sleigh Leg | |
| CNS48144 | 1 | Trapezoid Surface | |
| 2 | In-Surface Grommet |  |
|
| CNCGB | 2 | Center Grommet Spacers |  |
| 2 | In-Surface Grommet | |
|
| CNCBV2 | 4 | Cabinet Base | |
| BFB1 | 6 | Flat Bracket |  |
| GCNABCOV’ | 4 | Covered Leg |  |
*If applicable.
1 | Prepare Surface and Measure for Legs
Carefully place surface upside-down on floor, a cushioned area is preferred.
Measure 12” from surface edge and center-align to determine leg placement.
NOTE: Same process for square-ended table.

2 | Secure Angled Sleigh Legs
Follow measurements and insert screws per leg through metal plate and into laminate surface.

3 | Measure for Cabinet Base or Covered Leg
Place cabinet base, or covered leg, centered under table grommet cutouts.

4 | Install Cabinet base or covered Leg
Insert 4 screws per base through laminate top into bottom of surface.

5 | Attach Hardware to Surface Edge
Insert 2 wooden dowels, attach 2 flat brackets, and connect 4 sets of joint fasteners to one side of each surface edge.

6 | Flip and Assemble
Flip each piece over so that it is standing on a leg/cabinet base. Align open holes on surface edge with wooden dowels and threaded rods on other surface edge.

7 | Fully Secure Hardware

8 | Install Grommets
Insert wire management grommet.


S2: Standing height
Overview
THREE60 Conference Table
![]() All parts listed are for a single standing height table; additional parts will be needed for additional standing height table.
All parts listed are for a single standing height table; additional parts will be needed for additional standing height table.
Parts List
| Code | Qty. | Description | |
| GCNABSH | 2 | Standing Height Angled Sleigh Leg | |
| CNS4896 | 1 | Main Surface |  |
| 1 | In-Surface Grommet | |
|
| GCNABSHLE | 2 | Support Brace | |
| BFB1 | 2 | Flat Brackets | |
1 | Prepare Surface
Carefully place surface upside-down on floor, a cushioned area is preferred.
Measure 12” from surface edge and center-align to determine leg placement.
Attach 2 flat brackets on center seam of table.
NOTE: Leg placement may need to be adjusted based on surface size.

2 | Install Angled Sleigh Legs
Follow measurements and insert 15 screws per leg through metal plate and into laminate surface.

3 | Install Support Brace

4 | Flip and Insert Grommet
Insert wire management grommet.
Note: See page 13 for optional covered sleigh leg. See page 15 for power module install.

Optional Covered Sleigh Leg
All steps for installation are the same. However, leg will be aligned with grommet cutout on the table.
NOTE: Covered sleigh leg is optional for wire management.


S3: Optional Power
Overview
THREE60 Conference Table
Parts List
| Code | Qty. | Description | |
| BPCONF2V2 or BPCONF3 | 1 | In-Surface Power Module |  |
| JC1 | 5 | J-Clips |  |
| VB24 | 1 | Cable Vertebrae |
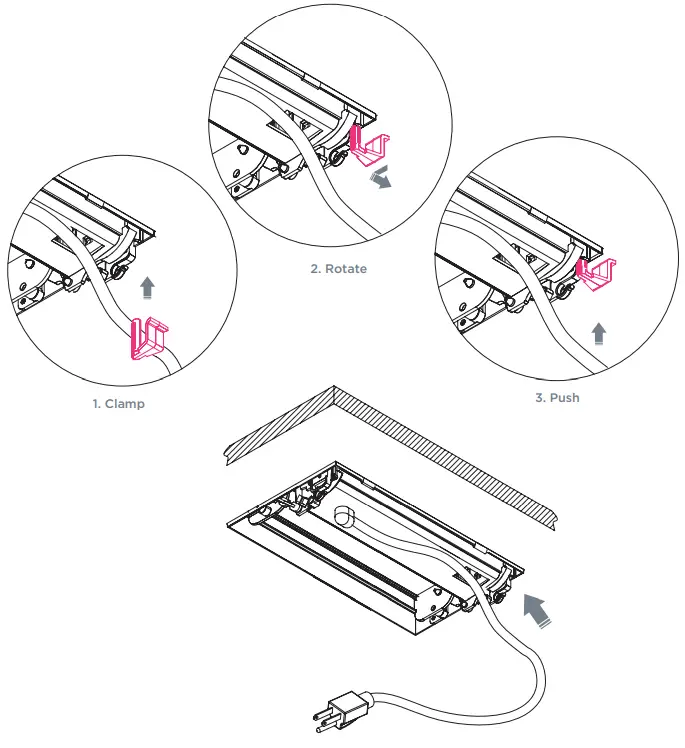
1 | Attach Metal Clips and Insert into Surface
Attach 2 metal clips to back of module base then insert into pre-cut holes in surface.

2 | Secure Module into Place
Insert plastic clamps into holes on bottom of module. Rotate and then push against surface to clamp module into place.
3 | Optional Power Vertebrae
Attach vertebrae to underside of top panel. Insert wood screws through top bracket and into laminate panel.
NOTE: Power vertebrae will be mounted adjacent to power module.

![]()
1-866-999-0955 | hello@juniperoffice.com | juniperoffice.com
© 2023 Juniper Office | Version 23.0.0
Documents / Resources
 |
Juniper THREE60 Conference Table [pdf] Installation Guide S1, S2, S3, THREE60 Conference Table, THREE60, Conference Table, Table |