![]()
SecureEdge Pro
Installation Manual
Introduction
This installation manual is for the SecureEdge Pro family of products. The SecureEdge Pro is available in multiple variants which only differ in the available modes of communication:
| Model | Description | Ethernet | 4G/LTE | Wi-Fi | GNSS |
| IX6000 | SecureEdge Pro – Ethernet | ✔ | |||
| IX6005 | SecureEdge Pro – 4G/LTE | ✔ | ✔ | ✔ | |
| IX6010 | SecureEdge Pro – Wi-Fi | ✔ | ✔ | ||
| IX6015 | SecureEdge Pro – 4G/LTE & Wi-Fi | ✔ | ✔ | ✔ | ✔ |
The SecureEdge Pro is delivered with the following accessories:
- Female 3-pin plug-in connector.
2.1. Help and support
For additional product support, installation tips and specifications go to http://support.ixon.cloud

For direct technical support and questions, get in touch with our Technical Support team.
E-mail support@ixon.cloud
Phone +31 (0)85 744-1105
⚠ Warning
Read this manual carefully before installing or operating the SecureEdge Pro.
Safety instructions
Neglecting the essential safety precautions and safety guidelines outlined below could result in significant harm to individuals and property!
It is crucial to adhere to all the safety instructions and information provided in the relevant product documentation. Doing so is essential for ensuring safe and problem-free operation.
Please pay close attention to the specific safety instructions provided in the other sections of this manual.
3.1. Personnel
Only qualified and skilled personnel are allowed to work with the SecureEdge Pro. They shall have the following qualifications:
- They are familiar with the installation, mounting, commissioning, and operation of the SecureEdge Pro.
- They possess the appropriate qualifications for their tasks.
- They are familiar with all regulations for the prevention of accidents, directives, and laws applicable at the location and are able to apply them.
3.2. Device
The hardware and software of the SecureEdge Pro must never be modified in a way that is not described in the installation manual. If you carry out any modifications that are not permitted, all your warranty claims will become null and void. This will result in exclusion of liability on the part of IXON.
3.3. Application
The SecureEdge Pro is an electrical communication device. It is only suitable for installation in control cabinets or other similar closed operating environments.
3.4. Handling
The SecureEdge Pro must be handled as follows:
- Connect or disconnect all pluggable terminals only when the SecureEdge Pro is powered off.
- Only remove the SecureEdge Pro from the installation when the SecureEdge Pro is powered off.
- Only open the panel to access the SIM or SSD slots. The SecureEdge Pro must be powered off before opening the panel. The panel must be closed immediately after use.
Hardware features

? Notice
The availability of antenna connectors is dependent on the model.
4.1. Technical data
4.1.1. General specifications
| IX6000 | IX6005 | IX6010 | IX6015 | |
| Power supply | 12-24 VDC +/- 20% ES1, PS2 | |||
| Rated current | 2A | |||
| Rated power | 4 W | 5 W | 4.5 W | 6 W |
| Max. power | 22.5 W | |||
| Operating temperature | -20℃ to 55℃ | |||
| Operating humidity | 10 to 95% non-condensing | |||
| Operating altitude | Up to a maximum of 2000m | |||
| Storage temperature | -20℃ to 55℃ | |||
| Storage humidity | 10 to 95% non-condensing | |||
| Storage altitude | Up to a maximum of 3000m | |||
| Ethernet ports | 5 LAN ports, 1 WAN port (all 1 Gbps) 1 LAN port can be configured as second WAN port |
|||
| USB version | USB 3.0 over USB-C connector | |||
| External Memory (replacable) | SSD, PCIe 3.0 2x lanes, in M.2 2242 with M key, D2 height | |||
| Processor | Quad-Core ARM Cortex-A55, 1.8GHz | |||
| Digital Input | 1 configurable Digital I/O | |||
| Mounting type | DIN rail | |||
| Size | 111x111x45 mm (H x D x W) | |||
| Weight | 0.529 kg | 0.558 kg | 0.542 kg | 0.570 kg |
| Display | 1.54″ TFT + CTP | |||
4.1.2. Wi-Fi specifications
Only applicable for models IX6010 and IX6015.
| Wi-Fi version | IEEE 802.11 a/b/g/n/ac |
| Wi-Fi modes | Station (Client) Mode and Access Point |
| Frequency | 2.4 GHz & 5 GHz |
| Speed | 867 Mbps |
| Security protocol | WPA2-PSK |
| Contains FCC ID | 2AATL-8274B-PR |
| Contains IC ID | 24844-8274BPR |
4.1.3. Cellular/GNSS specifications
Only applicable for models IX6005 and IX6015.
| Frequency bands | LTE-FDD: B1, B2, B3, B4, B5, B7, B8, B12, B13, B18, B19, B20, B25, B26, B28 LTE-TDD: B38, B39, B40, B41 WCDMA: B1, B2, B4, B5, B6, B8, B19 GSM/GPRS/EDGE: B2, B3, B5, B8 GNSS: GPS, GLONASS, BeiDou, Galileo and QZSS |
| Data rates | LTE-FDD: Max. 150 Mbps (download) / Max. 50 Mbps (upload) LTE-TDD: Max. 130 Mbps (download) / Max. 30 Mbps (upload) DC-HSPA+: Max. 42 Mbps (download) / Max. 5.76 Mbps (upload) WCDMA: Max. 384 Kbps (download) / Max. 384 Kbps (upload) EDGE: Max. 296 Kbps (download) / Max. 236.8 Kbps (upload) GPRS: Max. 107 Kbps (download) / Max. 85.6 Kbps (upload) |
| SIM card | Nano SIM card (4FF) |
| Contains FCC ID | XMR201903EG25G |
| Contains IC ID | 10224A-201903EG25G |
Mechanical installation
5.1. Dimensions

The SecureEdge Pro is designed to be cooled using natural convection. For proper cooling, you must provide a clearance of at least 35 mm above and below the device. Also, allow at least 35 mm of depth between the front of the device and the inside of the control cabinet.
⚠ Warning
The provided installation clearances represent the minimum dimensions required to guarantee adequate air circulation for cooling purposes. However, these dimensions do not take into account the bend radius of the connecting cables and screw-on antennas for devices equipped with Wi-Fi and/or 4G capabilities.
5.2 Mounting and dismounting

The SecureEdge Pro is mounted on a standard DIN rail. Hang the device on the rail and (A) push the unit down and (B) towards the DIN rail until you feel a click.

To remove the unit, (A) push the device down, (B) pull and rotate the device up and (C) lift off the rail.
Electrical installation
6.1. Instructions for installation
Consider the following instructions for installation:
- When installing devices in a control cabinet, always separate devices that generate high voltage and high electrical noise from low-voltage, logic-type devices such as the SecureEdge Pro.
- Avoid placing low-voltage signal wires and communications cables in the same tray with AC power wiring and high-energy, rapidly-switched DC wiring.
- Always use an IEC/EN 62368 certified ES1, PS2 power supply for powering the SecureEdge Pro. The output voltage of the power supply must not exceed 29 VDC.
- Always use the included female 3-pin plug-in connector when wiring the SecureEdge Pro.
- Always use twisted pair power cables with a maximum length of 3 m.
- Always use CAT5-S/FTP or higher type shielded cables to ensure a stable LAN connection.
- Always use a shielded USB cable.
6.2. Mains connection
| Mains connection | |
| Wire size range | 18 – 12 AWG |
| Stripping length | 7 mm |
| Max. cable length | 3m |
| Ground | Attach to a proper shielded DIN rail |

6.3. Digital Input/Output
By default, the Digital Input/Output (DIO) is not configured and doesn’t need to be wired. It can be configured to work as Digital Input (DI) or Digital Output (DO).
⚠ Warning
Before configuring DIO to work as DI or DO, be sure that proper wiring connection is made.
6.3.1. Digital Input
| Digital Input | |
| Type of digital input | Sinking |
| Voltage range | 0-29 VDC |
| Voltage range (OFF) | 0-3 VDC |
| Voltage range (ON) | 7-29 VDC |
| Current range | 2-5 mA |
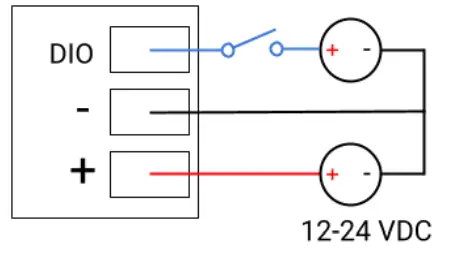
The Digital Input provides a way to locally manage SecureEdge Pro’s VPN connection (ON/OFF).
The wiring for proper operation of Digital Input (DI) is depicted in the image above.
6.3.2. Digital Output
The Digital Output is for future use and has no functionality yet. The wiring for proper operation of Digital Output (DO) are depicted in the images below.
| Digital Output | |
| Type of digital output | Sourcing |
| Maximum output current | 100 mA |

⚠ Warning
Use loads which have the same voltage rating as the input power supply.
6.4. Antennas
The SecureEdge Pro has connectors for:

⚠ Warning
Any antennas used with this transmitter must be installed with a minimum separation distance of 20 cm from all persons and must not be co-located or operated in conjunction with any other antennas or transmitters.
6.5. Installation
| Port | Type | Description |
| WiFi 1 | RP-SMA | Secondary connector. |
| WiFi 0 | RP-SMA | Primary connector. |
| 4G DIV | SMA | Secondary connector. |
| GNSS | SMA | Primary connector. |
| 4G MAIN | SMA | Primary connector. |
For optimal connection speed, connect both antenna connectors for Wi-Fi and Cellular.
⚠ Warning
Always connect the antenna to the primary connector first.
? Notice
Antennas are not included with the SecureEdge Pro and can be purchased from IXON separately.
SIM card & SSD
? Notice
Only insert or remove the SIM card and/or SSD when the SecureEdge Pro is powered off.
The SIM card and the SSD are not included with the SecureEdge Pro and can be purchased separately from external parties.
Make sure to close the SecureEdge Pro’s enclosure by pushing the panel into place before powering the Secure Edge Pro on again.
7.1. SIM card installation
This information is only applicable for models IX6005 and IX6015.
The SIM card holder is positioned behind the panel and suits a Nano SIM card (4FF). The SIM card can be placed inside the SIM card holder with the chip facing downwards by following the process below.

7.2. SSD installation
The SSD holder is positioned behind the panel and suits PCIe 3.0 2x lanes, in M.2 2242 with M key, D2 height. The SSD can be placed in the SSD holder and must be screwed down with a M2x4; 0.4 screw.
Display operation
The IXON SecureEdge Pro can be easily set up and operated through the built-in display. This allows you to configure basic device settings, such as connectivity setup and registration in the IXON Cloud. The display is operated by the gestures: swipe horizontally, scroll vertically and tap (single). A complete overview of the SecureEdge Pro’s display functionalities is found in this chapter.
8.1. Home Screen
The home screen displays the following information about the device:
- Name of the IXON Cloud company in which the device is registered;
- Ethernet connection status (“Unplugged” or “Connected”);
- Wi-Fi connection status (“Not connected or network name), signal strength and SSID;
- Cellular connection status (“Not connected or name of the telecom provider) and signal strength.
All items are gray by default and turn blue once the connection is active.
? Notice
The display will show a screensaver after one minute of inactivity.
Swiping left will show the settings menu of the SecureEdge Pro which will allow you to configure basic device settings and view additional status information of the device:
| Menu option | Description |
| Wi-Fi Client | Set up a Wi-Fi connection |
| Wi-Fi Hotspot | Set up a Wi-Fi hotspot |
| 4G / LTE | Set up a cellular connection |
| Register | Register the device in the IXON Cloud |
| Network | View network information |
| Active errors | Show an overview of active device errors |
| Lock | Set up a screen lock for the device |
| Factory reset | Reset the device to factory settings |
8.2. Wi-Fi Client
To set up a Wi-Fi connection, navigate to the Wi-Fi client menu and turn on Wi-Fi. The device will automatically scan for available Wi-Fi networks. Select the SSID of the network you would like to connect to from the list and enter the password via the display.
8.2.1. Wi-Fi Hotspot
When you need an internet connection on your personal device, you can use the SecureEdge Pro as a Wi-Fi hotspot. To set up a Wi-Fi hotspot, navigate to the Wi-Fi hotspot menu and turn on the hotspot. The device will automatically generate a network SSID and password. You can change the password by selecting the refresh button. Swiping left will show a QR code which you can scan with your smartphone to easily connect to the Wi-Fi hotspot.
8.2.2. 4G / LTE
To set up a cellular connection, you must first place a SIM card in the SecureEdge Pro. See chapter 7.1. for SIM card placement instructions.
After placing the SIM card, navigate to the 4G/LTE menu item on the display, turn on 4G/LTE and enter the SIM card’s APN and PIN.
The APN can be entered manually, or you can choose the default APN. Which method is most suitable, depends on the selected cellular provider:
- Default : Some cellular providers do not require an APN when connecting to their network.
This is the case with most regular, but not all, providers. When configuring the APN, you can select the default APN option, which effectively leaves the APN empty and makes it easier to connect to these providers. - Manually : If the provider requires a specific APN to connect, or if the default APN doesn’t work, the APN will need to be set manually. If you are unsure about which APN to enter, you’ll need to search online or contact the provider directly.
If there is no PIN code set on the SIM card, you can leave the “PIN code”-field empty.
8.3. Lock the SecureEdge Pro
To restrict access to the SecureEdge Pro’s settings, you can configure a lock. Enabling the lock will prevent any unauthorized users from changing the SecureEdge Pro’s settings.
With lock enabled, users are only able to navigate to the following items on the display:
- Network information (read-only access)
- Active errors
Navigating to the other menu items will show a prompt requesting the lock code.
You can set up the lock by navigating to the Lock menu item and turning on the lock. Next, you can enter a 4-digit lock code to limit access to the SecureEdge Pro display. You can disable the lock by navigating to the Lock menu item again and selecting “Turn off lock”.
? Notice
You can also enable or disable the lock in the fleet manager by navigating to the Info menu of your device. Here, you are also able to fill in the lock code to unlock the SecureEdge Pro.
8.4. Network information
To obtain the network information from your device, you can navigate to the network information menu. Here, the WAN and LAN IP-addresses will be shown. If you are using a Wi-Fi connection, the IP-address of the Wi-Fi connection is visible as well.
This menu also allows you to configure your local VPN control. You can choose one of these settings:
- DI high: VPN on when digital input is high
- DI low: VPN on when digital input is low
- Disabled (default setting): VPN is always on and digital input is not used
8.5. IXON Cloud registration
You can register the SecureEdge Pro in the IXON Cloud directly from the display. Navigate to the Register menu, scan the QR code with your smartphone and follow the instructions in the wizard.
Ensure your smartphone has access to the internet. After registration, the SecureEdge Pro is ready to use in the IXON Cloud.
For more information about the IXON Cloud, please visit http://support.ixon.cloud for extensive guides and help articles.
? Notice
Ensure that the mechanical and electrical installation have been completed and that the SecureEdge Pro is supplied with voltage before commissioning.
Local web interface
The SecureEdge Pro’s local web interface can be used to view and change the WAN, LAN, and Firewall configurations locally.
The local web interface can be opened by connecting the SecureEdge Pro to your computer using one of the edge gateway’s LAN ports and entering http://192.168.140.1 into your browser.
To change settings via the local web interface, enter the password which can be found on the product label on the side of the SecureEdge Pro.
? Notice
The web interface is not accessible through the WAN port.
Docker
The SecureEdge Pro allows users to deploy containerized applications to the edge gateway. For more information, please visit http://support.ixon.cloud or contact support@ixon.cloud .
Reset to factory default
⚠ Warning
After doing a factory reset, the SecureEdge Pro needs to be re-registered to the IXON Cloud. If the edge gateway is still listed in the IXON Cloud and you want to re-use those settings, make sure to turn on Recovery mode before registering again.
A factory reset will delete all data, this cannot be undone! The current Firmware version will remain installed.
To reset the SecureEdge Pro, simply navigate to the factory reset menu item on the display and follow the steps. Your device will then be reset as stated above.
Connectivity requirements for local IT
The SecureEdge Pro uses outgoing ports to establish a secure connection to the IXON Cloud.
This means there is no need to open any incoming ports in your firewall.
12.1. Overview
Below is an overview of the outgoing ports and protocols that the SecureEdge Pro utilizes.
| Direction | Port | Transport | Application |
| Outbound | 443 | TCP | HTTPS, MQTT (TLS) OpenVPN (1) |
| Outbound | 1194 (2) | UDP | OpenVPN |
| Outbound | 8443 (3) | TCP | HTTPS |
| Outbound | 53 (4) | TCP & UDP | DNS |
| Outbound | (no port) (5) | ICMP (Echo request) |
- The very first package may be considered unencrypted as the OpenVPN handshake takes place prior to the TLS handshake.
For this reason an exception may be required on firewall rules that block non-SSL traffic over SSL-ports. - Only used when the VPN connection type is set to UDP.
- Only used when stealth mode is activated for connectivity via a censored internet connection (i.e. when located in China).
- DNS requests are often handled by local DNS servers. In those cases the listed DNS port can be ignored.
- Only used when failover is configured.
12.2. Servers and DNS requests
The SecureEdge Pro connects to different IXON servers: REST API, MQTT, and OpenVPN servers, which include the following domains: .ixon.cloud;.ixon.net;.ayayot.com (phonetic IIoT).
Doing a DNS lookup (nslookup) at the following domain name always returns an up-to-date IP list of all current IXON servers: whitelist.ixon.cloud
12.3. MAC or IP address filter
Internet access may be granted to specific devices, based on their MAC or IP addresses. The SecureEdge Pro’s MAC address can be obtained from the label on the side of the SecureEdge Pro. The IP address can be set to a static IP address. However, by default the IP address is set to be assigned dynamically via DHCP.
12.4. Security best practices
Do not open any unnecessary ports in your company firewall
The SecureEdge Pro requires access to outgoing port 443 in your local firewall to function. To restrict the risk of unauthorized traffic, do not allow more traffic than necessary through your local firewall.
Install security updates for the SecureEdge Pro firmware
Remote upgrades of your SecureEdge Pro firmware are available. To make use of the latest functionalities and security features, regularly update your firmware.
Set up the lock on the SecureEdge Pro display
The lock restricts the SecureEdge Pro’s display, so no one can modify its configuration. Setting up a lock with a unique pin code is advised.
Do not set up unnecessary port forwardings in the SecureEdge Pro.
Port forwardings allow access through the SecureEdge Pro’s firewall to the machine network that would otherwise not be allowed. To restrict access to machine ports and services, only create port forwardings if necessary.
Restrict access to the SecureEdge Pro to authorized personnel only
Placing the SecureEdge Pro in a locked cabinet or room protects your setup from tampering.
Compliance
13.1. CE
TBD.
13.2. UL
TBD.
13.3. FCC
The SecureEdge Pro contains different FCC certified modules, depending on the variant.
| Article no. | Contains FCC ID |
| IX6000 | – |
| IX6005 | XMR201903EG25G |
| IX6010 | 2AATL-8274B-PR |
| IX6015 | XMR201903EG25G, 2AATL-8274B-PR |
13.4. IC
The SecureEdge Pro contains different IC certified modules, depending on the variant.
| Article no | Contains IC ID |
| IX6000 | – |
| IX6005 | 10224A-201903EG25G |
| IX6010 | 24844-8274BPR |
| IX6015 | 10224A-201903EG25G, 24844-8274BPR |
![]()
Thanks for choosing us! We’re dedicated to providing you with a reliable solution for seamless machine connectivity.
If you have any questions or concerns, please don’t hesitate to reach out to us.
IXON B.V.
Zuster Bloemstraat 20
5835 DW Beugen
The Netherlands
Documents / Resources
 |
IXON v1.0 Secure Edge Pro [pdf] Installation Guide v1.0 Secure Edge Pro, v1.0, Secure Edge Pro, Edge Pro, Pro |


