IMILAB EC5 Floodlight Security Camera
Scan the QR code for the tutorial on how to use the camera.

Please read this manual carefully before using the device and retain it for future reference.
Scan the QR code with your mobile phone to read the manual in more languages.

Product Introduction
Package List

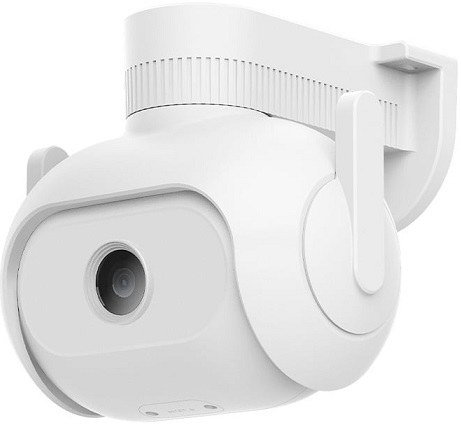
Product Appearance

Connect to Power Source
Power On
Insert the power supply cable into the camera’s power supply port.

Note: Do not twist the camera’s dome to force it to rotate after it is turned on. If the lens positioning is inaccurate, calibrate it with the app.
Indicator Light
Solid green: Successful connection/normal status Flashing green: Waiting for connection/network exception
Connecting to Xiaomi/Mi Home App
- Scan the QR code to download and install the app, sign up and log in.
- Connect the camera to the app. Make sure the network is smooth when connecting, and the camera is turned on normally, the indicator light flashes quickly in green. When connection is successful, the indicator light turns to solid green.

Open the app and tap the “+” at the top right corner.
Select “Scan” and scan the QR code on the camera body. Follow the step-by-step instructions to add the device.

Reset the Device if Required
Use a pin to press and hold the reset pinhole for about 7 seconds until the indicator light flashes green and the camera restores factory settings successfully. Then, reconnect to the app.
Note: Restoring the factory settings will not delete the contents of the MicroSD card.
Installing the Device
Installing the MicroSD card
Ensure that the camera is disconnected from the power supply. Remove the protective case and expose the MicroSD card slot. Insert the microSD card into the card slot in the direction as illustrated.

Note:
- The MicroSD card needs to be purchased separately. The camera can be used without a MicroSD card.
- When inserting or removing the MicroSD card, please disconnect the camera from the power supply. Use a MicroSD card from a reputable manufacturer (up to 256GB). The recommended read and write speed of the MicroSD card is at least U1/Class 10.
- After installing the MicroSD card or resetting the device, close the waterproof cover tightly before using it.
FAQ
Scan the QR code for Frequently Asked Questions.

Installing the Device
The device can be mounted on walls, ceilings, or poles.
Wall mounting
- Attach the wall mounting positioning sticker on the desired installation location on a wall. Drill two holes at the positions indicated on the sticker. The drilling diameter should be around 6.0 mm with a depth of around 30 mm.

- Insert two plastic expansion nuts into the wall. Put the base plate on the wall. Secure the base plate by inserting the screws into the expansion nuts.
Note: The product must be hung horizontally after installation (see below).
Ceiling mounting
- Attach the ceiling mounting positioning sticker on the desired installa-tion location on the ceiling. Drill two holes at the positions indicated on the sticker. The drilling diameter should be around 6.0 mm with a depth of around 30 mm.

- Insert two plastic expansion nuts into the wall. Put the base plate on the ceiling. Secure the base plate by inserting the screws into the expansion nuts.
Note: The product must be hung horizontally after installation (see below).
Pole mounting
Note: The product must be hung horizontally after installation (see below).

Notes on wall mounting:
- The wall on which the device is mounted must have a loading capacity of at least 3 times the weight of the device.
- To avoid any damages or injuries, the device must be securely fastened to the floor/wall as specified in the installation instructions.
Waterproofing kit
The camera has a LAN port and a power supply port. Waterproofing must be done on both these ports.
Note: The camera waterproof sleeve can effectively prevent rain and water seepage at the network interface location. The warranty does not cover any damage caused by improper installation. Please follow the instructions.

Basic Parameters
- Product name: IMILAB EC5 Floodlight Camera
- Dimension: 139 x 128 x 135 mm
- Model: CMSXJ55A
- Net weight: 680 g
- Power input: 12V
 1A
1A - Video code: H.265
- Resolution: 2304 x 1296
- Storage: MicroSD card (up to 256GB)
- Operating temperature: -30℃~60℃
- Wireless Connectivity: Wi-Fi IEEE 802.11 b/g/n 2.4GHz FCC ID:2APA9-CMSXJ55A
Precautions
- The working temperature of the device is -30℃ to 60℃. Do not use the device when the temperature is too high or too low.
- For better results, avoid placing the camera in front of or next to a glass surface, a white-colored wall or other reflective surfaces as this may cause the recording to have uneven lighting between the foreground and background or be overexposed.
- Please ensure that the device is within Wi-Fi signal coverage. Place it at a location with good Wi-Fi signal strength.
- Try to avoid placing the device near a metallic object, a microwave oven or other objects that may cause signal interference.
- Under normal use of condition, this equipment should be kept a separation distance of at least 20 cm between the antenna and the body of the user.
FCC Statement
Changes or modifications not expressly approved by the party responsible for compliance could void the user’s authority to operate the equipment. This device complies with Part 15 of the FCC Rules.
Operation is subject to the following two conditions:
- This device may not cause harmful interference, and
- This device must accept any interference received, including interfer-ence that may cause undesired operation.
Note: This equipment has been tested and found to comply with the limits for a Class B digital device, pursuant to Part 15 of the FCC Rules. These limits are designed to provide reasonable protection against harmful interference in a residential installation. Thise quipment generates, uses, and canradiate radio frequency energy, and if not installed and used in accordance with the instructions, may cause harmful interference to radio communications. However, there is no guarantee that interference will not occur in a particular installation. If this equipment does cause harmful interference to radio or television reception, which can be determined by turning the equipment off and on, the user is encouraged to try to correct the interference by one or more of the following measures:
- Reorient or relocate the receiving antenna.
- Increase the separation between the equipment and receiver.
- Connect the equipment into an outlet on a circuit different from that to which the receiver is connected.
- Consult the dealer or an experienced radio/TV technician for help.
FCC 20cm Statement: This equipment complies with FCC radiation exposure limits set forth for an uncontrolled environment. This equipment should be installed and operated with a minimum distance of 20cm between the radiator & your body. This transmi er must not be co-located or operating in conjunction with any other antenna or transmier.
WEEE Information
 All products bearing this symbol are waste electrical and electronic equipment (WEEE as in directive 2012/19/EU) which should not be mixed with unsorted household waste. Instead, you should protect human health and the environment by handing over your waste equipment to a designated collection point for the recycling of waste electrical and electronic equipment, appointed by the government or local authorities. Correct disposal and recycling will help prevent potential negative consequences to the environment and human health. Please contact the installer or local authorities for more information about the location as well as terms and conditions of such collection points.
EU Declaration of Conformity
 Hereby, Shanghai Imilab Technology Co., Ltd. declares that the radio equipment type IMILAB EC5 Floodlight Camera is in compliance with Directive 2014/53/EU. The full text of the EU declaration of conformity is available at the following internet address: https://www.imilabglobal.com/pages/eu-declaration-of-conformity
For detailed e-manual, please go to https://www.imilabglobal.com/pages/user-manual
External AC Adapter Specifications
- Manufacturer: Dong Guan City GangQi Electronic Co.,Ltd
- Model Identifier: GQ12-120100-CG
- Input Voltage: 100-240 Vac
- Input AC Frequency: 50/60 Hz
- Output Voltage: 12 V
- Output Current: 1 A
- Output Power: 12 W
- Average Active Efficiency: ≥ 82.96%
- Efficiency at Low Load (10%): > 73%
- No-load Power Consumption: < 0.1 W
The product complies with UK PSTI regulations, and we are committed to providing security updates and support for our products and applications for at least three years from their initial market release.
The full Declaration of Conformity can be found at https://www.imilabglobal.com/pages/psti-declaration. For any issues, please contact us at help@imilab.com or submit the Issue Feedback Form via the link above.
Documents / Resources
 |
IMILAB EC5 Floodlight Security Camera [pdf] User Manual EC5 Floodlight Security Camera, EC5, Floodlight Security Camera, Security Camera |