HUANYA HF5 Tuya WiFi Fingerprint Access Control and Reader
What’s in the box
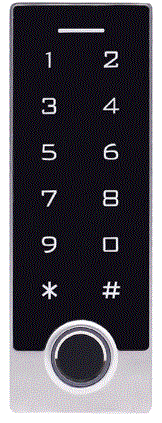
Fingerprint Access Control & Reader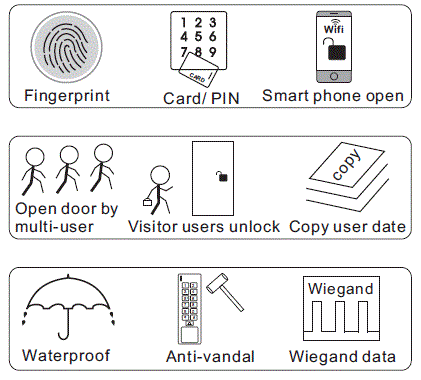
INTRODUCTION
- This device is a new generation metal waterproof fingerprint & RFID card standalone access control. It has the zinc alloy housing which is anti-explosion and anti-vandal. Conforms to waterproof IP66 which is suitable for outdoor use.
Support 100 or 500 fingerprint users and 10000 card/code users. Support fingerprint/card/code/multi-users/temporary visitor users opening the door. And can be set as the card reader. Support upload and download the data of card & PIN code users. It has the door contact detection and anti-tamper functions. - Supports OTA online upgrade ( The users can upgrade their devices by themselves if there is better functional applications)
Advantages and Features
- Smart phone management, Smart phone open (WiFi has this feature)
- Supports OTA online upgrade (WiFi has this feature)
- Smart phone door status check (WiFi has this feature)
- Set the temporary PIN code with APP
- Access Mode: fingerprint, card, PIN, multi users
- Wiegand 26-44 bits, 56 bits, 58 bits Input/output
- PIN Wiegand output formats: 4 bits, 8 bits(ASCII), 10 digits virtual card number.
- Pulse Mode and Toggle Mode
Specifications
| Fingerprint User | 100 or 500 |
| Card User/ PIN User | 10000 |
| Operating Voltage | DC10-24V |
| Idle Current | ≤50mA |
| Active Current | ≤120mA |
| Card Type | EM/ Mifare card |
| Card Frequency | 125KHz/ 13.56MHz |
| Read Range | ≤60mm |
| Operating Temperature | -20℃~+60℃ |
| Operating Humidity | 10%~99% |
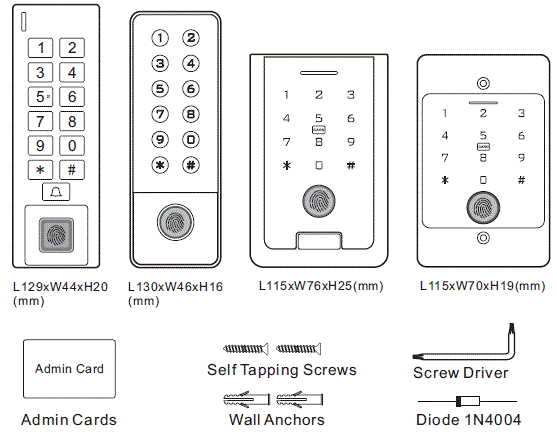
Carton Inventory
INSTALLATION
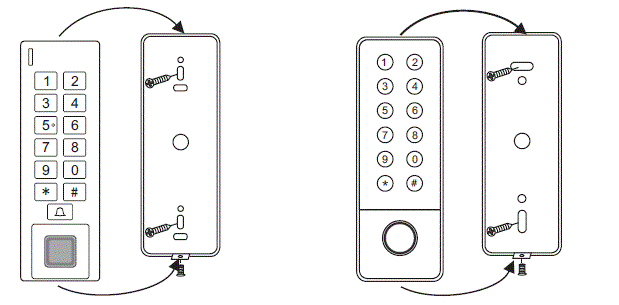
- Draw the location of the hole and drill the hole on the installation position according to the hole of the back cover.
- Fix the back cover on the wall with the wall anchors in the accessories bag.
- Thread the cable through cable hole, connect related cable. For the un-used cable please separate with insulating tape.
- Cover the front cover and fix the front and back cover together with screwdriver and screws.
Wires Definition
| NO. | Function | Colour | Notes |
| 1 | NC | Orange | Relay NC |
| 2 | COM | Purple | Relay COM |
| 3 | NO | Blue | Relay NO |
| 4 | GND | Black | Negative Pole |
| 5 | DC+ | Red | 10-24V DC Power Input |
| 6 | OPEN | Yellow | Exit Button |
| 7 | D_IN | Brown | Door Contact |
| 8 | ALARM- | Grey | Connect to external alarm negative pole |
| 9 | D0 | Green | Wiegand Output/Input Data 0 |
| 10 | D1 | White | Wiegand Output/ input Data 1 |
| 11 | BELL | Pink | External doorbell |
| 12 | BELL | Pink | External doorbell |
Sound and Light Indication
| Operation Status | LED | Buzzer |
| Standby Mode | Red light bright | — — |
| Enter program Mode | Red light shines | — — |
| In the Program Mode | Orange light bright | — — |
| Open lock | Green light bright | One beep |
| Operation failed | — — | Three beeps |
Administrator’s Code, Fingerprint and Card
| Name | Function |
| Admin Code | Enter into Program Mode |
| Admin Fingerprint/Card |
|
Modify Admin Code
| Programming Step | Keystroke Combination | LED |
| Enter Program Mode | * Admin Code # | Red shines |
| Modify Admin Code | 0# (New Admin Code) # (Repeat New Admin Code) # (Factory Default is 123456) | Orange bright |
| Exit Program Mode | * | Red bright |
Note: The Admin Code can be any 6 digits and the admin must keep it in mind.
Set Factory Default and Set Admin Card/ Fingerprint
- Press and hold the exit button, power on, release it after two beeps. Swipe the admin card, press the admin fingerprint 3 times, the red led on with one beep, the factory default setting done. And the admin card/ admin fingerprint added successfully.
- The admin card/ admin fingerprint has the function of adding/deleting users.
Note:
- Reset to factory default, the users’ information won’t be deleted.
- If you don’t want to add admin card/fingerprint: press and hold the Exit Button for 5 seconds, release it until hear one long beep and the red light bright.
Tuya app Smart phone unbinding
| Programming Step | Keystroke Combination | LED |
| Enter Program Mode | * Admin Code # | Red shines |
| WiFi unbinding | 90# (Admin Code) # | Orange bright |
| Exit Program Mode | * | Red bright |
Note: 1.WiFi unbinding: with this operation, the device will disconnect with all the smart phones, the phone can’t control the device at the time.
STANDALONE MODE
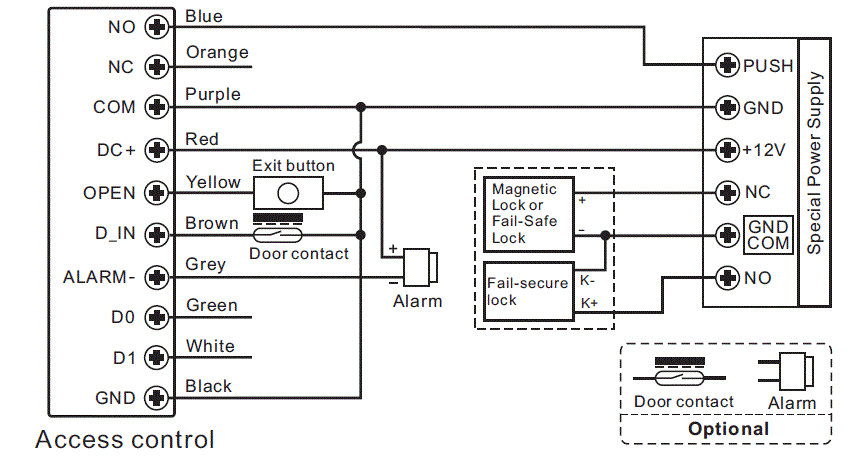
Connection Diagram
Special Power Supply
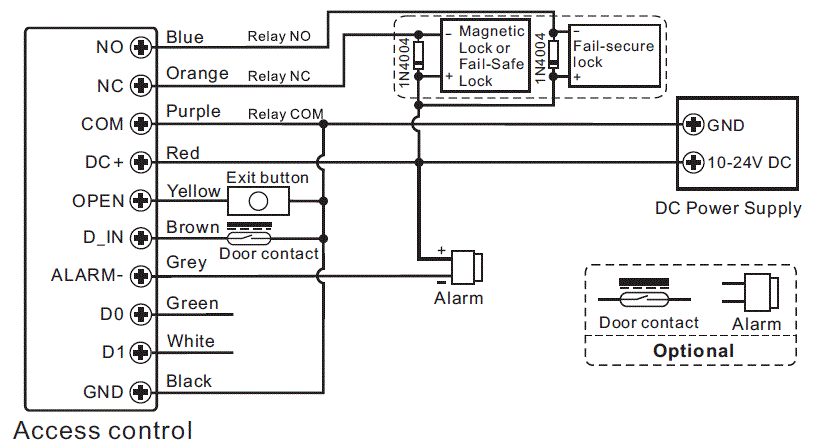
DC Power Supply
Attention: Install a 1N4004 or equivalent diode is needed when use common power supply, or the reader might be damaged. (1N4004 is included in the packing).
Usage of Admin Add/Delete Card and Fingerprint
| Using Admin cards to add and delete users | |
| Add users |
|
| Delete users |
|
| Simplified Instruction | ||
| Enter the Programming Mode | * – Admin Code-#
Then you can do the programming (Factory default is 123456) |
|
| Modify Admin Code | 0# (New Admin Code) # (Repeat New Admin Code)# (The Admin Code can be any 6 digits) | |
| Add Users | 1# – Read Card/ Press Fingerprint
Note: When adding users, each fingerprint should be pressed once (or three) in succession. |
|
| Delete Users | 2# – Read Card/ Press Fingerprint | |
| Exit from the Programming Mode | * | |
| How to release the door | ||
| Open door by Fingerprint | (Fingerprint) | |
| Open door by card | (Read Card) | |
| Open door by User PIN | (Users PIN) # | |
| Open door by user card + PIN | (Read Card) (Users PIN) # | |
Add Users
| Programming Step | Keystroke Combination | LED |
| Enter Program Mode | * Admin Code # | Red shines |
| Add Card/ PIN Users | ||
| Add Card User: By Card | 1# (Read Card)… |
Orange bright |
| Add Card User: By Card Number | 1# (Input 8/10 digits card number) #… | |
| Add PIN Users | 1# (4~6 digits PIN) # … | |
| Add Fingerprint Users | ||
| Add Fingerprint User: By Fingerprint | 1# (Fingerprint) … (Press each fingerprint 3 times) | Orange bright |
ID Number Add Users
| Programming Step | Keystroke Combination | LED | |
| Enter Program Mode | * Admin Code # | Red shines | |
| Add Card/ PIN Users | |||
| Add Card User | 10# ID# (Read Card)… |
Orange bright |
|
| Add Card User: By Card Number | 10# ID# (Input 8/10 digits card number) #… | ||
| Add PIN Users | 10# ID# (4~6 digits PIN) # … | ||
| Add Fingerprint Users | |||
| Add Fingerprint User: By Fingerprint | 11# ID# (Fingerprint) … (Press each fingerprint 3 times) | Orange bright | |
Note:
- The ID number is a number assigned to each user and it is usually useless. But when you want to delete specific user, you should input the ID number or card number.
- When adding users, the ID number will be assigned automatically from small to big.
- Add fingerprint users: Every fingerprint should be pressed 3 in times.
- User Fingerprint ID range: 1-100 or 1-500, User Card or Code ID range: 1-9988, Anti-duress users ID: 9989、9990, Visitor users ID range: 9991-10000.
Add proximity cards sequentially numbered
| Programming Step | Keystroke Combination | LED |
| Enter Program Mode | * Admin Code # | Red shines |
| Add proximity cards sequentially numbered | 10# (Input the first ID number) # (card quantity) # (The first card number) # | Orange bright |
| Exit Program Mode | * | Red bright |
Note: The ID number must be empty and successive.
Add Visitor Users
| Programming Step | Keystroke Combination | LED |
| Enter Program Mode | * Admin Code # | Red shines |
| Add Visitor Card | 10# ID# (1~9)# Read Card | Orange bright |
| Add Visitor PIN | 10# ID# (1~9)# (4~6 digits PIN)# | |
| Exit Program Mode | * | Red bright |
Note: Visitor users ID range: 9991~10000, Number of time is 1~9.
Delete User
| Programming Step | Keystroke Combination | LED |
| Enter Program Mode | * Admin Code # | Red |
| Delete Card User: By Card | 2# (Read Card) … | Orange bright |
| Delete User: By Fingerprint | 2# (Fingerprint) … | |
| Delete Card User: By Card number | 2# (Input 8/10 digits card number) # … | |
| Delete PIN User | 2# (4~6 digits PIN) # … |
| Delete Card/ PIN User: By ID number | 20# (Input ID number) # … | Orange bright |
| Delete All Card/ PIN User | 20# (Admin Code) # | |
| Delete Fingerprint User: By ID number | 21# (Input ID number) # … | |
| Delete All Fingerprint User | 21# (Admin Code) # | |
| Delete All User | 2# (Admin Code) # | |
| Exit Program Mode | * | Red |
Note: User Fingerprint ID range: 1-100 or 1-500, User Card or Code ID range: 1-9988, Anti-duress users ID: 9989、9990, Visitor users ID range: 9991-10000.
Change the user code
| Standby mode | * ID# old code # new code # new code # |
| Exit the programming mode | Automatically exit when change done |
Pulse Mode and Toggle Mode Setting
| Programming Step | Keystroke Combination | LED |
| Enter Program Mode | * Admin Code # | Red shines |
| Access Time Setting | 3# (0~180) # (Factory default is Pulse Mode) | Orange bright |
| Set Toggle Mode | 3# 9999# | |
| Exit Program Mode | * | Red bright |
Note:
- Pulse Mode and Toggle Mode, you only can choose one.
- Factory default is Pulse Mode, and access time is 5 seconds. 0 seconds=100MS.
- Pulse Mode: The door will be closed automatically after opening the door for a while.
- Toggle Mode: Under this mode, after opening the door, the door won’t be closed automatically until next valid user input. That’s means whether open or close the door, you must swipe valid card or input valid fingerprint.
Access Mode Setting
| Programming Step | Keystroke Combination | LED |
| Enter Program Mode | * Admin Code # | Red shines |
| Open door by card | 4# 0# | Orange bright |
| Open door by code | 4# 1# | |
| Open door by Fingerprint | 4# 2# | |
| Open door by card+ code | 4# 4# | |
| Open door by multi-user | 4# (42~49) # | |
| Open door by card or code or Fingerprint | 4# 3# (Factory Default) | |
| Exit Program Mode | * | Red bright |
Note: The number of Multi-User access can be set to 2~9. If the user number is set to 9, it should input 9 different valid users continuously to access, and the time interval of inputting two valid user should be less than or equal 10s. If timeout, the device will exit to standby mode automatically. During the operation the red led light shines.
Alarm output Time Setting (Factory default is 1 minute)
| Programming Step | Keystroke Combination | LED |
| Enter Program Mode | * Admin Code # | Red shines |
| Set alarm time | 30# (0~3)# | Orange bright |
| Exit Program Mode | * | Red bright |
Note: Alarm time range: 1~3 minutes, 0: Turn off alarm, and it includes door contact alarm, tamper alarm, and the time alarm of safe mode.
Door Detection Setting
| Programming Step | Keystroke Combination | LED |
| Enter Program Mode | * (Admin Code) # | Red shines |
| To disable door detection | 50# 0# (Factory Default) | Orange bright |
| To enable door detection | 50# 1# |
| Programming Step | Keystroke Combination | LED |
| Enter Program Mode | * (Admin Code) # | Red shines |
| To disable door detection | 50# 0# (Factory Default) | Orange bright |
| To enable door detection | 50# 1# |
Note: After enable the door detection function, you must connect the detection switch into the wiring. There will be two detection status:
- The door is opened by valid user, but not closed in 1 minute, the device will beep.
How to stop the warnings: Close the door/valid user/ Automatically stop when the alarm time is up. - If the door opened by force, the device and external alarm will activate.
How to stop the alarm: Valid user/Automatically stop when the alarm time is up.
Safe Mode Setting
| Programming Step | Keystroke Combination | LED |
| Enter Program Mode | * Admin Code # | Red shines |
| Control Sounds: OFF
ON |
6# 0#
6# 1# (Factory Default) |
Orange bright |
| Control Red LED: OFF
ON |
60# 0#
60# 1# (Factory Default) |
|
| Control Keypad LED: OFF
ON Intelligent keyboard light |
61# 0#
61# 1# (Factory Default) 61# 2# |
|
| Anti-tamper Alarm: OFF
ON |
52# 0# (Factory Default)
52# 1# |
|
| Exit Program Mode | * | Red bright |
Note:
- Lockout Mode: If swipe card/input fingerprint with invalid users for 10 times in 10 minute, the device will be lockout for 10 minutes. When in Lockout Mode, press the Exit Button can open the door.
- Alarm Output: If swipe card/input fingerprint with invalid users for 10 times in 10 minute, the device will beep and external alarm will activate. The valid user can remove the alarm.
Sound and Light mode Setting
| Programming Step | Keystroke Combination | LED |
| Enter Program Mode | * Admin Code # | Red shines |
| Enter the menu | 9# 1# | Orange bright |
| Exit Program Mode | * | Red bright |
Data transmission of user card & user code
Note: (Only support copy user of card and code)
- The two devices must be the device produced by us and support this function.
- The two devices have the same admin code
- Connect the Wiegand cable of the two devices and power on
For example:
For device A and B, they have the same admin code. Add a new card & code user to the device A. Device B has no user. Connect the Wiegand cable of device A and B, then power on. Do the operation of * admin code # 9# 1# on device A. The green led of the two devices flash. The device A is sending the user data to device B.
WIEGAND READER MODE
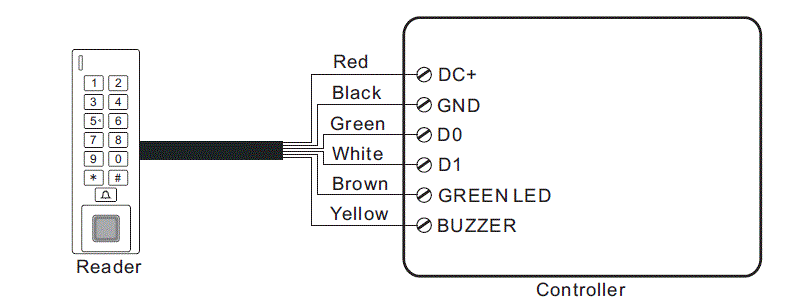
Connection Diagram
Set standalone / Wiegand reader mode
| Programming Step | Keystroke Combination | LED |
| Enter Program Mode | * Admin Code # | Red shines |
| Standalone Mode | 8# 0# (Factory Default) | Orange bright |
| Wiegand reader Mode | 8# 1# | |
| Exit Program Mode | * | Red bright |
Note: In wieg and reader mode, brown wire control the Green LED, Yellow wire control the buzzer, only active with low voltage.
Wiegand Format Setting (Factory Default: EM 26 bit, Mifare 34 bit, Password 4 bit
| Programming Step | Keystroke Combination | LED |
| Enter Program Mode | * Admin Code # | Red |
| Wiegand check code: OFF
ON |
7# 0#
7# 1# (Factory Default) |
Orange bright |
| Password Wiegand Format | 70# (0# or 4# or 8#) | |
| EM Wiegand format | 71# (26# ~ 44#) | |
| Mifare Wiegand format | 72# (26#~44#, 56#, 58#) | |
| Exit Program Mode | * | Red |
Note:
- 10 Digits Virtual Card Number: Input 4~6 digits PIN, press “#”, output a 10-bit decimal card number. For example,
input password 999999, the output card number is 0000999999 - Each key press sends 4 bits data, the corresponding relationship is:
1 (0001) 2 (0010) 3 (0011) 4 (0100) 5(0101) 6(0110)
7 (0111) 8 (1000) 9(1001) 0(0000) - Each key press sends 8 bits data, the corresponding relationship is:
1 (11100001) 2 (1101 0010) 3 (11000011) 4 (1011 0100)
5 (10100101) 6 (1001 0110) 7 (10000111) 8 (0111 1000)
INTERLOCK MODE
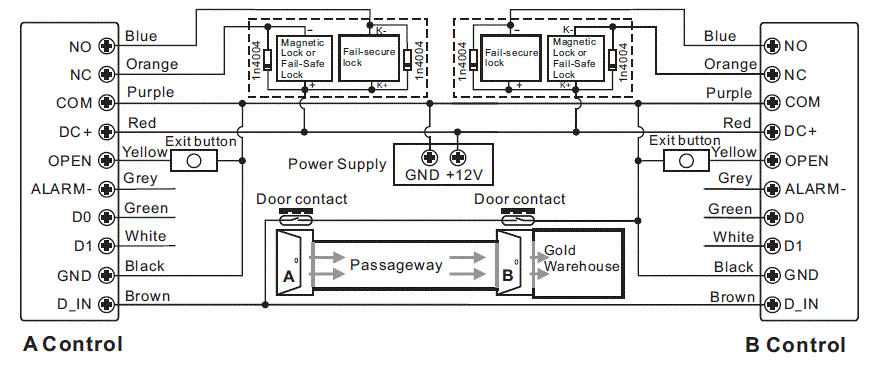
Interlock for two doors, this function usually apply in the places with high safety. For example, there are two doors name A and B in the passage. You access door A with card, and then you cannot access door B with the card until door A closed. That is to say: both of the doors should be closed, then you can swipe your card on one of them.
| Programming Step | Keystroke Combination | LED |
| Enter Program Mode | * Admin Code # | Red shines |
| Close Interlock Mode | 80# 0# (Factory Default) | Orange bright |
| Enable Interlock Mode | 80# 1# | |
| Exit Program Mode | * | Red bright |
Note: The Door Contact must be installed, or this function cannot be enable.
Wiring diagram of Interlock
FCC Caution:
This device complies with part 15 of the FCC Rules. Operation is subject to the following two conditions:
- This device may not cause harmful interference, and
- This device must accept any interference received, including interference that may cause undesired operation.
Any changes or modifications not expressly approved by the party responsible for compliance could void the user’s authority to operate the equipment.
NOTE: This equipment has been tested and found to comply with the limits for a Class B digital device, pursuant to Part 15 of the FCC Rules. These limits are designed to provide reasonable protection against harmful interference in a residential installation. This equipment generates, uses and can radiate radio frequency energy and, if not installed and used in accordance with the instructions, may cause harmful interference to radio communications. However, there is no guarantee that interference will not occur in a particular installation. If this equipment does cause harmful interference to radio or television reception, which can be determined by turning the equipment off and on, the user is encouraged to try to correct the interference by one or more of the following measures:
- Reorient or relocate the receiving antenna.
- Increase the separation between the equipment and receiver.
- Connect the equipment into an outlet on a circuit different from that to which the receiver is connected.
- Consult the dealer or an experienced radio/TV technician for help.
To maintain compliance with FCC’s RF Exposure guidelines, This equipment should be installed and operated with minimum distance between 20cm the radiator your body: Use only the supplied antenna.
FAQ
Q: How can I set the factory default and add Admin Card/Fingerprint?
A: Press and hold the exit button, power on, release it after two beeps. Swipe the admin card, press the admin fingerprint 3 times, the red LED on with one beep, the factory default setting is done. The admin card/admin fingerprint is added successfully.
Documents / Resources
 |
HUANYA HF5 Tuya WiFi Fingerprint Access Control and Reader [pdf] User Manual HF5, HF5 Tuya WiFi Fingerprint Access Control and Reader, Tuya WiFi Fingerprint Access Control and Reader, WiFi Fingerprint Access Control and Reader, Fingerprint Access Control and Reader, Access Control and Reader, Reader |