Haltian RADAR Release Vehicle Detection Sensor

Product Specifications
- Product Name: Haitian RADAR
- Installation Height for Wall or Pole: 40 – 60cm
- Maximum Ceiling Installation Height: 5 meters
Product Information
Haltian RADAR is a reliable wireless vehicle detection sensor designed for various facility management applications such as smart parking and loading dock occupancy detection. It is part of Haltian’s IoT solution and product family, offering a scalable and secure solution for businesses.
Product Usage Instructions
General Installation Instructions:
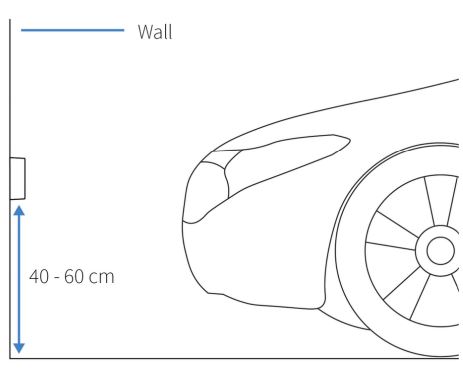
- Wall or pole installation: Install at a height of 40 – 60cm.
- Ceiling installation: Maximum height is 5 meters.
- For poles, angle the sensor roughly 45 degrees towards the observed spot.
Installation Guidelines:
Ensure a clear view of the detection beam towards the observed area. Avoid thick concrete structures, electrical transformers, metal objects blocking signals, and other interference sources listed in the manual.
Detailed Installation Steps:
- Remove attachment tape release paper.
- Attach the device to the clean surface firmly for 30 seconds.
- Alternatively, use Screw Mount Plate for ceiling installations.
- Power on the device using the included magnet tool by bringing it close to the QR code end. The LED will blink rapidly when ready.
FAQ
How far should sensors be installed from each other or the gateway?
Sensors should be installed within a maximum distance of 20 meters from the next sensor or gateway to ensure a full coverage mesh network.
Quick Guide
- Read the QR code to identify the device
- Choose your installation spot. For wall or pole installations, the installation height is 40 – 60cm. For ceiling installations, the maximum height is 5 meters.
- Installation:
- Method 1: Remove the attachment tape’s release paper and attach it to the device. Then remove the other release paper and install the device to a clean surface by pushing firmly for 30 seconds.
- Method 2: Use the Screw Mount Plate for ceiling installations by first attaching the plate to the device, and then screwing it to the installation surface. Note that the attachment plate is available as an outbox accessory.
- METHOD C REMOVED FOR NOW
- Power the device on with the included magnet tool by bringing the magnet close to the device’s end with the QR code. The LED will blink rapidly for 30 seconds when the device is ready to use.
Welcome to using Haltian IoT
- We at Haltian want to make IoT simple, so we have created a solution that is easy to use, scalable, and secure. I hope it will help you achieve your business goals!
- Haltian RADAR is the most reliable wireless vehicle detection sensor for various facility management use cases, like smart parking and loading dock occupancy detection.
- Haltian RADAR is a part of Haltian’s IoT solution and product family.
Sales package content
- Up to 5 x Haltian RADAR sensors, depending on the quantity ordered
- Haltian Adhesive tapes, one for each sensor
- 1 x Haltian Sensor Activation Tool for turning the device on
Accessories
Screw Mount Plate for, e.g. ceiling installations using screws. Available as a standalone purchase.
Using Haltian RADAR sensor
- Haltian RADAR measures the distance between the sensor and any surface. The sensor sends a 60GHz radio wave signal and calculates the distance from the time it takes for the wave to return to the sensor from an object in the beam area. The strength of the signal is also measured and with these, RADAR can reliably detect changes in the observed area.
- Haltian RADAR can be used to detect if a parking space or loading dock is occupied or not. It can also be used to detect any changes in the observed area for other occupancy monitoring use cases.
- Haltian RADAR gives reliable occupancy data and it has an adjustable sensing distance, making the installation flexible and easy.
- Haltian RADAR is made to function in any environmental conditions inside or outside. The 60 GHz radar detection remains uncompromised by any natural source of interference such as noise, rain, dust, temperature, object color and material, and direct or indirect light.
General installation instructions
- Install Haltian RADAR sensor in front of or above the space you want to monitor. Make sure that the sensor beam is directed toward the area. Install the device, if possible, perpendicular to the center of the measured area. However, depending on the installation spot, you can also position the device at an angle of up to 45 degrees or more. Ensure that the beam accurately covers the observed area, and adjust the sensing distance to avoid detecting objects beyond the intended monitoring zone.
- The best positions for parking place monitoring:
- On the wall or pole in front of the parking space
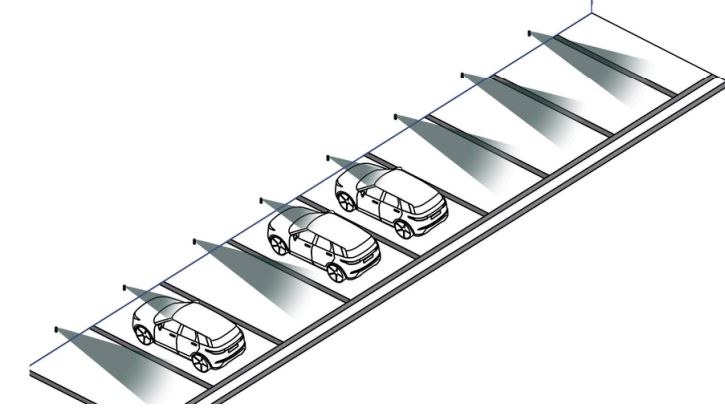
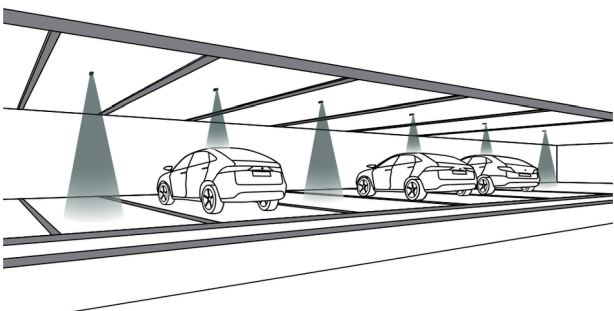
- On the ceiling above the parking space
- In poles, angled roughly 45 degrees to towards the observed spot. This is particularly important when installing two sensors on one pole detecting occupancy of two adjacent places.

The main thing to consider when choosing the installation method is to ensure a clear view of the detection beam towards the observed area.
- On the wall or pole in front of the parking space
Things to avoid in installation
The following can affect wireless radio communication:
- Thick concrete structures or thick fire doors.
- Electrical transformers or thick electrical wires.
- Escalators.
- Nearby halogen lamps, fluorescent lamps, or similar lamps with hot surfaces.
- Nearby radio equipment like WiFi routers or any other similar high-power RF transmitters.
- Metal objects blocking the signal between other sensors or the gateway
- Near elevator motors or similar targets causing a strong magnet field.

Installation
- Please make sure the Haltian gateway device is installed before you install the sensors.
- To identify the sensor, read the QR code on the end of the device with a QR code reader or Thingsee Toolbox application on your mobile device.
- Identifying the device is not necessary, but it will help you keep track of your IoT installation and help Haltian support to solve possible issues.

Note: Make sure the sensor is installed max. 20 meters from the next sensor or gateway. This is to ensure a full coverage mesh network between the sensors and the gateway. - After installation Haltian RADAR is powered on by using a the magnet included. Place the magnet close to the device’s end as shown in the picture.

- Haltian RADAR has an indication LED that shows the operating status.
- Out of the box the device is in deep sleep transport mode indicated with dim green LED blinking every 2 seconds. When the magnet is brought close to the device’s end point, the device will indicate start-up by blinking brightly for 15 seconds. Notice that the first boot(before LED starts blinking) may last about 30 seconds if the Radar detects that a newer OTA firmware update is available and automatically downloads it.
- LED statuses:
- Deep sleep mode = Quick, dim green LED blink every 2 seconds
- Start-up phase after using the magnet = device blinks brightly for 15 seconds with two-second intervals. Then switches to blink every 15 seconds for a further 10 minutes.
- Device installed and operating = LED off
- The status of an installed device can be checked using the magnet:
- Magnet placed on top of the device, Green LED blinks 3 times with 2 seconds intervals = Connection OK
- Magnet placed on top of the device, Green LED blink once = Device on, but the connection failed
- Failed connection means there’s no Wirepas network available, or no gateway connection exists.
Installation method 1: Installing Haltian RADAR with attachment tape
- The default attaching method in wall installations is using the included attachment tape. First, remove the tape’s release paper and attach it to the device. Usually, the tape is attached to the back of the device, but the tape can be attached to the sides as well if the installation requires it.
- The recommended installation height in wall installations is 40-60cm from the floor.
- Clean the installation surface with IPA -solvent (isopropyl alcohol) to remove any grease, dust, or other from the surface. The smoother the surface the better, but the gel tape allows some unevenness. Please note that the recommended temperature for the tape installation is at least +15 degrees. If the surface is much colder, you can pre-warm it using for example hot air blower/heat gun, or gas torch if it can be done safely.
- Remove the release paper from the other side and press the device firmly against the surface for a minimum of 30 seconds. Test lightly that the device is well attached and there is no excess movement. The tape will reach its full strength in about 24 hours.

Installation method 2: Installing Haltian RADAR with Screw Mount Plate (accessory)
- If the installation surface is not suitable for tape, you can use the Screw Mount Plate accessory available as a standalone purchase. Ceiling installations should always be done with the Screw Mount Plate. Please note that Haltian takes no responsibility for possible damages caused by falling devices.
- Attach the plate to the device using the 4 provided screws (screw torque max 20Ncm).
- Then use the 2 provided screws to install the device to the planned surface. Screw anchors are also included and can be used if they work on the surface material.
- If the ceiling height is more than 3 meters, you may need to adjust the sensing distance (using the Thingsee Toolbox mobile app) to be more than the default 2 meters. The maximum recommended height is 5 meters. It’s important to note how the sensing area is impacted by installation height (refer to the Detection Capability chapter below).

Installation method 3: Installing Haltian RADAR with pole attachment plate (accessory, will be available later)
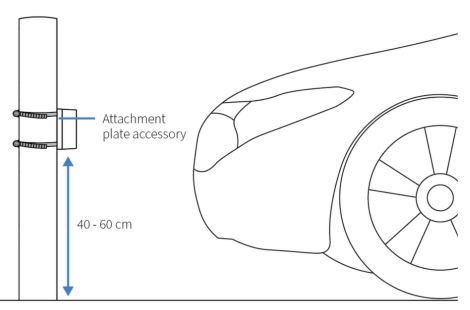
- When attaching Haltian RADAR to a pole you can use a Pole Mount Plate accessory.
- Attach the plate to the device using the 4 provided screws. Then use the provided cable ties for attaching Haltian RADAR to the pole The installation height from the floor in pole assembly is 40 – 60cm.
Using Haltian RADAR for loading dock monitoring
- Haltian RADAR sensor can be used for monitoring the occupancy of loading docks. In the loading dock case, Haitian RADAR is always wall-mounted or mounted to the loading dock frame or structures. The best position is in the middle of the dock, but both sides will work as long as the detecting cone still hits the area to be observed. Make sure that the detection cone does not hit the neighboring loading area to prevent false positives.


- Please check that the installation spot is not impacted by any moving mechanisms in the loading dock during its operation. The RADAR should be installed in a location where it will not be hit or damaged by a truck backing up or approaching the loading dock.
- The dock area doesn’t need to be free during the installation which makes the installation possible with minimal disruptions to normal warehouse operations. After installation, Haltian RADAR performs an Echo Level Adjustment (ELA) that automatically sets the detection threshold. If the dock is occupied by e.g. a truck during the installation, Haltian RADAR will show the place as free until the truck leaves.
- After this the device finds a new lower threshold level and detects the next truck arriving, informing that the place is now occupied.
- The ELA process can be also initiated manually using Thingsee Solution Suite application if there are, for example, new fixed structures brought into the observed area (i.e. new safety railings etc.) and those need to be taken out of the threshold. Without running a new ELA process, Haltian RADAR would always detect the structures and show the place as occupied.
Detection Capability
- Measurement range: 20 cm – 10m
- Sensing area is a cone shape, 17 degrees, region of interest (ROI).
Default measurement and reporting in parking use case (pre-configured in production)

Default settings:
- Check occupancy every 30 seconds
- Report occupancy value whenever the state changes and every 1 hour even if there is no change
- Report battery level every 24 hours
- Sensing distance 2 meters
The following parameters are configurable remotely over Haltian Operations Cloud:
- Measurement interval
- Sensing distance
- Reporting interval
Default measurement and reporting in loading dock use case (pre-configured in production)

Default settings:
- Check occupancy every 60 seconds
- Report occupancy value whenever the state changes and every 1 hour even if there is no change
- Report battery level every 24 hours
- Sensing distance 5 meters
The following parameters are configurable remotely over Haltian Operations Cloud:
- Measurement interval
- Sensing distance
- Reporting interval
Settings’ impact on battery life
- 30 min measurement interval up to 25 years
- 1 min measurement interval up to 10 years
- 30 s measurement interval up to 6 years (default setting)
- 10 s measurement interval up to 4 years
Device info
- Operating temperature -35 °C … +85 °C
- Operating humidity 0 % … 100 % RH non-condensing
- Storage temperature +5 °C … +25 °C
- Storage humidity 45 % … 85 % RH non-condensing
- IP rating grade: IP68
- Certifications: CE, and UKCA. RoHS compliant
- Battery type: Thionyl Chloride Lithium Battery 19Ah, non-user-replaceable
- Radio sensitivity: -95 dBm (BTLE)
Device dimensions (millimeters)

CERTIFICATION INFORMATION
EU DECLARATION OF CONFORMITY
- Hereby, Haltian Oy declares that the radio equipment DRA complies with Directive 2014/53/EU. The full text of the EU Declaration of Conformity is available at the following internet address: support.haltian.com
- Hereby, Haltian Oy declares that the radio equipment type DRA complies with the UK relevant statutory requirements (Radio Equipment Regulations 2017 (SI 2017 No. 1206)). The full text of the declaration of conformity is available at the following internet address: Technical information and FAQs | Haltian Support
- Haltian RADAR operates at Bluetooth® 2.4 GHz frequency band.
- Manufacturer name and address:
- Haltian Oy
- Yrttipellontie 1 D
- 90230 Oulu
- Finland
FCC REQUIREMENTS FOR OPERATION IN THE UNITED STATES
FCC Information for the User
This product does not contain any user serviceable components and is to be used with approved, internal antennas only. Any product changes of modifications will invalidate all applicable regulatory certifications and approvals.
FCC Guidelines for Human Exposure
This equipment complies with FCC radiation exposure limits set forth for an uncontrolled environment. This equipment should be installed and operated with a minimum distance of 20 cm between the radiator and your body. This transmitter must not be co-located or operating in conjunction with any other antenna or transmitter.
FCC Radio Frequency Interference Warnings & Instructions
This equipment has been tested and found to comply with the limits for a Class B digital device, under Part 15 of the FCC Rules. These limits are designed to provide reasonable protection against harmful interference in a residential installation.
This equipment uses and can radiate radio frequency energy and, if not installed and used under the instructions, may cause harmful interference to radio communications. However, there is no guarantee that interference will not occur in a particular installation. Suppose this equipment does cause harmful interference to radio or television reception, which can be determined by turning the equipment off and on. In that case, the user is encouraged to try to correct the interference by one or more of the following methods:
- Increase the separation between the equipment and the receiver.
- Consult the dealer or an experienced radio/TV technician for help.
- Any changes or modifications not expressly approved by the party responsible for compliance could void the user’s authority to operate this equipment.
FCC compliance statement:
This device complies with Part 15 of the FCC Rules. Operation is subject to the following two conditions:
- this device may not cause harmful interference
- this device must accept any interference received, including interference that may cause undesired operation.
SAFETY GUIDE
Read these simple guidelines. Not following them may be dangerous or against local laws and regulations. For further information, read the user guide and visit Everyday IoT for smoother working life
Usage
- Do not open or disassemble the device.
- Do not modify the device. Unauthorized modifications may damage the device and violate regulations governing radio devices.
- Disposal of the device into fire or a hot oven, or mechanically crushing or cutting of the device can result in an explosion
- Leaving the device in an extremely high temperature surrounding environment can result in an explosion or the leakage of flammable liquid or gas
- The device subjected to extremely low air pressure may result in an explosion or the leakage of flammable liquid or gas
- Please take care that the used devices are recycled by taking them to an appropriate collection point.
- Keep devices away from children.
Care and maintenance
Handle your device with care. The following suggestions help you keep your device operational.
- Unauthorized modifications may damage the device and violate regulations governing radio devices.
- Avoid dropping, knocking, or shaking the device. Overtly rough handling can break it.
- Use a soft cloth to clean the surface of the device. Do not clean the device with solvents, toxic chemicals or strong detergents as they may damage your device and void the warranty.
Damage
If the device is damaged contact support@haltian.com. Only qualified personnel may repair this device.
Small children
Your device is not a toy. It may contain small parts. Keep them out of the reach of small children.
RECYCLING
- Check the local regulations for proper disposal of electronic products. The Directive on Waste Electrical and Electronic Equipment (WEEE), which entered into force as European law on 13th February 2003, resulted in a major change in the treatment of electrical equipment at end-of-life. The purpose of this Directive is, as a first priority, the prevention of WEEE, and in addition, to promote the reuse, recycling and other forms of recovery of such wastes so as to reduce disposal.
- The crossed-out wheelie-bin symbol on your product, battery, literature, or packaging reminds you that all electrical and electronic products and batteries must be taken to separate collections at the end of their working life. Do not dispose of these products as unsorted municipal waste: take them for recycling. For info on your nearest recycling point, check with your local waste authority.
Documents / Resources
 |
Haltian RADAR Release Vehicle Detection Sensor [pdf] User Guide RADAR Release Vehicle Detection Sensor, RADAR, Release Vehicle Detection Sensor, Vehicle Detection Sensor, Detection Sensor, Sensor |


