 Instruction Manual
PIZ
Two-Wire Differential
Pressure Transducer

PIZ Two-Wire Differential Pressure Transducer
Document 7100.001784 Version 5.3 02/2010
Purpose of instruction manual
This instruction manual describes the features of the PU/PI and PS10 differential pressure transducers and provides guidelines for their use.
Improper use of this instrument or failure to follow these instructions may cause injury or equipment damage. Every person who uses the device must therefore read the manual and understand the possible risks. The instruction manual, and in particular the safety precautions contained therein, must be followed carefully. Contact the manufacturer if you do not understand any part of this instruction manual.
Handle this manual with care:
- It must be readily available throughout the lifecycle of the instrument.
- It must be provided to any individuals who assume responsibility for operating the instrument at a later date.
- It must include any supplementary materials provided by the manufacturer.
The manufacturer reserves the right to continue developing this instrument model without documenting such development in each individual case. The manufacturer
will be happy to determine whether this manual is up-to-date.
Conformity
![]() This instrument corresponds to the state of the art and meets all legal requirements set forth in EC directives as evidenced by the CE label.
This instrument corresponds to the state of the art and meets all legal requirements set forth in EC directives as evidenced by the CE label.
© 2005, 2017
The manufacturer owns the copyright to this instruction manual. This manual contains data, instructions and drawings pertaining to the features and usage of this instrument; copying this manual in part or in full or distributing it to third parties is prohibited.
Safety precautions
1.1 Appropriate use
In addition to differential pressure data, the PU/PI and PS10 differential pressure transducers also record positive and negative overpressures.
Always observe the operating requirements—particularly the permissible supply voltage—indicated on the rating plate and in the “Technical data” section of this manual.
The instrument may only be handled as indicated in this manual. Modifications to the instrument are prohibited. The manufacturer is not liable for damages caused by improper use or failure to follow these instructions. Violations of this type render all warranty claims null and void.
1.2 Shipping, assembly, electrical connections and start-up
Do not close the pressure inputs when shipping, as changes in barometric pressure could damage instruments with low measuring ranges.
Only technical personnel who are appropriately trained and authorized by the operator of the facility may assemble the instrument and set up its electrical connections.
The instrument may only be operated by appropriately trained individuals who have been authorized by the operator of the facility.
Pressurized air or breath is not to be used for performance tests, as this could damage instruments with low measurement ranges.
Measurement errors may occur if the instrument is not kept protected from sunlight.
Specific safety precautions are given in individual sections of this manual.
1.3 Troubleshooting, maintenance, repairs, disposal
The individual responsible for the electrical connections must be notified immediately if the instrument is damaged or if errors occur that cannot be corrected as indicated in section 5.
This individual must take the instrument out of service until the error has been corrected and ensure that it cannot be used unintentionally.
Always unplug the supply voltage before opening the instrument!
This instrument requires no maintenance.
Only the manufacturer may perform repairs that require the housing to be opened.
The electronic components of the instrument contain environmentally hazardous materials and materials that can be reused. For this reason the instrument must be recycled in accordance with the environmental guidelines of the jurisdiction in question once it has been taken permanently out of service.
1.4 Symbols
The symbols given below are used throughout this manual to indicate instances when improper operation could result in the following hazards:
![]() WARNING! This warns you of a potential hazard that could lead to bodily injury up to and including death if the corresponding instructions are not followed.
WARNING! This warns you of a potential hazard that could lead to bodily injury up to and including death if the corresponding instructions are not followed.
![]() WARNING: This warns you of a potential hazard that could lead to significant property damage if corresponding instructions are not followed.
WARNING: This warns you of a potential hazard that could lead to significant property damage if corresponding instructions are not followed.
![]() INFORMATION This indicates that the corresponding information is important for operating the instrument properly.
INFORMATION This indicates that the corresponding information is important for operating the instrument properly.
Instrument description
The PU/PI and PS10 pressure transducers are pneumatic, electronic sensors for measuring overpressures, vacuum pressures and differential pressures. Typical applications include, for instance, pressure measurements in air-conditioning and ventilation ducts. At the heart of the transducer is a pressure measurement capsule with a beryllium bronze membrane spring, which is displaced by the pressure difference between the two chambers of the measurement capsule. Inductive displacement transducers measure membrane deflection without contacting the membrane. The instrument has no frictional parts or parts subject to mechanical wear.
Start-up
| overpressure / pos. differential pressure | + input port | 0…1 kPa |
| vacuum / neg. differential pressure | – input port | 0…- 500 Pa |
| symmetrical overpressure / vacuum | + input port | ± 200 Pa |
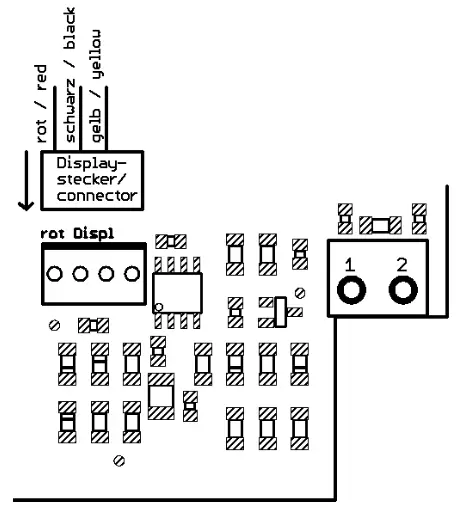
3.2 Supply voltage connections in the instrument:
(not all components are shown)

![]() Please note:
Please note:
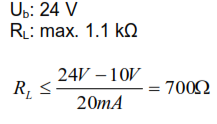
The maximum load resistance is dependent upon the supply voltage and may be calculated as follows:
![]()
Example:
 Display-connector

Calibrating the zero point
![]() Please remember that it takes roughly 30 to 60 minutes for the pressure transducer to warm up after it is switched on. The output signal may not remain stable during this period.
Please remember that it takes roughly 30 to 60 minutes for the pressure transducer to warm up after it is switched on. The output signal may not remain stable during this period.
It is recommended that the zero point after a long operating time (approximately 6 months) is checked and if necessary calibrate it again.
Once the pressure transducer has warmed up, the P1 trimmer can be used to calibrate the zero point of the analogue output. If the transducer has a display the zero point of the display must be calibrated too with P2.
The following table may be used to look up the value to which the analogue output must be set when the ports are open; this value is dependent upon the measurement range.
| Measurement range | Example | Set to |
| 0…nominal pressure | 0…1 kPa | 4 mA |
| ± nominal pressure | ± 200 Pa | 12 mA |
Troubleshooting
| Error description | Potential cause | Corrective action |
| no output signal | supply voltage is not connected incorrect supply voltage defective reverse polarity protection diode | connect correct supply voltage connect the correct supply voltage (see rating plate). replace D1 / D2 diode (model LL103A) |
| output signal is constant, despite change in pressure | pressure ports reversed | connect pressure as outlined in section 3.1. |
| output signal incorrect | defective pressure measurement cell | Send the instrument to the manufacturer for repair |
| zero point cannot be adjusted using P1 | defective pressure measurement cell | Send the instrument to the manufacturer for repair |
Technical data
| Measurement data | |
| measurement ranges | 0…50 Pa to 0…100 kPa or ±50 Pa to ±100 kPa (others available upon request) |
| overload capacity | 10 x the final value of the measurement range (for measurement ranges ≤ 20 kPa) 2 x the final value of the measurement range (for measurement ranges > 20 kPa) |
| hysteresis | 0.1 % |
| warm-up period | approx. 30 min. |
| time required for adjustment | approx. 20 ms (up to 5 s available upon request) |
| Margin of error (0.3Pa margin of error for the reference) | 1 %0.5 % only for meas. ranges ≥250 Pa (optional) 0.2 % only for meas. ranges ≥250 Pa (optional) |
| temperature-dependent drift in zero point | 0.04%/ K (within the +10°C…+50 °C range) |
| temperature-dependent drift in
measurement range |
0.04%/ K (within the +10°C…+50 °C range) |
| dead volume | approx. 2000 mm3 (for measurement ranges ³ 250 Pa) approx. 9000 mm3 (for measurement ranges < 250 Pa) |
| control volume | max. 200mm³ |
| max. system pressure | 100 kPa |
| Ambient conditions | |
| medium | air, all non-aggressive gases |
| operating temperature | 10° C to +60° C |
| storage temperature | -10° C to +70° C |
| relative humidity | 0…80 % |
| EMC standards | corresponds to EN 50 081 part 1 and EN 50 082 part 1 |
| conformity | |
| Electrical data | |
| power consumption | max. 1 W |
| supply voltage | 10…32 VDC (permissible peak-to-valley ratio < 0.2 Vss |
| load resistance RL | max. RL = 1.1 kΩ |
| display | 3½ or 4½-place LCD, character height = 13 mm (optional) |
| output signal | 4…20 mA |
| Physical data | |
| pressure port | Ø 6.5 mm for NW6 tubing (interior tubing diameter = 5 mm) |
| electrical connection | screw terminals for cables up to 2.5 mm2 PG7 cable gland |
| mounting orientation | vertical (when placing your order, please indicate if a horizontal orientation is required) |
| dimensions (w x h x d) | 80 x 120 x 70 mm 120 x 122 x 75 mm (for LCD option) |
| protection class | IP54 |
| weight | 0.3 kg |
| options | • 3½-place LCD • 4½-place LCD • ISO factory calibration certificate • DAkkS calibration certificate • cable gland: PG11 threaded connection • output signal attenuation up to 5 s |
Appendix A: Parts in contact with measurement medium
| · Beryllium bronze CuBe2 | · Araldite CY236 / HY988 |
| · Mu metal (nickel alloy) | · Loctite 242e |
| · Brass CuZn39Pb3 | · Carbonyl iron |
| · Aluminium AlCuMgPb / AlMg3 | · KEL (FPM: fluorinated rubber) |
| · Silicon (tubing) optional: Viton | · Vepuran Vu 4457/51 |
| · Crastin (PTBP) | · UHU-Plus endfest 300 binder |
For additional specifications and dimension drawings, please visit our website at http://www.halstrup-walcher.de/en/produkte/druckmesstechnik/index.php
Dimension drawings

7100.002144C_PIZ.doc 09/2017 Me/Ka
 halstrup-walcher GmbH
Stegener Straße 10
D-79199 Kirchzarten
Germany
Phone: +49 (0) 76 61/39 63–0
Fax: +49 (0) 76 61/39 63–99
E-Mail: info@halstrup-walcher.com
Internet: www.halstrup-walcher.com
Documents / Resources
 |
halstrup walcher PIZ Two-Wire Differential Pressure Transducer [pdf] Instruction Manual PIZ Two-Wire Differential Pressure Transducer, PIZ, Two-Wire Differential Pressure Transducer, Differential Pressure Transducer, Pressure Transducer, Transducer |


