![]() Installation Instructions
Installation Instructions![]() Flashing solution for bracket mounting on slate roofs
Flashing solution for bracket mounting on slate roofs
SpeedFlash® Kit

1 x SpeedFlash®base and cap
1 x Spring support
2 x Shims (packings)
1 x Foam insert
Tools you will need:
- SpeedFlash® Shield
Two shields supplied in every box. Also available to buy separately. - Scissors/Snips
- Angle Grinder
- Impact Driver
- Find the rafter positions.
There are several ways to do this:
• Gain access to loft space
• Use a type of Stud Finder tool
• Look under fascia board
If you struggle to find the rafter:
Open a small section of the roof using a slate ripper or our new ‘Double Sided Hacksaw Tool’ (cuts rather than rips the nails).
Locate the rafter positions.
The roof can easily be repaired using the Hallhook®.
Once you have identified the rafter, mark the centre line position of the rafter on the slates.
- You are now ready to mark the top slate, in preparation for cutting.
Measure upwards 190mm / 7.5” from the bottom of the slate and mark with a line.
- To conclude the line drawings for cutting purposes, measure 37.5mm / 1.48” left and right from the centre of the rafter line. Draw vertical lines from the 190mm / 7.5” horizontal line, down to the bottom of the slate.
You now have the full area marked ready for the first cuts.
- The SpeedFlash® Shield is used to protect a specific area of the course below when cutting the top slate(s).

- Insert the SpeedFlash® Shield fully as shown.
Using the angle grinder, cut out the marked area (top slates only).
Do not exceed the vertical lines.
NB: The shield’s purpose is to protect the lower course of slates. Take care to avoid contact with angle grinder to prolong shield life.
Remove the SpeedFlash® Shield.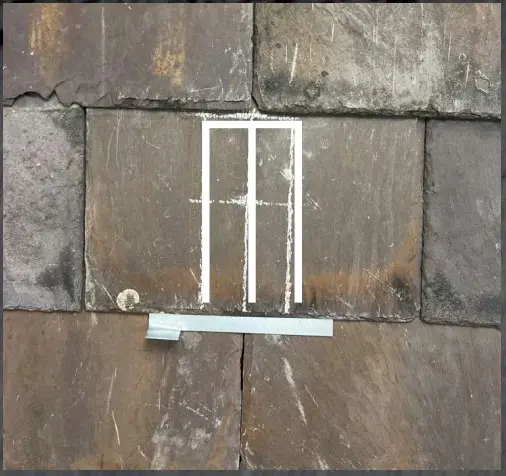
- Now you have cut the top slate(s), you need to cut the lower course to create the working area (the area in which the bracket will be fixed).
Mark 110mm / 4.33” up, from the bottom of the cut slate(s).
- Using the angle grinder, cut out the ‘working area’ on the slate i.e. the area from the 110mm / 4.33” horizontal line and the 190mm/ 7.5” horizontal line.
Cutting at 110mm / 4.33”, ensuresyou leave 10mm above the nail holes on the slate(s) underneath. This protects the area around the nail holes, thus preventing failure.
- You now have your working area in which to fix the bracket onto the rafter.
Place bracket into position to determine if any shims / packings are required to achieve clearance from the roofing material (slate) underneath.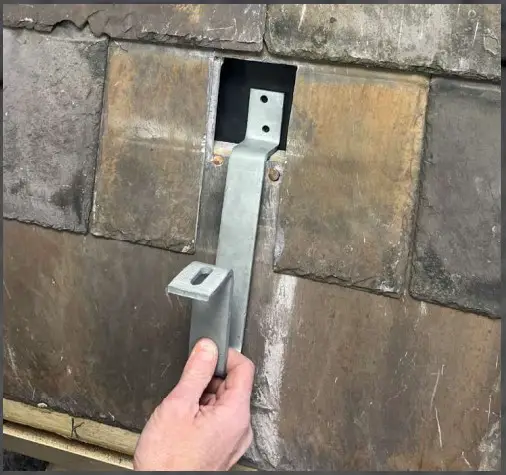
- Use shims / packings to create clearance between the bracket and the roofing material.

- Cut down SpeedFlash® to required size (determined by the size of the slate).

- SpeedFlash® can now be pushed into position.
The SpeedFlash® needs to stay in this position (the top touching the nails on the slate).
- To hold the SpeedFlash® in place, use the metal spring support. Insert support via the bottom opening, hooking the support onto the cut under slate.
Then pull down and attach support to the base of the SpeedFlash®.
- Install bracket.
Install / Fix bracket into position.
- Insert foam at the bottom opening of the SpeedFlash®.
Around the drop of the bracket, sealing the bottom opening.
- Finally, attach the cap.
Starting at the bottom of the SpeedFlash®, the cap slides onto the lip on the base. Then press into place at the top section, allowing clasps to clip into place.
Installation is complete.
![]()
- Patent applied for.
- Illustrations used 18” slates, set at 75mm / 3” head-lap.
The cuts will always be the same regardless of the size of slate (18” +) and or the rafter position. These cuts allow you to maintain 3” head-lap (as per building regulations). - SpeedFlash® has been designed in line with standard roofing practices of 75mm / 3” head-lap.
- SpeedFlash® is compatible with 18” to 24” slates. SpeedFlash® can be used on 16” slates however due to the need to maintain a 3” head-lap, the working area will be reduced. This reduces the compatibility with certain brackets.
- SpeedFlash® is not compatible with Pantile (wide plate) brackets, due to the width of the entry point into the SpeedFlash®.
- The working area will allow for brackets with a maximum fixing plate height of approximately 80mm.
- Plastic can be brittle in cold weather, do not attempt to bend during installation.
- Use appropriate safety PPE.
Installation video available on our website
![]()
120 Clydesdale Place, Leyland PR26 7QS
T: 01257 793113 Email: sales@geniusroofsolutions.com
Web: www.geniusroofsolutions.com
The contents of this instruction booklet are for general information and illustrative purposes only. Hallclip reserves the right to alter or update this booklet without prior notice. It may also change information and/or images at any time. Hallclip does its utmost to ensure that information contained in this booklet is accurate, complete and up-to-date. To the fullest extent permitted by law. Hallclip expressly disclaims all liability for any direct, indirect, or consequential loss or damage which howsoever arises in connection with the use of or reliance upon any materials and information appearing in this booklet. January 2024.
© Hallclip 2024. All content contained within this document is copyright and may not be altered, reproduced, or copied unless prior written consent is given by Hallclip.
![]()
Documents / Resources
 |
Genius Roof Solutions Flashing Solution for Bracket Mounting on Slate Roofs [pdf] Installation Guide 51845, 002, Flashing Solution for Bracket Mounting on Slate Roofs, Solution for Bracket Mounting on Slate Roofs, Bracket Mounting on Slate Roofs, Mounting on Slate Roofs, Slate Roofs, Roofs |