FRIGGA V5 Plus Series Temperature and Humidity Data Logger
USER MANUAL
V5 Plus Series User Manual

Temperature & Humidity Data Logger

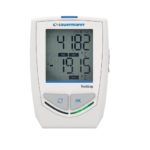
Appearance Description


Display Description

1. Recording Icon
2. Time
3. Airplane Mode
4. Bluetooth
5. Signal Icon
6. Battery Icon
7. Humidity Unit
8. Temperature Unit
9. QR Code
10. Device ID
11. Shipment ID
12. Alarm Status
1. Check For New Logger
Short press the red “STOP” button, and the screen will display the word “UNSEND” and use by information, indicating that the logger is currently in sleep state (new logger, not used). Please confirm battery power, if it is too low, please charge the logger first.

2. Turn on the logger
Long press the “START” button for more than 5 seconds, when the screen starts flashing the word “START”, please release the button and turn on the logger.

3. Start Delay
The logger enters into start delay phase after turning on.
The icon ” Delay ” displays on the left side of the screen, indicating the logger is in recording.
The icon ” ” displays on the left side, indicating the logger is in start delay phase.
Default delay start for 30 minutes.

4. Gateway Solution Information
When V5 plus monitor (master device) connects with beacon(s), a ” ![]() ” icon will show on the screen, meaning master devices and beacon(s) are connected.
” icon will show on the screen, meaning master devices and beacon(s) are connected.
After connection, beacon(s) will enter start delay mode for 30 minutes. After start delay, beacon(s) start recoding data and sending data to platform.
5. Recording Information
After entering the recording state, the ” ![]() ” icon will no longer be displayed.
” icon will no longer be displayed.

6. Alarm Information
If alarms are triggered during recording, alarm icon will be displayed in the left corner of the screen. If ” ![]() ” shows on the screen, it means alarm event(s) have happened in the past. If
” shows on the screen, it means alarm event(s) have happened in the past. If
” ![]() ” shows on the screen, it means the alarm is happening. Alarm LED light will flash once detect alarms.
” shows on the screen, it means the alarm is happening. Alarm LED light will flash once detect alarms.

7. Check Data
Click STATUS button, goes to the first page. Start & Stop Time of the device, as well as Temperature data will be shown on this page.

7.1 Check Data
Click PAGE DOWN button, goes to the second page. Detailed temperature data including MAX & MIN & AVG & MKT Temp will be accessible directly on the screen. Recording interval, Log Readings & Unsend Readings will be also found on this page.

7.2 Check Data
Click PAGE DOWN button, goes to the third page. On this page, check 6 temperature thresholds (3 upper limits, 3 lower limits) .

7.3 Check Data
Click PAGE DOWN button, goes to the fourth page. On this page, check Multi-level Temp. Chart throughout the journey.

7.4 Check Data
Click PAGE DOWN button, goes to the fifth page. On this page, check 6 humidity thresholds (3 upper limits, 3 lower limits) .
Note: Page 5 will be available if users set humidity thresholds on Frigga platform, otherwise, it won’t be showing on the screen.
7.5 Check Data
Click PAGE DOWN button, goes to the sixth page. On this page, check Multi-level humidity Chart throughout the journey.
Note: Page 6 will be available if users set humidity thresholds on Frigga platform, otherwise, it won’t be showing on the screen.
7.6 Check Data
Click PAGE DOWN button, goes to the seventh page.Bluetooth Low Energy (BLE) can be turned on or turned off following instruction, BLE status, whether it’s on or not, will be also shown on this page.
Note: If turn off BLE, mobile phone won’t be able to connect with device to read data when no signal.

8. Stop the Device
- Long press “STOP” button for 5 seconds to stop.
- Remote stop by pressing “End journey”on frigga cloud platform.
- Stop by connecting the USB port.

9. Get Report
- Connect to the computer and get report via the USB port.
- Generate data report on platform at “Reports” section, enter device ID to export data report, PDF and CVS version supported.
- When no signal, connect the device with Frigga Track APP via Bluetooth, read and upload all the unsent readings to Frigga cloud platform, complete report can be exported.

10. Charging
The battery of V5 Plus can be charged by connecting the USB port. Charge the device when the battery is less than 20%, the charging icon ” ![]() ” will be displayed when charging.
” will be displayed when charging.
Note: Don’t charge single use devices after activation, or the device will be stopped immediately.
11. More Information
Warranty: Frigga warrants that all electronic monitoring devices sold to Customers are free from defects in materials and workmanship under normal use for a period of 24 months from the date of purchase (“Warranty Period”).
Calibration report: The calibration report can be downloaded on Frigga cloud platform. Go to “Report Center”, click “Calibration Report”, enter the device ID to download calibration report. Batch export is supported.
FCC Warnning:
This equipment has been tested and found to comply with the limits for a Class B digital device, pursuan t to part 15 of the FCC Rules. These limits are designed to provide reasonable protection againstharmful interference in a residential installation. This equipment generates, uses and can radiateradio frequency energy and, if not installed and used in accordance with the instructions, maycause harmful interference to radio communications. However, there is no guarantee thatinterference will not occur in a particular installation. If this equipment does cause harmfulinterferenc e to radio or television reception, which can be determined by turning the equipmentoff and on, the user is encouraged to try to correct the interference by one or more of thefollowing measures:
- Reorient or reloca te the receiving antenna.
- Increase the separation between the equi pment and receiver.
- Connect the equipment into an outlet on a circuit different f rom that to which the receiver is c onnected.
- Consult the dealer or an experienced radio/TV technician for help.
Caution: Any changes or modifications to this device not explicitly approved by manufacturer could void your authority to operate this equipment.
This device complies with part 15 of the FCC Rules. Operation is subject to the following two conditions:
(1)This device may not cause harmful interference, and (2) this device must accept any interference received, including interference that may cause undesired operation.
This equipment complies with FCC radiation exposure limits set forth for an uncontrolled environment. This equipment should be installed and operated with minimum distance 20cm between the radiator and your body.
Specifications:
- Product: V5 Plus Series Temperature & Humidity Data Logger
- Manufacturer: Frigga Technologies
- Website: www.friggatech.com
Frequently Asked Questions (FAQ):
Q: How do I charge the logger?
A: Use the provided USB port to charge the logger. Ensure proper connection and wait for the battery to charge fully before use.
Q: What does the alarm LED light flashing indicate?
A: The alarm LED light flashing indicates that alarms have been detected during recording. Check the device for alarm details.
Q: How can I access detailed temperature and humidity data?
A: Use the PAGE DOWN button to navigate through different pages on the logger’s display to access detailed temperature and humidity data, thresholds, and charts.
Documents / Resources
 |
FRIGGA V5 Plus Series Temperature and Humidity Data Logger [pdf] User Manual V5 Plus Series, V5 Plus Series Temperature and Humidity Data Logger, Temperature and Humidity Data Logger, Humidity Data Logger, Data Logger, Logger |