FOSSiBOT F7200 Portable Power Station User Manual

Dear customer, thank you very much for purchasing and using the F7200 portable power station. Before operating this product, please carefully read the user manual for proper operation.
![]() Precautions For Use
Precautions For Use
- Please avoid long-term storage and use of this product in environments with high temperature, high humidity,or direct sunlight, to prevent the battery life from being shortened and to avoid other malfunctions. Keep the product away from fire sources, otherwise it may cause a fire hazard or explosion.
- This product must not be disassembled or modified. Improper operation may cause product malfunction or even fire. Unauthorized disassembly or modification may void the warranty.
- Be careful not to drop the product.
- Please store or use this product out of the reach of children, otherwise the product may be dropped or collided and may cause bodily injury to children. Keep the product away from pets as well.
- Please use our original accessories, and we do not guarantee defects caused by the use of non-original accessories.
- Please directly plug in the wall socket to charge the product, do not use extension cords or cable taps, otherwise there is a risk of damage to the extension cords and cable taps or even a fire; If the extension socket is plugged in to charge this product, please do not connect other electrical appliances to this socket, otherwise the household meter may trip.
- When the product is not in use or idle, please turn it off and unplug the power cable. If it needs to be idle for a long time, please consume the product from a fully charged state to an uncharged state, then recharge it to about 50% of the battery level and store it. For long-term storage, recharge to 50% very 3 months in a dry, room-temperature environment.
- If the product reaches scrap conditions, please discard or recycle the product in accordance with local laws. Contact your local recycling center for proper disposal instructions.
AC Output Parameter

Packing list

Product Introduction
This product is a portable power device with a built-in battery pack with charge/discharge capabilities. It includes both AC output interface and output, etc. It also has functions such as display, interface control, protection, and alarm. Moreover, this product can be charged by mains AC, solar panels and vehicle charging. It can be used with up to two battery packs with a maximum capacity of 15666Wh.
The following are the main features of this product:
- Equiped with LiFePO4 battery host, the battery energy is up to 5222.4Wh and after merging, the maximum capacity can reach 15666Wh, which can meet the daily consumption of a family. To connect additional battery packs, follow the instructions on page 10.
- Pyre sine wave AC output can meet almost all daily electronic equipment and small household appliances.
- Bidirectional fast-charging technology enables full recharge in approximately 2.5 hours.
- Multiple output interfaces including USB-A and Type-C PD (Power Delivery) support diverse application scenarios.
- Integrated UPS functionality achieves sub-10ms switching time, ensuring seamless power transition.
- Multi-layer protection mechanisms (battery management, circuit protection, and structural safeguards) ensure operational safety.

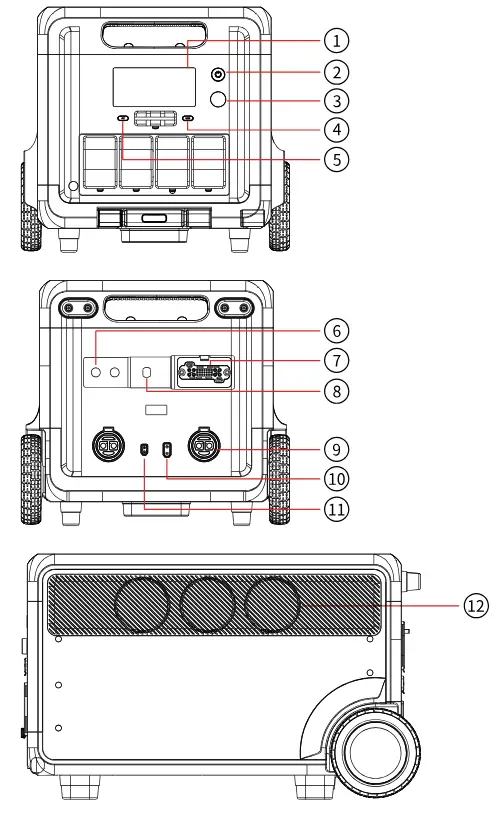
- LCD Screen
- Power ON/OFF Button
- Input Power Adjustment
- USB ON/OFF Button
- AC Button
- High Voltage PV Input
- AC Input
- High Voltage PV Input Button
- Parallel Port
- Low Voltage PV Input
- Car Charger Input
- Cooling Fans
1. LCD Screen
Display the product’s battery level and usage status tips.
(e.g., charging, discharging, USB port turned on, etc.)
2. Power ON/OFF Button
Instructions: Press and hold the power button for 3S to turn on/off the whole system.
Press and hold the Power button again for 3 seconds to turn it off
3. Input Power Adjustment
When the product is connected to the AC mains for charging, the power is adjusted according to the actual input voltage. It provides 5 levels of input power regulation: 600W/1200W/1800W/ 2400W/ 3000W. The clockwise rotation increases the input power, and the counterclockwise rotation decreases the input power. It is worth noting that charging this product at low power is beneficial for extending battery life.
4. USB ON/OFF Button
Instructions: Short press the USB button to turn on the USB output p and short press it again to turn it off.

5. AC Button
Tap the AC button to enable the AC output function. Since there may be differences in the AC output frequency and voltage in different regions, if you need to switch the frequency and voltage, the operations are as follows:
1) Press and hold the AC button for 3 seconds to enter the frequency switching mode, the 50Hz or 60Hz icon will flash on the display, short press the AC button again to select 50Hz or 60Hz; when the icon stops flashing and displays 50Hz or 60Hz, it indicates the switch is successful.
2) Quickly press the AC button for 10 times to select voltage.
Press the AC button 10 times in succession to enter the voltage switching mode, and then automatically exit the mode after a period of time.
6. High Voltage PV (Photovoltaic) Input
High voltage photovoltaic input MC4 interface, maximum power 2500W, 120V- 450V supported.
![]()
Danger: High voltage (120V-450V). Turn off the PV switch before connection or disconnection.
7. AC Input
Charging the product via a household outlet enables rapid charging at 1800W (120V) or 3000W (220V-240V), achieving a full 0% to 100% charge in just 2.5 hours. When using this charging method, please observe the following precautions:
※ Please directly plug in the wall socket to charge the product, do not use extension cords or cable taps, otherwise there is a risk of damage to the extension cords and cable taps or will even be a fire disaster.
※ If the extension socket is plugged in to charge this product, please do not connect other electrical appliances to this socket, otherwise the household meter may trip.
8. High Voltage PV Input Button
It can control the on and off of high voltage DC input to further ensure the safety of users.
![]()
Danger: High voltage (120V-450V). Turn off the PV switch before connection or disconnection.
9. Parallel Port
The capacity expansion need to be accomplished by connecting the parallel cable into the portable power station. This interface can achieve a maximum input and output of 7200W.
10 11. Low Voltage PV Input/Car Charger Input
This interface supports solar panel input or car charger input. For more details, please refer to “Solar Panel Connection” on page 11 of this manual and “Car/Vehicle Charging” .
![]()
Only one input source (either the low-voltage PV input or the vehicle-mounted charger input port) can be used at a time.
12. Cooling Fans
When the product reaches the temperature threshold set by the system, the cooling fan will automatically run, accompanied by a certain fan noise (fan noise below 60dB is normal). Do not block the cooling suction/exhaust port during use of this product, and do not place any object within the range of 30CM.
Introduction of Display Interface

- Connected to the AC Mains
- PV/Car Charger Input
- Bluetooth
- WIFI
- Battery Progress Bar
- AC Output
- Output Power in Total
- PD Output
- Host Logo
- Parellel Operation Logo
- Battery Level Percentage
- Remain Using/Recharging Time
- High/Low Temperature Protection
- Fan Status
- Input Power in Total
Screen Display Description
Power display: When the product is in the charging state, the battery progress bar rotates continuously in the form of a clockwise marquee, and the battery level percentage gradually increases; when the product battery level is 0, the battery level percentage icon flashes.
Input and output status: When the product is working, the total input power, total output power and the cursor corresponding to the working area will be displayed on the screen.
Alarm prompt: See the following troubleshooting table for details.
Troublshooting Sheet

AC Input
When charging the product via mains input, the provided power cable must be used. Under single-phase input at standard voltage (120V), the charger delivers an input power of 1800W. With dual-phase input at standard voltage (240V), the charger provides 3000W input power.
When connecting the product to the AC socket with a charging cable, first connect the charger to this product, insert the charger tail plug into the product’s AC input port, and hear a “click” sound, indicating that the charger and product are connected, and then connect the charger head plug to the AC socket.

UPS Mode
● UPS Feature
This product has the function of backup uninterruptible power supply. The usage and operation precautions are as follows:
As shown in Pic1 below, when the product is connected between the wall socket and the electrical appliance, and the power supply and AC switch of the product are in the ON state, the product enters the UPS working mode.
The AC mains in the socket supplies power to the electrical appliance through the bypass circuit, and also charges the product.
In this working state:
The total charge and discharge power of this product must be lower than 1800W(100V-120V) or 7200W(220V-240W) , otherwise the overload protection may be triggered. Note: In 120V voltage Ups mode, only ports 1 and 2 work properly, and ports 3 and 4 are disabled.

As shown in Pic 2 below, when the AC mains at the socket end is disconnected, the bypass output inside the product stops working, the product switches to a bidirectional inverter circuit within 10ms, and the circuit outputs supply power to the electrical appliance to ensure that the electrical appliance is uninterrupted and works normally during the process.

Battery Pack Connection Instructions

The portable power station can be connected to up to two battery packs through parallel cables, with a maximum capacity of up to 15666Wh. Please connect the product when the portable power station and extra battery pack are turned off. After the connection is completed, there will be icons of S1 and S2 connection displays on the screen. After connecting them successfully, the system can start charging or discharging. When charging and discharging after connection, the power will be distributed according to the left power of the product.
To ensure balanced charging and discharging, the system will automatically distribute power based on the remaining capacity of each battery pack.
The charging power of the device with lower capacity is small when charging, and the output power of the device with higher capacity is high when discharging. If there is no external charging, energy exchange may occur between the portable power station and battery packs. When the left capacity of them is close, the charging process will stop, and the power will be show on the screen.
Precautions
- Please do not plug and unplug the connecting cable when the products is under use, please connect or disconnect these two products when they are turned off.
- Please do not make the connecting ports of the portable power station short-circuited.
Connection of Solar Panels
Under the condition of light, this product can be connected to the solar panel and getting charged. The charging power is determined according to the conditions of light and weather.
This product supports solar panel charging with the following specifications:
High-Voltage PV Input (MC4 Interface):
Maximum Power: 2500W
Voltage Range: 120V- 450V
Connection: MC4 interface
Low-Voltage PV Input (XT90 Interface):
Maximum Power: 1200W
Voltage Range: 12V-50V
Connection: XT90 interface
Important Notes: Ensure that the input voltage from the solar panels does not exceed the specified ranges.
Any damage caused by exceeding the voltage limits (above 450V forhigh-voltage input or above 50V for low-voltage input) will not be covered under warranty. When connecting solar panels, follow the instructions provided in this manual to ensure proper setup and avoid potential damage to the product.
● Solar panel charging
Scheme One
Low voltage PV input (XT90)

Scheme Two
High voltage PV input(MC4)

※ How to remove the HV PV panel: Clamp the main connector with the wrench’s small clip and pull the PV panel’s MC4 ports out.
Car/Vehicle Charging
When the car is in the process of starting, connect the car charging port on the car and the product through the car charging cable to charge the product. The connection method is shown in the picture below:
This product supports 12V/24V car charger charging, please pay attention to the following two points when using this method to charge:
※ Please do it when the car started, otherwise the car battery may be exhausted.
※ Vehicle charging power is usually in the range of 120W(12V) to 240W(24V), and the charging time is long.
If fast charging is required, the AC mains charging is recommended.

Product Specifications

Battery Specifications

Connecting to App


FCC Statement
This equipment has been tested and found to comply with the limits for a Class B digital device, pursuant to part 15 of the FCC Rules. These limits are designed to provide reasonable protection against harmful interference in a residential installation. This equipment generates, uses and can radiate radio frequency energy and, if not installed and used in accordance with the instructions, may cause harmful interference to radio communications. However, there is no guarantee that interference will not occur in a particular installation. If this equipment does cause harmful interference to radio or television reception, which can be determined by turning the equipment off and on, the user is encouraged to try to correct the interference by one or more of the following measures:
- Reorient or relocate the receiving antenna.
- Increase the separation between the equipment and receiver.
- Connect the equipment into an outlet on a circuit different from that to which the receiver is connected.
- Consult the dealer or an experienced radio/TV technician for help.
Caution: Any changes or modifications to this device not explicitly approved by manufacturer could void your authority to operate this equipment.
This device complies with part 15 of the FCC Rules. Operation is subject to the following two conditions:
(1) This device may not cause harmful interference, and (2) this device must accept any interference received, including interference that may cause undesired operation.
RF Exposure Information
This equipment complies with FCC radiation exposure limits set forth for an uncontrolled environment. This equipment should be installed and operated with minimum distance 20cm between the radiator and your body.
Warranty Card

This product provides a 24-month warranty service from the date of purchase
- If there is a quality problem within the range of normal use, we provide warranty service.
- After purchasing our company’s products, please keep this product together with invoices and other items. When maintenance services are needed, please provide information according to our company’s request.
- In the case where the warranty is damaged or altered,and no stamp of the sales store on the warranty, the warranty service may not be provided.
- Damage caused by use beyond the normal range of use is not covered by the warranty service.
- The content of the warranty scope shall be subject to the content recognized by the company.
- Even within the scope of the warranty, sometimes it will be exchanged for products with the same function. The shipping and repair fees for products outside the warranty range shall be paid by the customer.
- Sometimes the specifications and functions of the product will be updated without prior notice.
Disclaimer
Before use, please read the user manual of this product to ensure full understanding and correct use. After reading, keep the user manual properly for future reference. If you do not operate this product correctly, you could cause serious injury to yourself or others, or result in damage to the product and property. Once you use this product, you are deemed to have understood, recognized and accepted all terms and content of this document. Users undertake to be responsible for their own actions and all consequences arising therefrom. We are not responsible for all losses caused by the user’s failure to use the product in accordance with the User Manual.
In compliance with the law, the company has the final right to interpret this document and all related documents of the product. If it is updated, revised or terminated without prior notice, please visit our official website for the latest product information.
Manufacturer: Shenzhen Qichang Intelligent Technology Co., Ltd.
Address: Room 510, 5th Floor, BId 7, Yunli Smart Park, Bantian Street, Longgang District,
Shenzhen, Guangdong, China
Technical service email: support@fossibot.com
Company official website: https://us.fossibot.com

Documents / Resources
 |
FOSSiBOT F7200 Portable Power Station [pdf] User Manual F7200, F7200 Portable Power Station, Portable Power Station, Power Station, Station |